
Installation Guide


– 3 –
IMPORTANT - the deck must be level both front to back and side to side. If it is not level, the tub will not be level
and it will not drain properly. The opening into which the tub will be dropped should be cut 1" smaller than the tub all
around. For example, for a 60" x 42" rectangular tub, an opening 58" x 40" will extend 1" under the lip of the tub all the
way around and will provide clearance for the whirlpool system. In the case of oval and round tubs, Hydro Systems ships
a full size paper template with the tub.
THREE WALL: For tubs installed in a three wall enclosure, the tub will need a rough opening the same size as its
overall dimensions. For example, a 60" x 42" tub will need a space 60" x 42" for installation. Do not include nish
wall coverings (wall board, tile, etc) in your rough framing calculations. Studs and walls should be straight and plumb,
and corners must be square. Stringers must be provided to support the deck where it meets the wall.
IMPORTANT - The stringers must be level both front to back and side to side. If they are not level, the tub will
not be level and it will not drain properly.
A
1"
1"
X
Figure 1a
1"
Figure 1b
Mortar
A
1"
X
Figure 2a
B
X
Figure 2b
On tubs with integral tile anges, (Figure 2a) measure the distance from the underside of the tub deck to the bottom
of the
tub base at the drain end of the tub (A) plus 1" for the mortar bed. On tubs with integral tile anges and a skirt panel,
(Figure 2b) measure the distance from the top of the stringer to the oor (X) must equal the distance from the bottom
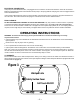
The two most common types of installations are DROP-IN and THREE WALL installations. DROP-IN (Figure 1)
For drop-in, or deck-mounted tubs, the nished height of the deck (X) where the tub will sit must equal the
dimension from the trimmed edge of the tub to the oor at the drain end of the tub (A) plus 1”. The 1” is for
the mortar bed.
NOTE: Tub lip resting on ledge, stringer or frame
is non-weight bearing.
Tub MUST be supported by mortor only.