
Installation Guide


– 5 –
3. TEST THE WHIRLPOOL SYSTEM BEFORE YOU INSTALL THE TUB. All Hydro Systems whirlpool tubs are fully
tested at the factory before shipping. However, it is the responsibility of the installer to check the system before
installing the tub; if the tub is to be set in “rough framing” and can be accessed from all sides after setting, skip to
paragraph 4 below. If the tub will be set in “nished framing” and can’t be accessed from all sides, we recommend
testing the tub outdoors before setting it. Here’s how:
•
Put the tub on a at surface such as a driveway or lawn.
•
Tape over the drain.
•
Fill the tub with a garden hose. Fill it to at least 1” above the highest jet.
•
Plug the control box into a 110v GFCI protected outlet.
•
Start the pump by pressing the Hydro Systems Logo on the touch pad.
•
Check the jets and check the entire system for leaks. Some components will be inaccessible after the tub is installed,
so check each component and each connection all around the tub.
•
If the tub has optional equipment such as mood lights or LED lighting, now is the time to check those components, too.
If the tub has an in-line heater, plug it into a separate 110v GFCI protected source while the pump is running.
(The heater will operate only when the pump is running). The heater’s indicator light will be on when the heater
is operating.
DO NOT INSTALL THE TUB if the system is leaking. Contact your dealer or call Hydro Systems at 661-775-0686.
If the whirlpool system is performing properly and there are no leaks in the system, you are now ready to set the tub.
NOTE: Bathtub serial number will be needed.
4. SETTING THE TUB
•
Install the waste & overow on the tub.
•
If your tub has the standard single speed pump or varible speed or blower, remove the hold-down bolts securing the
components to the platform.
•
The tub must be supported evenly around the perimeter of the deck and also under the entire bottom.
•
To set the tub, mix a stiff batch of slow-setting mortar (without gravel) and pile more than enough on the oor.
It may be necessary to construct a dam to contain the mortar. Do not use drywall compound or plaster of Paris.
•
Lower the tub into position. Slip the drain into the waste line as it goes down. Allow the tub to settle into the wet mortar,
squishing the excess out at the sides and ends of the tub.
•
When the deck hits the supports all around, the tub is level and at the correct height.
•
If the mortar is very deep, the tub may try to “Float” in the mortar bed. Put four to six inches of water in the tub to hold
it down. Allow the mortar to cure overnight before draining the tub.
•
Fasten the tile anges to the wall studs with galvanized nails or screws - pre-drill the holes for them rst. Note – the
tile anges are not structural and must not bear any weight. The tub must be supported under the deck.
•
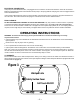
If the tub was ordered with the pump in a remote location, the pump was shipped in a box strapped inside the tub crate.
All PVC pipe and ttings required to connect the pump to the whirlpool system are strapped to the tub. Remove them
now. Construct a support stand for the pump so that the pump intake is higher than the suction tting, and lower than
all jets on the tub. The slope of the pipe from the suction tting up to the pump should be a minimum of 1/8” per foot.
The discharge line from the top of the pump to the tub must slope evenly up to the systm. It must not go below the
pump intake or above the jet closest to the pump. The pump must not hang on the pipes. It must sit on the sound
dampening pad, and it must not be bolted down (unless it is a variable speed pump). Connect both pipes to the
whirlpool system and thread the unions onto the pump. Be sure the “O” rings are in the unions. Hand tighten only,
and do not use any type of joint sealant. The use of any sealant voids the warranty.