
Installation Guide

LED VAPOR LIGHT
INSTALLATION INSTRUCTIONS
WARNINGS AND CAUTIONS
Make sure that the supply voltage corresponds to the
rated product voltage.
If the product is damaged, do not use it.
All wiring connections should be capped with UL
approved wire connectors.
For ceiling or suspended mount there are two stainless
steel surface brackets included.
This fixture is intended to be connected to a properly
installed and grounded UL listed junction box with
suitable strain relief means for power cord. The junction
box is not included, should be purchased separately.
www.hyperikon.com
info@hyperikon.com
707 Broadway Suite 800
San Diego, CA 92101
(888) 846-4973
Remove the fixture and the mounting package from the box and make sure that no parts are missing by referencing the
illustrations on the installation instructions.
GENERAL: All electrical connections must be in accordance with local and National Electrical Code (N.E.C.) standards.
Installation must be performed by a qualified installer.
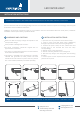
1. Open the cover of junction box on the back of lamp.
2. Insert a power cord (SVT 300V 150°C 18AWGx3c)
through a special hole at the end of the lighting fixture.
3. Connect the power cord (Live wire, Neutral wire and
Ground wire) to the terminal box from the lamp
correspondingly.
4. Affix the cover of the junction box.
5. Affix the mounting brackets to the ceiling/wall.
6. Affix the lamp body to the ceiling/wall with mounting
brackets.
7. Connect power cord of VaporProof lamp to the nearest
junction box of power.
INSTALLATION INSTRUCTIONS
PLEASE READ CAREFULLY AND SAVE THESE INSTRUCTIONS, AS YOU MAY NEED THEM AT A LATER DATE.
NOTE: DAISY CHAIN LINKING ALLOWED FOR A MAXIMUM OF 12 40W VAPOR LIGHTS AND 7 70W VAPOR LIGHTS.
820±5mm
1
2
3
4
5
6
7
VAPOR