
User's Manual
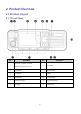
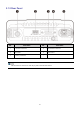
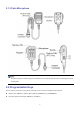
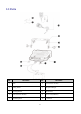
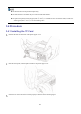

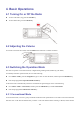

Table Of Contents
- Documentation Conventions
- 1. Packing List
- 2. Product Overview
- 3. Installation
- 4. Basic Operations
- 5. Status Indications
- 6. Call Services
- 6.1 Group Call
- 6.2 Private Call
- 6.3 All Call
- 6.4 Broadcast Call (Trunking Only)
- 6.5 Include Call (Trunking Only)
- 6.6 Phone Call
- 6.7 Call on Analog Channel (Conventional Only)
- 7. Message Services
- 8. General Features
- 8.1 Settings
- 8.1.1 Basic Settings
- 8.1.2 Call Settings
- 8.1.2.1 Power Level
- 8.1.2.2 VOX
- 8.1.2.3 Talker Alias
- 8.1.2.4 Talk Around (Conventional Only)
- 8.1.2.5 Squelch Level (Conventional Only)
- 8.1.2.6 Compandor (Conventional Only)
- 8.1.2.7 ESN Check in Idle (Trunking Only)
- 8.1.2.8 Call Priority (Trunking Only)
- 8.1.2.9 Any Call (Trunking Only)
- 8.1.2.10 Call Divert (Trunking Only)
- 8.1.3 Security
- 8.1.4 Product Information
- 8.2 Contacts
- 8.3 Profiles
- 8.4 Scan
- 8.5 Positioning
- 8.6 BT
- 8.7 One Touch Call/Menu
- 8.8 Quick Dial
- 8.9 Roam
- 8.10 Clarity Transmission
- 8.11 DGNA
- 8.12 Ignition Sense
- 8.13 Public Address
- 8.14 Priority Interrupt
- 8.15 Emergency
- 8.16 Horn & Lights
- 8.17 Emergency Erase Data
- 8.18 Stun, Revive, and Kill
- 8.1 Settings
- 1. Go to Basic Settings > MIC & SPK.
- 2. Select MIC Selection.
- 3. Select the audio option.
- 1. Go to Basic Settings > MIC & SPK.
- 2. Select SPK Selection.
- 3. Select the audio option.
- 9. Troubleshooting
- 10. Care and Cleaning
- 11. Optional Accessories
- 12. Abbreviations
-15.6V negat
Before installation, check the ground polarity and voltage of the vehicle power. The radio must work with a 10.8
8
3. Installation
3.1 Instructions
Before installing the radio in a vehicle, read the following instructions carefully:
ive ground electrical system.
Before installation, check how long the screws will extend from the bottom surface of the radio. Drill the mounting
hole cautiously to avoid damage to the vehicle wiring and other parts.
Before you install the radio in the mounting bracket, connect the antenna and power cord to the radio. Use the
dedicated antenna and power cord provided by the Company for digital radios.
Install the radio with the mounting bracket supplied by the Company, to avoid accidental radio looseness. The loose
radio may cause bodily injury.
Install the radio in a location where you can reach the front panel conveniently.
Keep sufficient clearance at the back of the radio for wiring.
Use the fuse with the same specification for DC power cord upon replacement.
If any other devices are in the vicinity of the radio, keep the antenna of these devices at least 10 m away from that
of the radio.
3.2 Tools
Electric drill
Phillips screwdriver
T20 torx screwdriver