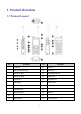
. Product Overview 1.1 Product Layout No. Part Name No.
1.2 Programmable Keys For enhanced convenience, you can request your dealer to program the following keys as shortcuts to radio features: SK1, Sk2, P1/Answer key, P2/End Key, Up key, and Down key. For details, consult your dealer.
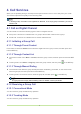
2. Basic Operations 2.1 Charging the Battery Use the approved charger to charge the battery. Read the Safety Information Booklet before charging. The remaining lithium-ion battery power is limited to 30% pursuant to the new lithium battery shipment regulation approved by International Air Transport Association (IATA). Before initial use, charge the battery. You can charge either the standalone battery or the radio with battery attached.
2.4 Selecting the Contact or Channel To select the contact or channel, press and then rotate the Smart knob. If you do not rotate the Smart knob after pressing it within 5s or if you press it again within 5s, you can rotate it to adjust the volume. 2.5 Locking or Unlocking the Keypad When the keypad is not in use, it is recommended that you lock it to avoid unintended operations.
» Press the preprogrammed Operation Mode Switch key. » If the Zone/Subgroup Switch Mode feature is enabled, you can switch the operation mode by switching the contact through the menu or the Smart knob. Auto Switch The Mode Automatic Switch feature allows the radio to automatically switch the operation mode, so as to guarantee the normal communication of the radios in no-signal coverage areas or when the system fails.
Press and then rotate the Smart knob. On the home screen, press the Back/Subgroup key or go to Menu > Subgroup, select the subgroup, and then select the group or private contact. Press the preprogrammed Group/Private Up or Group/Private Down key. 2.7.2.2 Selecting a Subgroup A subgroup consists of multiple groups or private contacts.
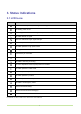
3. Status Indications 3.1 LCD Icons Icon Radio Status The fuller the battery bar is, the stronger the battery power remains. The battery power is low. The battery power runs out. Recharge or replace the battery. The radio detects no signal. More bars indicate stronger signal strength. The radio operates in low power mode. The radio operates in high power mode. The keypad is locked. An accessory is connected. The Mode Automatic Switch feature is enabled. The radio is scanning or hunting.
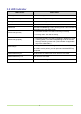
3.2 LED Indicator LED Indicator Radio Status Flashes green The radio is being turned on. Flashes green slowly The radio is standby in trunking mode. Glows green The radio is receiving. Glows red The radio is transmitting. Flashes red The radio is establishing a call in trunking mode. This indication is applicable only to the calling radio. Flashes orange slowly Flashes orange rapidly Glows orange Conventional mode: The radio is scanning or roaming. Trunking mode: The radio is hunting.
4. Call Services When you are speaking during a call, keep the microphone about 2.5 cm to 5 cm away from your mouth. This ensures optimal voice quality on the receiving radio. In trunking mode, if the radio is not registered or attached, or an empty group is selected, you cannot initiate a call. 4.1 Call on Digital Channel You can initiate or receive the following types of calls on a digital channel: Group call: a call from an individual user in a group to all the other members in the group.
4.1.3 Ending a Group Call 4.1.3.1 Conventional Mode In conventional mode, a group call ends when the call hang time expires. 4.1.3.2 Trunking Mode In trunking mode, a group call ends in any of the following cases: The call hang time expires. The calling party hangs up. The call duration exceeds the preset time. The BS signal is lost. A pre-emptive call or an emergency call occupies the channel. The calling party changes the contact with the Clear Down feature enabled. 4.1.
When receiving a FOACSU private call, the radio rings and vibrates. To answer the call, press the PTT key within the preset time. Off Air Call Set-Up (OACSU):The call is established automatically 4.1.6 Ending a Private Call 4.1.6.1 Conventional Mode In conventional mode, a private call ends when the call hang time expires. 4.1.6.2 Trunking Mode In trunking mode, a private call ends in any of the following cases: The call hang time expires. The calling or called party hangs up.
4.3 Emergency Call The Emergency feature allows you to seek help from your companion or the control center in case of emergency. You can initiate an emergency call with the highest priority even when your radio is transmitting or receiving. This feature is configured and enabled by your dealer.
5. Message Services The radio can send and receive short messages, which are classified into the following types: Quick text message: a frequently used text message that can be created, edited, or deleted through the menu. Status message: a predefined code that transfers the message content. 5.1 Sending New Message 1. Go to Menu > Message > Msg New > New Msg. 2. In the recipient text box, enter the contact ID, and then press to switch the ID type.
FCC/ISEDC Statement This device complies with part 15 of the FCC Rules. Operation is subject to the following two conditions: (1) This device may not cause harmful interference, and (2) this device must accept any interference received, including interference that may cause undesired operation. Any changes or modifications not expressly approved by the party responsible for compliance could void the user's authority to operate the equipment.
RF Exposure Compliance and Control Guidelines and Operating Instructions To control your exposure and ensure compliance with the occupational/controlled environmental exposure limits, Use of non-approved antennas, batteries, and accessories causes the radio to exceed the FCC RF exposure guidelines. Contact your local dealer for the optional accessories of the product. always adhere to the following procedures. Guidelines: Do not remove the RF Exposure Label from the device.