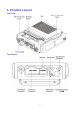
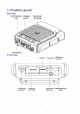
. Product Layout Full View Front Panel 2
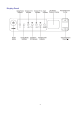
Display Panel 3
2. Basic Operations 2.1 Turning the Product On or Off 1. Connect the product to the power supply through the power adapter, or attach the battery. 2. To turn the product on or off, long press the Power Button. If the power adapter is disconnected from the power supply and no battery is attached, the product will automatically turn off. Then, when the power adapter is reconnected to the power supply, the product will automatically turn on again. 2.
3. Release the PTT key. If no TX contacts are preprogrammed, when you make a call, the digital mode indicator will flash once rapidly. For more details about the product status, see 3 LED Indicators and 4 LED Seven-Segment Display.
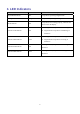
3. LED Indicators Indicator Status Description Digital Mode Indicator Blue The product is operating in digital mode. Analog Mode Indicator Orange The product is operating in analog mode. Alarm Indicator Red Timeslot A TX Indicator The product is not working properly, and shows the alarm code on the display. Red Analog mode: The product is transmitting. Digital mode: The product is transmitting on timeslot A. Timeslot A RX Indicator Green Analog mode: The product is receiving.
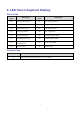
4.
FCC Statement This equipment has been tested and found to comply with the limits for a Class B digital device, pursuant to part 15 of FCC Rules. These limits are designed to provide reasonable protection against harmful interference in a residential installation. This equipment generates and can radiate radio frequency energy. If not installed and used in accordance with the instructions, it may cause harmful interference to radio communications.
FCC Radiation Exposure Statement: This equipment complies with FCC radiation exposure limits set forth for an occupational/controlled environment. This transmitter must not be co‐located or operating in conjunction with any other antenna or transmitter. This equipment should be installed and operated with minimum distance 86cm between the radiator &you body.