Preface Thank you for purchasing HYT TC-320 Business Radio. TC-320 is unique for its compact and delicate body. It is ergonomically designed to give you exceptional experience of portability. This easy-to-use radio will deliver you secure, instant and reliable communications at peak efficiency. Please read this manual carefully before use. The information presented herein will help you to derive maximum performance from your radio.
Contents Safety Information ............................................................................................................. 2 Product Inspection ............................................................................................................ 3 Radio Overview ................................................................................................................. 4 Battery Information ...........................................................................................
Safety Information The following safety precautions shall always be observed during operation, service and repair of this equipment. ◇ This equipment shall be serviced by qualified technicians only. ◇ Do not modify the radio for any reason. ◇ Use only HYT supplied or approved batteries and chargers. ◇ To avoid electromagnetic interference and/or compatibility conflicts, turn off your radio in any area where posted notices instruct you to do so. Turn off your radio before boarding an aircraft.
FCC and Industry Canada Notice to Users This device complies with Part 15 of FCC rules and RSS‐210 of the Industry Canada rules per the conditions list below: 1. This device may not cause harmful interference. 2. This device must accept any interference received,including interference that may cause undesired operation. 3. Changes or modifications made to this unit not expressly approved by party responsible for compliance could void the user’s authority to operate the equipment.
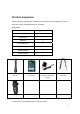
Product Inspection Please unpack the package box carefully and check that all items shipped are received; report any missing or damaged items to your dealer. Accessories Item Qty.
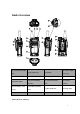
Radio Overview (1) PTT (Push-to-Talk) Key (5) Microphone (9) Power Switch (4) Volume Adjust (2) SK (Side Key) (3) Speaker (6) Nameplate (7) Charging Terminal (8) Antenna (10) Channel/Status (11) Channel Selector (12) Charge Indicator Knob Indicator (15) Mini USB Jack (16) Strap Hole (19) Rear Cover (20) Battery Latch (13) Accessory Jack (14) Audio Accessory Cover Jack (17) Screw (Belt Clip) (18) Belt Clip Keys [+]/[-] ﹡PTT (Push-to-Talk) Key 4
Press and hold down the PTT key to transmit, and release it to receive. ﹡SK (Side Key) Side Key is a programmable key that can be assigned with long/short press functions by your dealer. Note: Short Press: Key press shorter than 1 second. Long Press: Key press longer than 1 second. ﹡Status Indicator Status indications and alert tones are shown in the table below: When the radio is turned on, the power on alert tone sounds and Power on (to enter user Status Indicator flashes orange once.
A low-pitched tone is heard when transmit power is switched Power adjust from high power to low power. A high-pitched tone is heard when transmit power is switched from low power to high power. VOX One beep sounds when the VOX feature is activated. Two beeps sound when the VOX feature is disabled. * Battery Latch Used to secure or remove the battery. * Audio Accessory Jack Used to connect audio accessories such as earpieces.
Battery Tips 1. When charging your battery, keep it at a temperature among 5℃ - 40℃. Temperature out of the limit may cause battery leakage or damage. 2. When charging a battery attached to a radio, turn the radio off to ensure a full charge. 3. Do not cut off the power supply or remove the battery when charging a battery. 4. Never charge a battery that is wet. Please dry it with soft cloth prior to charge. 5. The battery will eventually wear out.
Please follow these steps to charge your radio using the switching power or charger: 1. Plug the AC connector of the switching power into the AC outlet socket. 2. Plug the Mini USB connector of the switching power into the Mini USB jack of the radio or charger. 3. Place the radio with the battery attached in the charger when the charger indicator glows green to indicate the power supplies normally. (Please skip this step if you don’t use a charger) 4.
1. Plug the AC connector of the switching power into the AC outlet socket. 2. Plug the Mini USB connector of the switching power into the Mini USB jack of the charger. Indicator of the charger glows green. 3. Place the battery in the charger. 4. Make sure the battery is connected to the charger. The charging process initiates when the charger indicator glows orange. 5. The charger indicator glows green when the battery is fully charged. Please remove the battery then.
Assembly and Disassembly Attaching/Removing the Battery Attaching the Battery 1. Hold the top part of the radio’s body, and slide the battery latch in the direction of arrow ① Then lift the rear cover and remove it from the radio’s body, as shown in Figure 1. Figure 1 2. Align the discharging terminal of the battery with the radio’s charging piece, and insert the tab at the top of the battery into the slot at the top of the radio’s body.
Figure 3 Removing the Battery 1. Turn off the radio, if it is turned on. Then follow step 1 in the section “Attaching the Battery” to remove the rear cover. 2. Hold the top part of the radio's body, and lift the battery in the direction of arrow ① by the notch at its bottom, and then remove the battery from the radio’s body in the direction of arrow ②, as shown in Figure 4. Figure 4 Attaching/Removing the Antenna Attaching the Antenna 1.
Figure 5 Removing the Antenna Turn the antenna counter-clockwise until you can remove it. Attaching/Removing the Belt Clip Attaching the Belt Clip Align the two screw holes on the metal bracket of the belt clip with holes on the elliptical protrusion on the back side of the radio. Then secure the belt clip on the back side of the radio, as shown in Figure 6. Align the belt clip screws with screw holes on the metal bracket of the belt clip, and then secure the screws.
Loosen the screw to remove the belt clip. Please refer to the operations for attaching the belt clip. Attaching/Removing the Battery When the Belt Clip is Attached When the belt clip is attached to the radio, please first press the belt clip to make its bottom up, and then attach/remove the rear cover and battery by the steps mentioned above, as shown in Figure 7. Figure 7 Attaching/Removing the Earpiece/Mini USB Attaching the Earpiece/Mini USB 1.
Basic Operations Turning the Radio On/Off Long press the Power Switch until an alert tone is heard to turn the radio on. To turn the radio off, do the same as you turn it on. Adjusting the Volume You may adjust the volume level through Volume Adjust Keys [+]/[-]. Press the [+] key to increase the volume, or press the [-] key to decrease the volume. Selecting a Channel Turn the Channel Selector knob to select a channel. Make sure the desired channel number points at the Channel Indicator.
z Scan z Scrambler z VOX (Voice-Operated Transmit) z Compandor z Squelch Off z Squelch Off Momentary z Battery Strength Indicator z Channel Lock (If you rotate the Channel Selector knob with Channel Lock function enabled, the current channel number will remain unchanged. This function will not be disabled after programming. ) Advanced Operations The following functions are programmable by your dealer.
mode ten seconds later. Pressing any key or receiving a signal will cause the radio to exit from Battery Save and restore it to normal operation. Power Adjust Users can switch the Tx power level between high and low power by pressing the programmed Power Adjust key. Time-out Timer (TOT) The TOT timer limits the amount of time the radio can continuously transmit on a channel. This can also protect your radio from damage due to excessive transmission.
pressed at the moment, the radio will give an alert indicating that transmission is prohibited. Monitor z Squelch Off Purpose: In this mode, the speaker is unmuted in any condition so as to receive any sound on the current channel. When audio signal is received on the channel, audio will be heard. Otherwise, background noise will be heard. Operation: Press the Monitor key to enter this mode, and press it again to exit. z Squelch Off Momentary Purpose: Refer to Squelch Off.
when activity is detected and signaling condition is satisfied on a channel. Press the key again to exit scanning. When scanning is active, the radio will continuously scan for activity on scan list members. Once activity is detected on a channel, scanning will pause on the active channel for you to receive activity. The channels available for scanning are programmed by your dealer.
(2) Auto If Auto Scan is enabled for a channel, the radio will automatically enter scan mode when it is switched to this channel. When it is switched to other channels or powers off, the radio will exit from scan mode. z Talk Back This option defines whether users can talk back on the channel where scanning pauses. When the option is checked, users can do so. If the scanning does not pause on any channel, users may talk back on the predefined channel.
function is enabled, the radio will automatically begin transmitting when you speak, and terminate transmitting when you stop talking, with no need of PTT press. Operation Steps: 1. Push the PTT/VOX switch on the earpiece to VOX. 2. Plug the earpiece into the accessory jack of the radio. 3. Press the programmed VOX key to activate the VOX feature. 4. When no signal is received, speak through the microphone of the earpiece and your voice will be transmitted. Operation Instructions: 1.
Note: To purchase accessories, please contact your local dealer. Troubleshooting Symptom Solution z Cannot power on the radio. The battery has run out. Please recharge the battery or replace it with a new one. z The battery is not properly installed. Please remove the battery and attach it again. The operating time is noticeably shorter than normal performance, even though the battery is properly charged. z The battery has worn out, and it is time to buy a new battery.
Care and Cleaning z Do not hold the radio by its antenna or external earpiece directly. z Do not place the radio in a dusty or dirty environment. z Clean the radio with a lint-free cloth to remove dirt or grease, to avoid poor contact due to excessive dust. z Clean the radio using a lint-free cloth moistened with clean water and a mild dishwashing liquid. z Avoid subjecting the radio to corrosives, solvents or spirits.