WARNING DO NOT ATTEMPT TO OPERATE THIS MACHINE UNTIL YOU HAVE READ AND UNDERSTOOD ALL SAFETY PRECAUTIONS AND OPERATING INSTRUCTIONS. EQUIPMENT AND CHEMICALS WHEN USED CAN BE DANGEROUS.
H.E.R.O. WARRANTY H.E.R.O. INDUSTRIES , guarantees this airless pump to be free of defects in materials and workmanship to the original owner, for a period of one full year from the date of purchase. The warranty entitles the owner to parts replacement at no charge. The parts replacement warranty is valid for any necessary replacement, whither caused by material or workmanship defect or simple wear. H.E.R.O.
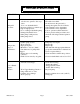
UNIT LAYOUT Hydraulic Motor Pump Wet Cup Pressure Gauge Filter Manifold Prime/Drain Hose Prime/Drain Valve Suction Hose Pump Outlet Spray Hose Hook Up Drive Belt Hydraulic Pump & Pressure Control Hydraulic Pump Shut Off Valve Hydraulic Fluid Fill & Vent Hydraulic Fluid Level Gauge Paint Piston Pump Suction Tube & Suction Filter HRO-ST3131 Page 3 Mar 8, 2004
SAFETY WARNING! • Use of this high-pressure equipment could result in serious injury and is for professional use only! • You must operate this equipment only after the instruction manual is clearly understood. • Workman and assistant must always wear protective eyewear, gloves, clothing, and respirators as recommended by the material manufacturer. GAS / HYDRAULIC POWERED AIRLESS SPRAY PUMPS.
EQUIPMENT PRESSURE The HRO ST-3131 pump can develop 3500 P.S.I. (225 Bar) maximum working pressure at Never exceed this maximum pressure to the pump. Exceeding the maximum working pressure can result in serious equipment damage or rupture. FIRE OR EXPLOSION WARNING The flow of fluid through the inside of pump and hose can give occasion to static electricity by the high velocity, so be sure to ground every part of the spray equipment properly.
GROUNDING SAFETY • Check your local electrical code for detailed grounding instructions for your area and type of equipment and be sure to ground all of this spray equipment as the following. • 1 2 3 5 6 Pump : Use a ground wire and ground to a good source such as the building ground source, or drive a steel spike into the ground and attach the ground wire to it. Fluid hoses : Use only grounded hoses to a maximum of 500 FT (150M) Spray Gun : Connect to a properly grounded fluid hose and pump.
WARNING OPERATION If there are leaks, shut off the pump immediately and release system pressure. Follow the “Pressure Relief Procedure” then tighten connections, start the pump again and check to be sure leaking has stopped. Always use the lowest pressure necessary to get the desired results, Higher pressures waste fluid and cause premature wear of the pump packings and spray tips.
WARNING If there are leaks, shut off the pump immediately and release system pressure follow the “Pressure Relief Procedure” then tighten connections, start the pump again and check to be sure leaking has stopped. Always use the lowest air pressure necessary to get the desired results, Higher pressures waste fluid and cause premature wear of the pump packings and spray tips.
TROUBLE SHOOTING TROUBLE Pump will not stroke. Pump stokes, but poor performance. Low or Erratic Output / Pressure HRO-ST3131 POSSIBLE CAUSE REMEDY 1. Ball valve on the hydraulic shut off valve not opened to the on position. 2. Low or no hydraulic fluid 3. Pressure regulator not turned up to high enough pressure. 4. Poor or damaged hydraulic pump 5. Damaged hydraulic motor 6. Paint pump at full pressure. 7. Paint pump seized. 1. Turn ball valve to the on position. 2. Fill with correct fluid. 3.
WARNING If there are leaks, shut off the pump immediately and release system pressure follow the “Pressure Clearance Procedure” then tighten connections, start the pump again and check to be sure leaking has stopped. Always use the lowest air pressure necessary to get the desired results, higher pressure waste fluid and cause premature wear of the pump packing and spray tip.
FLUSHING PROCEDURE Follow the pressures relief procedure on page 3. 1. 2. Remove and clean gun filter. Unscrew filter housing retainer (ref# 1) (should be hand tight) and remove and clean filter (ref# 5) thoroughly. 3. Re-install the filter housing and retainer. Flush sprayer without filter screen installed. 4. Close prime valve. 5. Pour a gallon of the correct thinner into a clean 5 gallon pail. 6. Insert the intake tube into the pail. 7. Turn regulator control knob all the way counter-clockwise. 8.
Manufactured by: H.E.R.O. INDUSTRIES 2719 LAKE CITY WAY BURNABY, B.C.