i-data Electronic Documentation The i-data Printing Solutions ida ReRouter ida ReRouter Installation & Operator’s Guide Doc. no 60276 Revision 00 WARNING: This equipment generates, uses, and can radiate radio frequency energy and if not installed and used in accordance with the instruction manual, may cause interference to radio communications.
Document No.: D60276-00 © Copyright i-data international a-s 1997 MAIN OFFICE: i-data international a-s Vadstrupvej 35-43 DK-2880 Bagsvaerd Denmark Telephone: +45 44 36 60 00 Telefax: +45 44 36 61 11 E-mail: i-data i-data.com WWW: http://www.i-data.com i-data Denmark Vadstrupvej 35 DK-2880 Bagsvaerd Denmark Telephone: +45 44 44 77 50 Telefax: +45 44 44 85 50 i-data Sweden Datavägen 21 S-43600 Askim Sweden Telephone: + 00 46 31 680710 Telefax: + 00 46 31 682670 i-data UK Ltd.
Preface idaReRouter Preface January 1997 This manual covers the installation and configuration of the ida ReRouter. The ida ReRouter is a transaction program designed to take Host IPDS print using the LU 6.2 protocol and convert it to print using a bi-directional TCP/IP protocol. The program operates under OS/2 2.0 or higher. For a broader description of the ida ReRouter, see chapter 1: "Introduction". The user must have basic knowledge of Communications Manager, SNA, OS/2 and TCP/IP related environments.
Preface idaReRouter Related Manuals For operation of the ida ReRouter on a remote device, you are also to consult the documentation for that particular remote device. Token Ring Ethernet ida 913-03 Token Ring LAN Brick Installation Guide Doc. no. D11068/D61068 ida 913-04 Ethernet LAN Brick Installation Guide Doc. no. D11069/D61069 i-data 7913-03 IPDS Token Ring LAN Attachment Installation Guide Doc. no. D11072/D61062 i-data 7913-04 IPDS Ethernet LAN Attachment Installation Guide Doc. no.
Table of Contents ida ReRouter Table of Contents 1. Introduction ................................ ................................ .................... 7 1.1 What is the ida ReRouter?................................ ............................... 7 1.2 Product Features ................................ ................................ ............. 9 2. Items Supplied with ida ReRouter................................ .................. 10 3. Product Requirements ................................ ...........
Table of Contents ida ReRouter 8. Testing Connection to Remote Device ................................ .......... 59 8.1 PING Function ................................ ................................ ................. 59 8.2 Log Files ................................ ................................ .......................... 61 9. Problem Determination ................................ ................................ .. 62 9.1 Error Syntax ................................ ................................
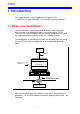
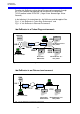
Introduction ida ReRouter 1. Introduction This chapter provides a brief introductory description of the ida ReRouter. Chapter 4 describes the installation and setup in details. 1.1 What is the ida ReRouter? The ida ReRouter is a transaction program which is able to take Host print using the LU 6.2 protocol and pass it to a bi-directional TCP/IP (Transmission Control Protocol / Internet Protocol) protocol on any one of the supported products stated in section 2.2. “Product Features”.
Introduction ida ReRouter From the ida ReRouter, printer data will be passed transparently through the TCP/IP protocol and repacked into the format of a bi-directional TCP/IP protocol called “PPR/PPD” ( Page Printer RemotePage Printer Daemon). In the following is illustrated how the ida ReRouter could be applied. See Fig. 1.2: "ida ReRouter in Token Ring Environment" and Fig. 1.3: "ida ReRouter in Ethernet Environment".
Introduction ida ReRouter ida ReRouter The ida ReRouter consists of two main programs: - idaRoute (LU 6.2 to TCP/IP ReRouter for OS/2) The function of the idaRoute is to act as link between the Host (SNA environment) and the TCP/IP protocol. In this way the Host will assume that communication with an LU 6.2 device has been established.
Kit Contents ida ReRouter 2. Items Supplied with ida ReRouter The following items are supplied with the ida ReRouter: • 3.5" diskette containing among others a setup file and an informatiive file - readme.txt. ..... and other files used for setting up and configuring the ida ReRouter.
Product Requirements ida ReRouter 3. Product Requirements 3.1 Host System Requirements • Mainframe - PSF/VM 2.1 or higher - PSF/MVS 2.1 or higher - PSF/VSE 2.1 or higher • AS/400 - OS/400, version 2.2 or higher - PSF/400 for OS/400, version 3.1 or higher 3.2 Personal Computer Requirements Hardware: • LAN attached OS/2 workstation Software: • OS/2 2.0 or higher • Communications Manager ES, version 1.0 or higher or Communications Manager/2, version 1.0 or higher • TCP/IP 2.
Installation and Setup ida ReRouter 4. Installation and Setup of ida ReRouter This chapter describes the installation and configuration of the ida ReRouter. 4.1 Installation of ida ReRouter 1. Insert the ida ReRouter installation diskette into drive A. 2. Type: A: setup 3.
Installation and Setup ida ReRouter 4. Set the location of the program to the disk and directory of choice 5. Select the field " Install" if all files are to be installed (This will create folders, icons, programs, etc). (If the ida ReRouter is to be upgraded, select "Update" for only the program files to be installed.) 6. Select/De-select the installation options according to needs and requirements.
Installation and Setup ida ReRouter 4.2 Setup of ida ReRouter After having completed the installation, the OS/2 desktop will create a folder called “ ida ReRouter”. This folder contains two objects: - the configuration program - a ReadMe file 1. Click on the "idaReRouter" folder. ida ReRouter 2. Click on the idaRCtrl icon.
Installation and Setup ida ReRouter Route name This is the user defined Alias for a particular route. Status The status panel provides information on the status of each Route session to the remote printer. The status messages are: INACTIVE ACTIVATING ACTIVE DEACTIVATING INTERVENTION REQUIRED Together with the above status messages, there will be a complete LOG of all events in the LOG file associated with each Route. See section 8.
Installation and Setup ida ReRouter New The defining of new routes is described in details in section 4.2.1: "Defining a new route". To add more routes, see section 4.2.2: "Additional routes". Change Changing an existing route is described in section 4.2.3: "Changing a route". Delete Deleting a route is described in section 4.2.4: "Deleting a route". Verify Verifying the settings is only necessary to use when the idaRoute.ini file has been modified manually without using the idaRCtrl.
Installation and Setup ida ReRouter DeActivate Route NOTE: This entry field should be used only with great care. The request for deactivating a route derives from the OS/2 system. The remote printer device /queue will be stopped on the Host system and active jobs will be interrupted. Refresh This entry field will refresh the system and include the latest changes. Automatic refresh interval of 30 seconds. View Log This field is used for viewing an ASCII log file. 4. For help click the sub menu " Help".
Installation and Setup ida ReRouter 4.2.1 Defining a new route 1. To setup the ida ReRouter, click on "Setup" in the setup dialog screen (or select: "ALT_S"). See the screen on page 16. 2. Click on "New" to define a new route. The following screen will appear: Define a new route 3. Enter Route name (mandatory) Route name is the user defined Alias for a particular route. Range: Alphanumerical string (A-Z, a-z, 0-9), no white spaces. Max. 15 characters Default: None 4.
Installation and Setup ida ReRouter NOTE: LU Alias must match the LU Alias defined in Communications Manager If the LU Alias is not defined, the idaRoute will terminate and write to the log file. 6. Enter IP Address (in Decimal Dot notation) NOTE: Must match the device (e.g. ida 913-03 / ida 913 04) being communicated with Range: 0.0.0.0 - 255.255.255.255. Default: None 7. Select Port No.
Installation and Setup ida ReRouter When the all the setup entries have been made and verified, the ida ReRouter will create a configuration file (idaRoute.ini file). See the sample configuration file below. ; **************************************************************************************** ;* idaRoute.ini * ; * Configuration file for the i-data LU 6.2 to TCP/IP ReRouter for OS/2 2.
Installation and Setup ida ReRouter 4.2.2 Additional routes More routes may be added by clicking on "Setup" and then "New". Follow the setup procedures in the steps 3-10 above. NOTE: No two route names and LU Aliases may be identical. For each route defined, the idaRoute will be loaded implying that it will be running in multiple instances. The OS/2 system puts a limit on the defined routes. However, 32 routes are able to run simultaneously. 4.2.3 Changing a route 1.
Installation and Setup ida ReRouter 4.3 Keep Alive Function The KEEPALIVE feature is a monitor function to check the conneciton between the transaction program (i.e. the ida ReRouter program) and the printer. The monitoring of the conneciton is done at defined intervals. 4.3.1 Support for KeepAlive to OS/2 The TCP/IP components for OS/2 offer network attachment for printers.
Installation and Setup ida ReRouter 4.3.2 TCP/IP KeepAlive configuration on OS/2 • OS/2 2.0 with APAR IR28716 fix must be installed. • TCP/IP 2.0 with CSD UN64092 or later must be installed. • The TCP/IP "inetcfg" command can be used to configure the "KEEPALIVE" parameter. inetcfg KEEPALIVE=nnn where nnn is the number of minutes a TCP connection must remain inactive before TCP generates a KEEPALIVE transmission for an application that requests them. The default is 120 minutes.
Configuration ida ReRouter 5. Configuration of S/370 Networks This chapter will provide you with configuration instructions for the S/370390 networks with PSF. 5.1 Configuration Examples for MVS and VM 5.1.1 PSF/MVS printer definition and startup procedure / From the system PARMLIB PRT08,CLASS=A,SEP,NOMARK,DRAIN,MODE=FSS,FSS=WRITER08, PRMODE=(LINE, PAGE),UCS=0 Example of PSF/MVS JES2 printer definition NOTE: The SEP parameter must be used if PTF number = UY94833 for environment 102 is not installed.
Configuration ida ReRouter //PSF PROC //IDAFSS1 EXEC PGM=APSPPIEP.
Configuration ida ReRouter NOTE: OVLYDD, PSEGDD, PDEFDD and FDEFDD The Overlay, Segment, Pagedef. and Formdef. library statements should match the IPDS emulation selected on the device to be communicated with. DISINTV To avoid unnecessary stopping/starting of sesssion, the DISINTV (Disconnect Interval Timer) should be set to 0. 5.1.
Configuration ida ReRouter 5.1.3 PSS/MVS printer definition and startup procedure /* From the system PARMLIB PRT410,CLASS=A,DRAIN,MODE=FSS,FSS=PSS4, PRMODE=(LINE, PAGE),UCS=0,WS=(W,R,Q/F) PRT411,CLASS=A,DRAIN,MODE=FSS,FSS=PSS4, PRMODE=(LINE, PAGE),UCS=0,WS=(W,R,Q/F) Example of PSS/MVS JES2 printer definition //PSS4 PROC //PSS4 EXEC PGM=IDAPSS4,TIME=1440,REGION=4M //STEPLIB DD DISP=SHR,DSN=USER.LINKLIB //*------------------------------------------------------//SYSPROF DD DISP=SHR,DSN=USER.
Configuration ida ReRouter 5.1.
Configuration ida ReRouter /**********************************************************************/ /* */ /* IDA AFP EXEC Version 6 Release 01 - (C) Copyright I-data A/S 1994 */ /* Process parm and transfer them to IDA AFP virtual machine */ /* */ /* Dependencies: LIST3820, LIST38PP */ /* PSEG3820, PSEG38PP, PSEG300 */ /* OVLY3820, OVLY38PP */ /* and normal files (line data files) */ /* */ /**********************************************************************/ FSSUSER = 'PSS1' /* USERID OFF VIRTUAL MACHI
Configuration ida ReRouter 5.1.5 PSS printer profile using SNA and TCP/IP attachment KEY KEY=01234567890123450123 DDNAME DDNAME=PSS4.
Configuration ida ReRouter 5.1.
Configuration ida ReRouter MODE TABLE: LOCAL 37XX SDLC LOGMODE FMPROF TSPROF PRIPROT SECPROT COMPROT RUSIZES PSNDPAC SSNDPAC SRCVPAC PSERVIC REMOTE 37XX SDLC/TR LOCAL REMOTE LOCAL LOCAL 37XX 3174 TR 3174 TR 3172 TR GATEWAY GATEWAY ETHERNE ATTACHMENT T GATEWAY IBM3820M IBM3820R IBM3820T X’13’ X’13’ X’13’ X’07’ X’07’ X’07’ X’B0’ X’B0’ X’B0’ X’B0’ X’B0’ X’B0’ X’D0B1’ X’D0B1’ X’D0B1’ X’B7B7’ X’8686’ X’8787’ X’03’ X’10’ X’10’ X’00’ X’00’ X’00’ X’03’ X’10’ X’10’ X’060200000000000000002000’ IBM3820R X’13’ X’
Configuration of AS/400 Networks ida ReRouter 6. Configuration of AS/400 Networks The object of this chapter is to provide you with guidelines for manual configuration of your AS/400 system connecting to an IPDS session. The examples assume that configuration is made for a Token Ring attached workstation. 6.
Configuration of AS/400 Networks ida ReRouter 6.2 Creating Printer Device Description Type: CRTDEVPRT Prompts: Parameter and values in parentheses Device description DEVD(RER1PRT) Device class DEVCLS(*RMT) Device model MODEL(0) Device type Type (*IPDS) Advanced function printing AFP (*YES) The default for this parameter is *NO. However, for AFP printing this parameter must be *YES.
Configuration of AS/400 Networks ida ReRouter 6.3 Updating APPN Remote Location List (SNA connections only) The APPN location lists, which are only used for APPN configurations (i.e. when APPN /*YES) is specified in the controller description, define special characteristics of remote locations. The CRTFGL (Create Configuration List) command is used to define a list of remote locations for APPN. 1.
Configuration of AS/400 Networks ida ReRouter Local Location Name (S4450327) The local location name is the name defined in the network attributes. The value for Local Location Name can be obtained by using the DSPNETA value.
Configuration of AS/400 Networks ida ReRouter 6.4 Sample Controller Definition Controller description.................. Option.......................................... Category of controller.................. Link type...................................... Online at IPL................................ Active switched line..................... Character code............................ Maximum frame size.................... Remote network identifier............ Remote control point....................
Workstation Configuration ida ReRouter 7. Workstation Configuration - For SNA connection The PC configuration description of Communications Manager/2, LAPS and TCP/IP includes both the AS/400 and the S/370 (S/390) network systems. 7.1 Communications Manager/2 for S/370-390 and AS/400 This section describes the configuration of Communications Manager/2 for the two network systems S/370 (S/390) and AS/400. The configuration details is followed by configuration worksheets for the two network systems.
Workstation Configuration ida ReRouter 7.1.1 Changing configuration file Communications Manager Setup 1. Select "Setup" to create or modify a configuration 2. Enter the name of the configuration file you wish to modify in " Configuration" 3. Select "OK". Communications Manager Configuration Def. 1. Select "Token Ring or other LAN types" 2. Select "APPC APIs " in the field "Features or Applications" 3.
Workstation Configuration ida ReRouter Configuring SNA local node characteristics Communications Manager Profile List Sheet 1. Select "SNA local node characteristics" 2. Select "Configure" Local Node Characteristics 1. Set "Network ID" to, see worksheet ( 6) 2. Set "Local node name" to the number of your workstation (from the host) 3. Set "Node type" If set to "End node - to network node server", then also define "Your network node server address” (hex) 4.
Workstation Configuration ida ReRouter Connection List The connection may already have been defined. If so, check that the connection matches the description below. (If the connection is to be changed, select “Change” instead of “Create.) For S/370 host connection: 1. Select "To host" under partner type 2. Select "Create" For AS/400 host connection: 1. Select "To peer node" 2. Select "Create" Adapter List 1. Select the relevant adapter under " Adapter type" 2.
Workstation Configuration ida ReRouter 2. Host connection (normally S/370-390): 2a. Select “Activate at startup” 2b. Select “Local PU Name” 2c. Select "APPN Support" (if needed) 2d. Set "Node ID", see worksheet ( 8) 2e. Set "LAN destination address " to: see worksheet ( 16) 2 f. Specify “ Address format” as required 2g. Fill in “Partner network ID ” see worksheet ( 11) 2h. Fill in “Partner node name” see worksheet ( 11) 3. Peer node connection (normally AS/400): 3a. Select “Activate at startup” 3b.
Workstation Configuration ida ReRouter Creating a local LU SNA / Local LUs Features List 1. Select "Local LUs" 2. Select "Create" Local LU 1. Set "LU name" to: see worksheet ( 14) 2. Set "Alias" to: see worksheet ( 15) The LU Alias must be the same as defined in the ida ReRouter. 3 If dependent LUs are being used select LU NAU address ( 16). 4. Select "OK" SNA Features / Partner LU Optional parameter CM dependent 1. Select "Partner LUs" 2. Select "Create" 3.
Workstation Configuration ida ReRouter Mode Definition ( AS/400 only) 1. Select "Modes", see worksheet ( 19) 2. Select "Create" 3. Enter the value “ QSPWTR” 4. Select “OK” Creating a transaction program definition SNA Features List / Transaction Program Def. 1. Select "Transaction program definitions" 2. Select "Create" Transaction Program Definition For IPDS connection to PSF/370-390 and PSF/400: 1. Set "Transaction program (TP) name" to: $DPF (See worksheet ( 9)) 2.
Workstation Configuration ida ReRouter For ICDS connection to ida PSS: 1. Set "Transaction program (TP) name" to:IDAROUTE 2. Set "OS/2 program path and file name" to: see worksheet ( 10) 3. Set program parameter strings to “IDAROUTE”. 4. Select “Continue”. Note: The TP name used must match the TP name used in the PSS printer profile (i.e. in this case it is IDAROUTE). For details, see the section “Related Manuals” for documentation reference to host configuration Additional TP Parameters 1.
Workstation Configuration ida ReRouter Communications Manager Configuration Def. 1. Select "Close" Your configuration file is automatically verified. You may now be presented with a pop-up window with the following message: “Do you wish to dynamically update your SNA resources”. Select “YES”. Select "Close" to exit from Communications Manager Setup.
Workstation Configuration ida ReRouter 7.1.2 S/370 Network Configuration Worksheet On the following pages you will find sample configuration worksheets for two remote devices connected to the the ida 913-03 Token Ring and the ida PS 13, using the dependent LUs. ida ReRouter, First device: ida 913-03 Token Ring WORKSTATION: Configuration filename Token Ring DLC Profile 1 2 3 4 5 Adapter number Max. link stations Max.RU size C&SM LAN ID Comm.
Workstation Configuration ida ReRouter Second device: ida PS 13 WORK-STATION: Configuration filename Token Ring DLC Profile 1 2 3 4 5 Adapter number Max. link stations Max.RU size C&SM LAN ID Comm. Manager/2 TOKENR LAPS PSF 0 10 1024 IDATA1 VTAM NCP IDA REROUTER KEYWORDS 1024 Local Node Characteristics 6 7 8 Network name Local node name Node ID DKIDTN01 IDATA1 05D 00000 DKIDTN01 05D 00000 SNA Features: Transaction Program Def.
Workstation Configuration ida ReRouter 7.1.3 AS/400 Network Configuration Worksheet This section provides details on the configuration worksheets for two remote devices connected to the Token Ring and the ida PS 13. First device: ida 913-03 Token Ring WORKSTATION: 1 Configuration filename Token Ring DCL Profile 2 Adapter number 3 Max. link stations 4 Max.RU size 5 C&SM LAN ID Local Node Characteristics 6 Network name (ID) 7 Local node name 8 Local Node ID Transaction Program Def.
Workstation Configuration ida ReRouter First device: ida 913-03 Token Ring WORKSTATION: Configuration filename Token Ring DCL Profile 2 Adapter number 3 Max. link stations 4 Max.RU size 5 C&SM LAN ID Local Node Characteristics 6 Network name (ID) 7 Local node name 8 Local Node ID Transaction Program Def.
Workstation Configuration ida ReRouter Second device: ida PS 13 WORK-STATION: Configuration filename Token Ring DCL Profile 2 Adapter number 3 Max. link stations 4 Max.RU size 5 C&SM LAN ID Local Node Characteristics 6 Network name (ID) 7 Local node name 8 Local Node ID Transaction Program Def. 9 TP name 10 Program path / name Partner LU 11 Full PLU name Local LU 12 Local LU name 13 Local LU alias 14 Local LU address Connections 15 Destination address 16 LAN Adapter addr. 17 IP Address 18 Port No. .
Workstation Configuration ida ReRouter Second device: ida PS 13 WORKSTATION 1 Configuration filename Token Ring DCL Profile 2 Adapter number 3 Max. link stations 4 Max.RU size 5 C&SM LAN ID Local Node Characteristics 6 Network name (ID) 7 Local node name 8 Local Node ID Transaction Program Def.
Testing Connection to Remote Device ida ReRouter 7.1.4 Explanation to Configuration Worksheets This chapter gives a description of each of the Communication Manager/2 profiles for S/370 - S/390 and AS/400 stated in the configuration worksheet (see the sections 7.1.2 for S/370 and section 7.1.3 for AS/400). The numbers below refer to the profile numbers in the worksheet. 1.
Testing Connection to Remote Device ida ReRouter 8. Node ID This identifier is used by the host to link with thi s workstation when attached to a T/R network. It must be unique within a switched node network. Co-ordinate this assignment with your network administrator. S/370 - S/390: Must match the host VTAM IDNUM configuration parameter. Set the Node ID parameter to zero (0) for an establishment controller (e.g. 3174). Co-ordinate this assignment with the network administrator.
Testing Connection to Remote Device ida ReRouter AS/400: The Network ID can be obtained from the AS/400 RMTNETID parameter in - AS/400 APPC controller description The Partner LU is obtained from the AS/400 LCLLOCNAME parameter in: - AS/400 APPC device description - AS/400 APPC printer device description 12. Local LU name Specifies the real name of the logical unit (LU) as known in the system. Must match the name in: S/370 - S/390: NCP/VTAM LU name.
Testing Connection to Remote Device ida ReRouter 15. LAN Destination address Specifies the destination address for a LAN adapter. The destination address is the address of the partner's LAN adapter. 16. LAN adapter address This parameter is for S/370 - S/390 only! Used by the VTAM (or an esta blishment controller, e.g. 3174) to communicate with the workstation. 17. IP Address The IP address is the defined address of the remote device being communicated with. Must be stated in decimal dotted notation: 0.0.
Testing Connection to Remote Device ida ReRouter 7.2 LAPS When installing TCP/IP, a LAPS (LAN Adapter Protocol Support) protocol must be added for the TPC/IP in question. First select network adapter and then add the protocol for the TCP/IP as illustrated in the screen below. The selected protocol will then appear in the field "Current Configuration". Press "OK" to confirm the configuration. 7.3 TCP/IP The TCP/IP (Transmission Control Protocol / Internet Protocol) is used to transfer print data.
Testing Connection to Remote Device ida ReRouter Network Tick the field "Enable LAN Adapter 0" and define the IP address for the PC and subnet mask. Routing NOTE: Routing is only defined if connection is made to multiple IP network. When configuration of the TCP/IP protocol is completed, you must confirm the configuration. Press ALT+ F4 or make a double click in the top left corner of the actual screen. Then select "SAVE" to save the TCP/IP configuration.
Testing Connection to Remote Device ida ReRouter 8. Testing Connection to Remote Device When the ida ReRouter has been installed and is ready for operation you are recommended to test the connection to the remote device being communicated with. For a list of remote printer devices being supported with the ida ReRouter, see chapter 1: "Introduction". The remote devices to be operated with the ida ReRouter support the Internet Control Message Protocol (ICMP) PING function 8.
Testing Connection to Remote Device ida ReRouter PING function succeeded: If the PING is OK, you receive a system response like this: PING 192.0.5.7: 56 data bytes 64 bytes from 192.0.5.7: icmp_seq=0. time=0. ms 64 bytes from 192.0.5.7: icmp_seq=1. time=0. ms 64 bytes from 192.0.5.7: icmp_seq=2. time=0. ms 64 bytes from 192.0.5.7: icmp_seq=3. time=0. ms 64 bytes from 192.0.5.7: icmp_seq=4. time=0. ms ----- 192.0.5.7 PING Statistics ---------- 4.
Testing Connection to Remote Device ida ReRouter 8.2 Log Files In the following chapter 9: "Problem Determination", all the log files for the idaRoute program are described together with a suggested action to correct the error situation. All log messages sent to the log file will be time stamped. A brief overview of the log files can be seen by activating the pull-down window "View Log" (see section 4.2, step 3 for details). NOTE: The status field will always be changed when new sessions are activated.
Problem Determination ida ReRouter 9. Problem Determination The idaRoute program logs all errors. All entries in the log file are time stamped. Apart from the error messages indicated in the following, a number of status messages are also logged. The errors produced will use the following syntax: 9.
Problem Determination ida ReRouter ROUT0035E: Cannot open configuration file [...] Description: Action: Note: The system is not properly configured. The configuration file "idaRoute.ini" is not created in the idaRoute directory. Use the idaRCtrl program to make the proper setup. - ROUT0052E: Configuration error for entry [...] Description: Action: Note: A configuration error has been found - [...] identifies the wrong keyword. Correct the entry, using the idaRCtrl.
Problem Determination ida ReRouter ROUT0110E: Invalid APPC opcode [...] Description: The transaction program has discovered an APPC syntax error. Try once more. If problem persists, contact your system administrator. - Action: Note: ROUT0111E: APPC error: opcode [...] Primary rc: Secondary rc: Description: Action: Note: A situation with a communication failure has occured. Check the configuration to the Host and the Communications Manager/2.
Problem Determination ida ReRouter ROUT0604E: TCP/IP communication error [...] Description: Action: Note: A situation with a communication failure has occurred. Check the remote device to see if it is ready and active. "Ping" the remote device (for details.see chapter 8:”Testing the Remote De vice"). Retry. - ROUT0605E: No connection established to remote device Description: An attempt to make a connection to the remote device has failed. Check the remote device to see if it is ready and active.
Problem Determination ida ReRouter ROUT0611I: Trace enabled [...] Description: Action: Note: Program trace is enabled. Trace information is written to the .trc file. (see section 9.2: "Trace" for further information). ROUT0612W: SWIDDEF file error [...] Description: Action: Note: The swiddef is either invalid or non-existing. Re-install or update the ida ReRouter. If problem persists then contact your point of purchase.
Problem Determination ida ReRouter ROUT0618I: Remote device (printer) is not ready Description: Action: Note: An attempt to make a connection has failed. Check the remote device and retry. Make sure that a test page can be ejected from the remote device. ROUT0619E: Cannot reach the specified destination Description: Action: Note: Connection to the remote device cannot be established.
Problem Determination ida ReRouter ROUT0803E: Thread handling error [...] Description: Action: An OS/2 system call has failed. Re-start the ida ReRouter, re-start the OS/2. If problem persist, contact your system administrator. - Note: 9.2 Trace The Trace entry in the setup screen (see chapter 4: "Installation and Setup of ida ReRouter”) provides a debugging facility.
Appendix Section ida ReRouter 10.
Appendix Section ida ReRouter Appendix A: Keyword Definitions The configuration file - idaRoute.ini - created upon completion of the setup dialog (see section 4.2: Setup of ida ReRouter) consists of multiple route definitions. Each route definition is a set of keywords defining the actual setting of the route. The configuration file is not used for normal configuration and operation. For this you use the setup dialog screen.
Appendix Section ida ReRouter KEYWORD: "ROUTE_NAME" DESCRIPTION: User defined Alias for a particular route. RANGE: Alphanumerical string (A-Z, a-z and 0-9) No white spaces Max. 15 characters DEFAULT: None KEYWORD: "DESCRIPTION" DESCRIPTION: A short description of the defined route RANGE: Alphanumerical string (A-Z, a-z and 0-9). All characters before the value are used as the string (spaces included)Max.
Appendix Section ida ReRouter KEYWORD: "IPADDRESS" DESCRIPTION: The Internet Protocol address for the TCP/IP device. RANGE: Decimal dotted notation 0.0.0.0. - 255.255.255.255 DEFAULT: None KEYWORD: "PORTNO" DESCRIPTION: Specifies the actual port number of the remote printer device (printer daemon) RANGE: Decimal value 0-9999 DEFAULT: 5001 KEYWORD: "CONTIMEOUT" DESCRIPTION: Specifies the time the idaRoute (the .ini file) will wait from the time of connection till response is received.
Appendix Section ida ReRouter Appendix B:Fill-InConfigurationWorksheet In the following pages, you will find blank configuration worksheets for the networks S/370 and AS/400. With these you can make your own system configuration worksheets.
Appendix Section ida ReRouter Fill-In Configuration Worksheet for S/370 Networks Remote Device: _______________________ WORK-STATION: PSF Comm. Manager/2 VTAM NCP LAPS 1 Configuration filename Token Ring DLC Profile 2 3 4 5 Adapter number Max. link stations Max.RU size C&SM LAN ID Local Node Characteristics 6 7 8 Network name Local node name Node ID NETID SNA Features: Transaction Program Def.
Appendix Section ida ReRouter Fill-In Configuration Worksheet for AS/400 - Part 1. Remote Device: _______________________ WORK-STATION: TR LINE APPCCont Comm. Manager/2 LAPS 1 Configuration filename Token Ring DCL Profile 2 Adapter number 3 Max. link stations 4 Max.RU size 5 C&SM LAN ID Local Node Characteristics 6 Network name (ID) 7 Local node name 8 Local Node ID Transaction Program Def.
Appendix Section ida ReRouter Fill-In Configuration Worksheet for AS/400 COMMUNICATIONS MANAGER /2 PROFILE 1 Configuration filename Token Ring DCL Profile 2 Adapter number 3 Max. link stations 4 Max.RU size 5 C&SM LAN ID Local Node Characteristics 6 Network name (ID) 7 Local node name 8 Local Node ID Transaction Program Def. 9 TP name 10 Program path / name Partner LU 11 Full PLU name Local LU 12 Local LU name 13 Local LU alias 14 Local LU address Connections 15 Destination address 16 LAN Adapter addr.
Appendix Section ida ReRouter Appendix C: i-data Products Mainframe environment Hardware AFP IPDS Laser IPDS Matrix Non-IPDS Laser Non-IPDS Matrix ida 270x - Optra - 4039 - MIO - SIO ida PDS - Optra - 4039 - MIO ida 234-11 MT 691 ida PDS - 270 C/RS - LCD ida PDS - 270 C/RS - TR LCD - LCD ida 270x - Optra - 4039 - MIO - SIO -G - Canon III - Canon 4 - Canon Plus ida 224-1C - IBM 4072 - IBM 4226 - IBM 238x/9x - OKI 395 - OKI 520 -Epson SQ 2550 ida 234-11 MT 800 ida 270 C/RS ida Flex ida RPP i
Appendix Section ida ReRouter Midrange environment Hardware AFP IPDS Laser IPDS Matrix ida 812-1x - Optra - 4029 - 4039 - MIO - SIO ida PDS - Optra - 4039 - MIO ida 234-12 MT 691 ida 234-12 MT 800 - 250 C/RS ida PDS - 250 C/RS - TR LCD - LCD Non-IPDS Laser Non-IPDS Matrix ida 812-1x - Optra - 4029 - 4039 - MIO - SIO -G - Canon III - Canon 4 - Canon Plus ida 224-1T - IBM 4072 - IBM 4226 - IBM 238x/9x - OKI 395 - OKI 520 -Epson SQ 2550 ida Flex -ida 234-1 MT 691 - ida 234-1 MT800 ida 250 C/RS
Reader's Comments This manual is part of a library that serves as a reference source for programmers and operators of i-data equipment. This form may be used to communicate your view about this publication. Your interest is appreciated. Comments may be written in your own language, use of English is not required. Please send this form to: Documentation i-data international a-s Vadstrupvej 35-43 DK-2880 Bagsvaerd Denmark or use our E-mail address at the Internet: i-data i-data.