Readiris 14 User Guide Mac OS 5/31/2012 I.R.I.S.
ReadirisTM 14 – User Guide Table of Contents Introduction ....................................................................... 1 What's new in Readiris 14 ................................................. 3 Legal Notices..................................................................... 5 Section 1: Installation and Activation ....................................... 9 System requirements ......................................................... 9 Software installation .................................
Table of Contents Section 4: Scanning and Opening Documents........................ 33 General Processing Options ............................................ 33 Preprocessing Options. ....................................................................... 34 Page Analysis Options ........................................................................ 35 Scanning Documents ....................................................... 36 Scanning with I.R.I.S. scanners .......................................
ReadirisTM 14 – User Guide Section 6: Optimizing the Scanned Documents ..................... 63 Adjusting the Image Quality ........................................... 65 Section 7: Editing the Recognition Zones ............................... 71 Introduction ..................................................................... 71 Using zoning templates ................................................... 78 Section 8: Saving Documents ...................................................
Table of Contents Batch Processing ........................................................... 109 Watched Folder ............................................................. 111 How to .................................................................................. 115 How to configure your scanner in Readiris ................... 115 How to recognize barcodes ........................................... 117 Recognizing barcodes manually .......................................................
ReadirisTM 14 – User Guide RI_14_dgi_21052012-02 Welcome to the Readiris documentation. The aim of this documentation is to help you get up to speed with using Readiris. It covers Readiris' installation and setup, the basic processing steps and the application's commands and working areas. At the end of the documentation you find an How to section in which particular questions are addressed. The procedures described in this documentation are based on the Mac OS Lion operating system.
Introduction and send to online Storage Systems. Readiris supports a wide range of output formats, the most important ones being PDF, DOCX and XLSX. The documents Readiris generates can either be saved on your computer, directly sent via e-mail or exported to online Storage Systems such as Evernote, Dropbox and Google Docs. Readiris recognizes documents in 130 languages.
ReadirisTM 14 – User Guide WHAT'S NEW IN READIRIS 14 Improved User Interface Thumbnail View Export to online Storage Systems Deskewing digital camera images Improved User Interface The Readiris interface has been redesigned and improved. All the commands you need to process documents and to complete your OCR tasks are now grouped in a top toolbar. Tip: to learn more about the new interface, see the topic Exploring the interface.
Introduction In Regular View you see the current image that is analyzed. The page thumbnails are displayed in the Pages panel. Export to online Storage Systems The documents you process with Readiris can be sent to several online Storage Systems: Evernote, Dropbox and Google Docs. Deskewing digital camera images Readiris now automatically detects if images have been made by a digital camera, and allows you to correct their perspective. This way you can deskew documents that were photographed from an angle.
ReadirisTM 14 – User Guide LEGAL NOTICES Copyrights Copyrights © 1987-2012 I.R.I.S. All Rights Reserved. I.R.I.S. owns the copyrights to the Readiris software, to the online help system and to this publication. The information contained in this document is the property of I.R.I.S. Its content is subject to change without notice and does not represent a commitment on the part of I.R.I.S.
Legal Notices Patents iHQC patent-protected. US Patent No. 8,068,684. TM Acknowledgements Portions of this I.R.I.S. software uses the following copyrighted material, the use of which is hereby acknowledged. Dropbox SDK Copyright (c) 2010 Dropbox (Evenflow, Inc.), http://getdropbox.
ReadirisTM 14 – User Guide Redistribution and use in source and binary forms, with or without modification, are permitted provided that the following conditions are met: o Redistributions of source code must retain the above copyright notice, this list of conditions and the following disclaimer. o Redistributions in binary form must reproduce the above copyright notice, this list of conditions and the following disclaimer in the documentation and/or other materials provided with the distribution.
Legal Notices Copyright (c) 1991-1997 Silicon Graphics, Inc.
ReadirisTM 14 – User Guide SECTION 1: INSTALLATION AND ACTIVATION SYSTEM REQUIREMENTS This is the minimal system configuration required to use Readiris: A Mac OS computer with Intel or Power PC G4 processor. The operating system Mac OS X 10.5 or higher. Earlier versions of the Mac OS operating system are not supported. 220 MB of free hard disk space. SOFTWARE INSTALLATION To install Readiris: Insert the Readiris CD-ROM in the CD-ROM drive of your computer.
Section 1: Installation and Activation You might be asked to enter an Administrator Username and Password to install Readiris. Scroll down and Agree with the terms of the license agreement. Then click Install to start the actual installation. You are prompted to enter the serial number. The serial number can be found inside the product box and contains 11 digits. When the installation is finished, click Close. The Readiris folder is added to the Applications folder by the installation program.
ReadirisTM 14 – User Guide Fill in your data and click Submit. You will receive the software key by e-mail within 24 hours. Once you've received the key from I.R.I.S. insert it in the corresponding field, and then click OK. SOFTWARE REGISTRATION Registering is required to get Technical Support. It also offers other benefits, such as free updates, free trial downloads, video tutorials, discount on new products, and so on.
Section 1: Installation and Activation Fill in your data and click Submit. Note that an internet connection is required to complete the activation. CHECK FOR UPDATES When you register your copy of Readiris you are entitled to free software updates. To check if updates are available: On the Help menu, click Search for Updates. Note: Readiris automatically checks for updates every 30 days.
ReadirisTM 14 – User Guide UNINSTALLING READIRIS Should you want to remove Readiris from your computer, follow the procedure below. To uninstall the application: Click Finder and open the Applications folder. Drag the Readiris folder to the Trash. Readiris will be removed from your machine. Note: the Readiris preferences are not removed by dragging the Readiris folder to the trash can, in case you should want to reinstall the software later on.
Section 1: Installation and Activation TECHNICAL SUPPORT If you register your copy of Readiris you are entitled to free technical support. In the Technical Support section of our website www.irislink.com/support you can find F.A.Q.'s (frequently asked questions), Video Tutorials, and much more information to solve common issues. If you still can't find an answer to your question, click Technical Support Contact and fill in the Web Contact Form.
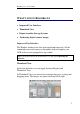
ReadirisTM 14 – User Guide SECTION 2: GETTING STARTED EXPLORING THE INTERFACE The new Readiris interface looks as follows: The interface consists of the following components and panels: 1. The Readiris menu bar The Readiris menu bar regroups all the commands and options available in Readiris, including advanced settings.
Section 2: Getting Started 2. The top toolbar The top toolbar is by far the most important tool in Readiris. It contains all the basic commands you need to process your documents. The commands are classified per group. The top toolbar can be customized in two ways: o You can add or remove output formats in the Format and Destination group, by clicking the down arrow.
ReadirisTM 14 – User Guide can be edited with the tools in the Image and Layout Editing panel. 4. The Pages panel Each page you scan or open in Readiris has its thumbnail displayed in the Pages panel. The pages are processed top-down. To change the order of the pages, you drag a page from one location to another. To have a better overview of the page thumbnails you can switch to Thumbnail view. In this view only the page thumbnails are displayed. The analyzed image is not displayed anymore.
Section 2: Getting Started To change the user interface language in Readiris: Click the System Preferences icon. Click the Language & Text icon. Drag the language of your choice to the top of the list. The user interface of Readiris is available in a wide range of languages. Restart Readiris to apply the new language settings. CONFIGURING YOUR SCANNER IN READIRIS Readiris supports all Twain 1.
ReadirisTM 14 – User Guide Click Install to install the driver. Note that an internet connection is required to complete this operation. Twain scanners Connect your scanner to your Mac and power it on. Install your scanner's Twain driver. In general, drivers can be found on the CD-ROM provided with your scanner and on the website of your scanner manufacturer. They are not provided by I.R.I.S. Note that some scanner drivers may not work under the latest versions of Mac OS.
Section 2: Getting Started IRISCard Anywhere / IRIScan Anywhere / IRIScan Book scanners You do not need to install any drivers when using these scanners. They are not Twain driver-based scanners that can be used from within any application to scan documents. Instead, they are designed to be used on their own, disconnected from any computer. The documents you scan are stored in the scanner’s internal memory (or optional SD card / USB flash drive).
ReadirisTM 14 – User Guide Once the scanner has been configured you can start scanning, using the default scanner settings.
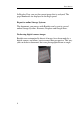
ReadirisTM 14 – User Guide SECTION 3: BASIC DOCUMENT PROCESSING Processing documents with Readiris is fairly straightforward when using a basic configuration. In this section we discuss which steps to take when doing such a basic configuration. For detailed information about all the configuration steps, see sections 4 to 9. Step 1: Scan or Open your images In order to scan paper documents your scanner must be correctly configured. See the section Configuring your scanner if necessary.
Section 3: Basic Document Processing Readiris can deskew (straighten) documents and rotate them by means of Page orientation detection. When your scanner generates black borders around your documents, or when your documents contain information that is partially cut from the page, Readiris tends to create recognition zones on the borders of the document, even though they do not contain any useful content. In such cases it is recommended to use the option Ignore Border Zones.
ReadirisTM 14 – User Guide The images are displayed in the interface. Step 2: Modifying the images The images you scan and load into Readiris can be modified easily: To change the order of the pages, drag the thumbnails to a different position in the Pages panel. To delete a page, select a page and click the delete icon. To delete a zone, select it and press the Backspace button on your keyboard. If necessary you can modify the recognition zones.
Section 3: Basic Document Processing Step 4: Select the Output format In the Format and Destination group, click the output format you want to generate. You can, for instance, save your documents as DOCX documents to do text editing, or save them as PDF documents for storage purposes. For detailed information about the different output formats and the different formatting options, see the sections Saving Documents and Selecting the Layout Options.
ReadirisTM 14 – User Guide Select File to save the documents locally to your computer or portable storage device. Click Application > Select Application to open the documents directly in that application. Select Storage system to send your documents to an online Storage system. Note that the connection to the online Storage system must be configured correctly to be able to export. See the section Saving Documents to online Storage Systems to learn how to do so. Select the required Layout options.
Section 3: Basic Document Processing When you've gone through these steps, click Save to start the text recognition and generate output documents. Starting a new project When you are done saving your scanned documents, or when you want to start over: Click New on the top toolbar. This command erases your documents from Readiris so you can start a new project.
ReadirisTM 14 – User Guide AUTOMATIC PROCESSING If you want to speed up the processing in Readiris or need to process batches of scanned documents, you can use the Automatic Processing feature. This feature automatically processes the documents you scan and open in Readiris, converts them into the output format you defined, and exports them either to a specific folder you defined or to the configured storage system.
Section 3: Basic Document Processing When you can documents on a flatbed scanner, each page will be saved in a separate output file. Notes: You can process up to 50 pages at a time in Readiris Pro. You can also export documents to your online Storage Systems Google Docs, Evernote and Dropbox. In that case any Output folder you selected is ignored. Tip: To add the Automatic Processing feature to the top toolbar: Ctrl-click inside the top toolbar, and select Customize Toolbar.
ReadirisTM 14 – User Guide Name the settings, select an location and click Save. Note: if you want to save specific settings as default settings, click Save as Default on the Settings menu.
Section 3: Basic Document Processing Restoring Factory Settings On the Settings menu, click Restore Factory Settings.
ReadirisTM 14 – User Guide SECTION 4: SCANNING AND OPENING DOCUMENTS GENERAL PROCESSING OPTIONS When scanning and opening documents, Readiris applies several general processing options. To access these options: On the Readiris menu, click Preferences. The Preferences window opens on the General tab.
Section 4: Scanning and Opening Documents The options you set here are applied as default to all the documents you'll open or scan. Preprocessing Options. Smoothen color and grayscale images This option is activated by default. It renders grayscale and color images more homogeneous by smoothening out differences in intensity. As a result, a stronger contrast is created between the foreground (text) and background (artwork). Sometimes smoothening is the only way to separate text from a colored background.
ReadirisTM 14 – User Guide Page Analysis Options Note that you can also access these options via the Settings menu. Page analysis Page Analysis is selected by default. This option divides your documents into recognition zones. Without recognition zones, Readiris cannot process your documents. If you choose to disable this function, you will need to draw recognition zones manually on your documents.
Section 4: Scanning and Opening Documents contain any useful content. In such cases it is recommended to use the option Ignore Border Zones. When you are done, close the Preferences window. The settings are saved automatically. SCANNING DOCUMENTS Readiris is Image Capture and Twain compliant. It supports almost any flatbed and sheet-fed scanner, all-in-one device, digital camera and scanner currently available. Important note: Readiris Pro can scan 50 pages at a time.
ReadirisTM 14 – User Guide Select Color and 300 DPI as preferences to obtain optimal results. When you are scanning business cards or Asian languages it is recommended to use a scanning resolution of 400 dpi. Then select the Page Analysis options See General Processing Options for more information. Click the Scan button in the dialogue box to start scanning documents. Note: pay attention to line skew. Line skew over 0.5° increases the risk of OCR errors.
Section 4: Scanning and Opening Documents - Readiris can be set as target application of your scanner, if your scanner supports that feature. That way you scan documents on your scanner and transfer them to Readiris, just by clicking your scanner buttons. See your scanner documentation for more information. SCANNING WITH I.R.I.S. SCANNERS IRIScan Express 2 When using an IRIScan 2 scanner there are specific settings you can apply. On the Readiris menu, click Preferences. Click the Scanner tab.
ReadirisTM 14 – User Guide Resolution Select a scanning resolution of 300 dpi. When you are scanning business cards or Asian languages it is recommended to use a scanning resolution of 400 dpi. Calibrate Click the Calibrate button should it be necessary to calibrate your scanner. When you are done, close the Preferences windows and start scanning documents.
Section 4: Scanning and Opening Documents OR insert the SD card or USB flash drive you used in the scanner into your Mac. Readiris detects if card images were scanned to the storage medium. Click Yes to select them. Readiris then opens the right folder. OPENING IMAGE FILES Besides scanning documents, you can also open image files and PDF files with Readiris. Important note: Readiris Pro can open multipage image files of up to 50 pages.
ReadirisTM 14 – User Guide multipage TIFF images, Windows bitmaps (BMP) and PDF documents. To open existing image files: Click the File button. Then select the images files you want to process, and click Open. You can also open multiple images files at a time: o Select the first image file and hold down the Cmd-key as you select additional images or; o Select a continuous range of image files by clicking the first image and holding down the Shift key as you select the last image.
Section 4: Scanning and Opening Documents Should you want to abort the loading process, press Esc on your keyboard. Tip: when loading multipage image files (TIFF images) and PDF documents, you can define the page range (in case you only need a certain chapter of a document for instance). Note: when you click the File button on the top toolbar after you saved your current document, you are prompted whether you want to delete the current document or not.
ReadirisTM 14 – User Guide OPENING DIGITAL CAMERA IMAGES Readiris automatically detects when images have been made by a digital camera and uses special recognition algorithms to process them. To open digital camera images: Click File on the top toolbar. Select your digital camera images and click Open. In the page thumbnail, you see a little camera icon, which indicates Readiris recognizes the image as digital camera image.
Section 4: Scanning and Opening Documents Deskewing Digital Camera Images When photographing documents with a digital camera, it may happen that the documents are shot from an angle, which gives them a 3D effect and renders the recognition impossible. To solve this issue, you can deskew your digital camera images: Open your digital camera image. On the Layout and Editing toolbar, click the Deskew icon. Drag the corners one by one in the direction of your text.
ReadirisTM 14 – User Guide Click Apply to deskew the image. Tips for making digital camera images Always select the highest image resolution. Enable the macro mode of the camera to take close-ups. Enable the document mode of the camera (if any). Only use optical zoom, not digital zoom. Hold the camera directly above the document. Avoid photographing documents at an angle. Produce stable images. Use a tripod if necessary. Disable the flash when photographing glossy paper.
ReadirisTM 14 – User Guide SECTION 5: SELECTING THE RECOGNITION OPTIONS RECOGNITION OPTIONS Readiris converts scanned images, image files and PDF files into editable text documents and text-searchable PDF documents. In order for Readiris to recognize the text in your images, you need to activate the correct recognition options. By far the most important recognition option is the document language. To select the document language: Click the language list, and select your document language.
Section 5: Selecting the Recognition Options Important: select the document language before executing page analysis when you are dealing with Asian or Hebrew documents. Specific page analysis algorithms are used for these documents. Tip Readiris Pro: in case you want to recognize documents in multiple languages, make sure to select the language with the largest character set. E.g. if you want to recognize a document that contains both English and French text, select French as document language.
ReadirisTM 14 – User Guide When this option is selected Readiris only recognizes the numerals 0-9 and the following series of symbols: + * / % , Plus sign Asterisk Slash Percentage Comma .
Section 5: Selecting the Recognition Options Selecting the language per page When specific pages use a different language than the overall document, you don't need to define a secondary language. You can apply a different language to those pages. Select the pages in the Pages panel, Ctrl-click them and use the command Language to assign another language than the overall document language to that/those page(s). Pages with a different language than the overall language are marked in red in the Pages panel.
ReadirisTM 14 – User Guide Unlike secondary languages, there are no limitations here. Note: the tooltip of each page in the Pages panel indicates which language applies to that page. Speed vs. Accuracy In Readiris you can choose whether to favor recognition speed over accuracy and the other way around. Tip: when you are processing low-quality images, it is recommended to set this feature to accuracy. This yields markedly better results. To access the Speed vs.
Section 5: Selecting the Recognition Options Cmd-click to select the Secondary languages. The list of secondary languages changes depending on the selected primary languages. Note: do not select languages that do not apply; the bigger the character set, the slower the recognition and the higher the risk of OCR errors.
ReadirisTM 14 – User Guide To select the font type: On the Settings menu, point to Font type. The font type is set to Automatic by default. That way, Readiris recognizes "25 pin" or "NLQ" (Near Letter Quality) dot matrix, or other "normal" printing. To recognize only dot matrix printed documents, click Dot matrix. Readiris will recognize so-called "draft" or "9 pin" dot matrix printed documents. Character pitch The character pitch is the number of characters per inch in a typeface.
Section 5: Selecting the Recognition Options ADVANCED RECOGNITION OPTIONS Besides the regular recognition options, Readiris also offers several advanced recognition options: Interactive Learning By means of Interactive learning you can train the recognition system on fonts and character shapes, and correct the OCR results if necessary.
ReadirisTM 14 – User Guide User Lexicons (Readiris Corporate only) During recognition, Readiris is assisted by linguistic databases to recognize text correctly. These linguistic databases are standard lexicons and are available for every supported language. As powerful as these standard lexicons may be, the recognition accuracy can still be boosted using customized user lexicons.
Section 5: Selecting the Recognition Options The characters the recognition system isn't sure of are displayed. If the results are correct: Click the Learn button to save the result as sure. The learning results are temporarily stored in the computer memory, for the duration of the recognition. Readiris will no longer display the learned characters when recognizing the remainder of the document. When a new document is recognized, the learning results are erased.
ReadirisTM 14 – User Guide or o Click Don't learn to save the result as unsure. Use this command for damaged characters which could be confused with other characters if learned. E.g. the number 1 and the letter I, which have an identical form in many fonts. o Click Delete to delete characters from the output. Use this button to prevent document noise from appearing in the output file. o Click Undo to correct mistakes. Readiris keeps track of the last 32 operations.
Section 5: Selecting the Recognition Options every time. Therefore, it is useful to use font dictionaries. Font dictionaries contain font information learned during interactive learning and can substantially increase the recognition results. Note that font dictionaries are limited to 500 shapes. You are recommended to create separate dictionaries for specific applications. To create a new font dictionary: On the Learn menu click the command New Dictionary.
ReadirisTM 14 – User Guide Click Save to process the document. USING USER LEXICONS (This section applies to Readiris Corporate only) During recognition, Readiris is assisted by linguistic databases to recognize text correctly. These linguistic databases are standard lexicons and are available for every supported language. As powerful as these standard lexicons may be, the recognition accuracy can still be boosted using customized user lexicons.
Section 5: Selecting the Recognition Options You can also access the User Lexicon Editor in the Readiris installation folder. On the File menu click New to open a new lexicon. Insert the words you want Readiris to recognize and click the Add button. You can also copy-paste text segments from other files and import and edit existing text files. Tip: importing company documents or word lists may be the fastest way to create a user lexicon containing company-specific terminology.
ReadirisTM 14 – User Guide Syntax rules Several syntax rules apply when inserting terminology: Case differences are maintained. E.g. IRISCard stays IRISCard All punctuation symbols and special characters at the beginning and end of words are filtered out automatically. Hyphens inside words are maintained. E.g. Notre-Dame-de-Paris stays Notre-Dame-de-Paris Tip: watch out for hyphenation at the end of a line when you import text files or copy-paste words that cover two lines. Numbers are rejected.
ReadirisTM 14 – User Guide SECTION 6: OPTIMIZING THE SCANNED DOCUMENTS The documents you scan and open in Readiris can be optimized in several ways with the Image and Layout Edting toolbar on the right side of the interface. Deskewing pages When a page has been scanned crookedly it can be deskewed - or straightened. To deskew a page: select the page, then click the Deskew icon. Deskewing digital camera images Readiris automatically detects if an image was made by a digital camera.
Section 6: Optimizing the Scanned Documents If the image was made from an angle, you can correct its perspective with the Deskew icon. Notice that the Deskew icon looks different for digital camera images. To deskew an image: Select the image, then click the Deskew icon. Drag the corners one by one in the direction of your text. Make sure the top and bottom sides are parallel to the text. Make sure the right and left sides are parallel to the text margins. Click Apply to deskew the image.
ReadirisTM 14 – User Guide Rotating images To rotate an image, click the Rotate icon. Then click the required option. ADJUSTING THE IMAGE QUALITY The recognition results depend a great deal on the image quality of your documents. If you're scanning very low-quality documents, Readiris will not be able to recognize them properly. The reason for this is that Readiris works by converting pictures of text characters into actual text characters.
Section 6: Optimizing the Scanned Documents Example 2: text is too bright In the image below, the text characters start to show gaps and incomplete shapes. To improve the recognition results: Check the Scanner Settings and make sure your documents have been scanned in a resolution of 300 dpi and in color. If that's not the case, re-scan your documents using these settings. Then access the Image Adjustment options: Click the Adjust icon on the Image and Layout Editing toolbar.
ReadirisTM 14 – User Guide Example 1: image is too dark The image below is too dark and results in a plain black image. There is no text to be recognized. In this case you need to increase the brightness of the image in order for the text to be displayed, as in the image below. Example 2: image is too bright The image below is too light and results in broken text characters. The text is hardy legible.
Section 6: Optimizing the Scanned Documents Contrast Move the slider to increase or decrease the contrast between the text and the background. Example: insufficient contrast The image below results in broken text characters. In this case you need to increase the contrast to obtain satisfactory results, as in the image below. Despeckle Sometimes documents contain a lot of "noise" - little black spots that occur when scanning low-quality documents or using bad scanner settings.
ReadirisTM 14 – User Guide When you are done adjusting the image quality: Click Apply to preview the results. If the results are satisfactory, click OK. If not, change the settings again.
ReadirisTM 14 – User Guide SECTION 7: EDITING THE RECOGNITION ZONES INTRODUCTION When you scan a document or open an image file in Readiris, each page is divided automatically into recognition zones. Readiris uses these zones to determine how each part of your documents must be converted. If your document does not contain any zones, no recognition will be done. In Readiris there are 4 kinds of recognition zones. You have text zones, image zones, table zones and barcode zones.
Section 7: Editing the Recognition Zones Viewing the Recognition Zones Several viewing options are available allowing you to inspect the opened images and their recognition zones. Changing the View Size Click the Size icon on the Image and Layout Editing toolbar. Then select the required option. Note that you can also use keyboard shortcuts to apply these viewing options. Zooming in on images Click the Loupe icon on the Image and Layout Editing toolbar. Then move the Loupe over the image.
ReadirisTM 14 – User Guide Modifying the automatic Page Analysis Readiris divides documents into text, table and graphic recognition zones when the option Page Analysis has been activated. This automatic page analysis can be modified in several ways. For instance, you can expand and reduce zones in size, move zones to a different location, manually create new zones, change the zone type of existing zones, change the sort order, and so on.
Section 7: Editing the Recognition Zones Deleting zones Click the zone you want to delete. Or Cmd-click to select multiple zones. The entire zone(s) are now marked in their corresponding color. Then press the Backspace button on your keyboard. Deleting all zones On the Edit menu, click Delete All Zones. Deleting small zones On the Edit menu, click Delete Small Zones. All zones that are smaller than 50 pixels will be removed.
ReadirisTM 14 – User Guide Note that barcode zones must always be drawn manually. They are not created automatically by the Page Analysis feature. Changing the zone type Click the Layout icon to display the Layout tool. Click the zone type you want to create. On the right side of the tool, set the option to Click on existing zones to set as .... Then click the zones you want to change. Changing the sort order of zones Click the Layout icon to display the Layout tool. Click the Sort icon.
Section 7: Editing the Recognition Zones Click the Layout icon to display the Layout tool. Click the Text icon. Then draw a text zone that overlaps the two zones to connect them. The two zones are merged into one. Note that only zones of the same zone type can be connected. OR Close the Layout tool. Click a zone to select it. The entire zone is now marked in its corresponding color and the markers on the borders are displayed.
ReadirisTM 14 – User Guide Recognizing a particular area In case your document only contains content in a certain area of the page, you can use the Frame option to exclude the remainder of the page from the recognition. Click the Layout icon to display the Layout tool. Click the Frame icon. Then draw a frame around the section that contains the information. Everything outside the frame will be ignored.
Section 7: Editing the Recognition Zones USING ZONING TEMPLATES When you want to scan many similar looking documents, it might be useful to apply zoning templates, instead of editing the recognition zones each time. In a zoning template you indicate what your documents look like and where the text, picture or tables zones are located. This way, Readiris only looks in the indicated areas, saving you a considerable amount of time. To create a zoning template: Scan the first document.
ReadirisTM 14 – User Guide On the Layout menu, click Open Layout. Then, scan or open your documents in Readiris. The same layout is applied to all the documents you open. To stop using the template, re-activate Page Analysis again. Manually copying the zoning layout. It is also possible to manually copy the zoning layout from one page to another: Cmd-click the zones you want to copy to another page. Tip: make sure the Layout tool is closed. Otherwise, Cmd-click won't work.
ReadirisTM 14 – User Guide SECTION 8: SAVING DOCUMENTS SAVING DOCUMENTS The documents you process with Readiris can be saved in a large number of output formats, ranging from plain text files to fully formatted Word processing and Spreadsheet files, and PDF files. With Readiris you can also turn Image PDFs - in which you cannot select or copy any text - into fully text-searchable PDF documents. The output formats are displayed in the Format and Destination group.
Section 8: Saving Documents Below you find an overview of the supported output formats. PDF PDF stands for "Portable Document Format". It is a format developed by Adobe Systems Inc. to facilitate document exchange. PDF files are device-independent and resolutionindependent, and can be opened on any Operating System (Windows, Mac OS, Linux, iOS, Android, etc.) PDF files are mostly used for storage purposes. Note that the content of PDF files cannot be edited (easily).
ReadirisTM 14 – User Guide Note: many options are available for PDF files. Readiris can generate hyper-compressed PDF files, password-protected PDF files, PDF/A-compliant PDF files. See the section PDF Options for more information. Tip: with Readiris you can also turn Image PDFs into textsearchable PDFs. DOCX DOCX is the new standard text processor format used in Microsoft Word 2008 and 2011. It is a standard format in several applications on the Microsoft Windows operating systems.
Section 8: Saving Documents XLSX XLSX is the new standard spreadsheet file format in Microsoft Excel 2008 and 2011 and in iWork Numbers. XLSX files are created using the Open XML standard. Each cell in an XLSX file can have a different formatting. See the section Selecting the Layout Options for more information about the available layout options. HTML HTML stands for "Hypertext Markup Language". It is the predominant markup language for web pages.
ReadirisTM 14 – User Guide The following image file formats are supported as output: TIFF, PNG, Photoshop, JPEG, JPEG 2000 and Windows bitmap. For each of these output formats listed above, specific layout options are available. See the section Selecting the Layout Options for more information. Selecting the Destination of your documents The documents you process in Readiris can be saved to different destinations: you can save them as file.
Section 8: Saving Documents To select a destination: Click the down arrow right of the Format and Destination group, and select the format you want to add to the group. Example: Show DOCX export format. The corresponding button will be added to the toolbar. Double-click the required format on the Format and Destination group to access its options: Then select the destination of your choice.
ReadirisTM 14 – User Guide Note that the online Storage Systems must be configured correctly to be able to export. See the section Saving Documents to online Storage Systems for more information. When you are done, click OK to save the settings. Then click Save to export your documents. Starting a new project Click New on the top toolbar. This command erases your document from Readiris so you can start a new one.
Section 8: Saving Documents Then click the Accounts icon. Select the account you want to configure. Google Docs Preliminary note: you need a valid gmail account to do this configuration. Enter your User Name and Password, then click Sign in. Click Edit to specify to which Collection you want to export documents. To add a Google Docs account, click the + sign and enter your credentials.
ReadirisTM 14 – User Guide Click Select to specify to which Notebook you want to export documents. Dropbox Preliminary note: the Dropbox application must be installed on your computer and must be configured for your Dropbox account. Click Select to specify to which Storage Folder you want to export documents. When you are done, close the Preferences window. To save your documents to the configured Storage System: Double-click the required format in the Format and Destination group.
Section 8: Saving Documents The results are copied to the clipboard. You can now paste them into other applications. Note that you can also send content directly to Evernote, if the connection is configured correctly. SAVING DOCUMENTS AS IMAGE FILES Although Readiris is a text recognition application, it can also save documents as image files. The following image file formats are supported as output: TIFF, PNG, Photoshop, JPEG, JPEG 2000 and Windows bitmap.
ReadirisTM 14 – User Guide Then double-click the JPEG button to access the options. Select the destination to which you want to save the image files. Then click the Format list and select the required image format. When you are done, click OK to save the settings.
Section 8: Saving Documents Then click Save to export your documents. Other ways of saving documents as image files Ctrl-click a Graphic zone in your documents, and select Copy as Graphic. This command copies the image to the Clipboard. Drag a thumbnail from the Pages panel or Thumbnail view to the Desktop to save the entire page as JPEG image. SELECTING THE LAYOUT OPTIONS Depending on the output format you select in the Format and Destination group, different formatting options are available.
ReadirisTM 14 – User Guide Layout Options The Layout Options play an important role when generating Word processor documents (DOCX, ODT, RTF), Spreadsheet documents (XLSX) and Web page documents (HTML). They determine for a large part what your final documents will look like. Which layout options are available depends on the output format you select. When you select an image output format, such as PDF Image, or TIFF, for instance, these options are not available.
Section 8: Saving Documents PDF Options When generating PDF documents, only the specific PDF Options are available. These include bookmarking, iHQC-compression and password protection. See the sections PDF Options and PDF Passwords for more information. LAYOUT OPTIONS (TEXT DOCUMENTS) The Layout Options play an important role when generating Word processor documents (.docx, .rtf, .odt), Spreadsheet documents (.xlsx) and Web page documents (.htm).
ReadirisTM 14 – User Guide Example of body text The option Retain word and paragraph formatting keeps the general format structure of your scanned document. The font type, size and type style are maintained across the recognition process. The tabs and the alignment of each block are recreated. The text blocks and columns aren't recreated; the paragraphs just follow each other. Tables are recaptured correctly.
Section 8: Saving Documents The word and paragraph formatting are maintained. Hyperlinks are re-created too. Example of a re-created source document The option Use columns instead of frames creates columns instead of text frames to position the information on the page. o Columnized texts are easier to edit than documents containing multiple frames: the text flows naturally from one column to the next.
ReadirisTM 14 – User Guide o The option Add image as page background places the scanned image as page background beneath the recognized text. Note: this option increases the file size of the output files substantially. The format PDF Text-Image modifies PDF files in the same manner. To avoid the file increase discussed above, select the option Maintain colors of background. This provides a similar but less drastic, more compact alternative.
Section 8: Saving Documents Worksheet: The option Create one worksheet per page sees to it that one worksheet is created per scanned page. If a page contains tables and text, all is placed inside the same worksheet. The option Create one worksheet per table places each table in a separate worksheet and includes the recognized text (outside the tables) in another worksheet. If the document being processed contains more than one page, each page will be processed in the same manner.
ReadirisTM 14 – User Guide Example image The option Convert figures into numbers encodes recognized figures as numbers. As a result, you can execute arithmetical operations on those cells. The text cells (in any table) remain text. Note that only figures inside tables are encoded as numbers. The option Merge lines into paragraphs enables automatic paragraph detection. Readiris wordwraps the recognized text until a new paragraph starts, and reglues hyphenated words at the end of a line.
Section 8: Saving Documents SELECTING THE GRAPHICS OPTIONS The Graphics Options determine how the images will be presented in the output documents, e.g. in black-and-white or in color. They also define their resolution. Note: when you select an output format or application that does not support images, then the Graphics Options will be unavailable in Readiris. Below you find a description of what each option does. Color type Readiris saves graphics in their original depth by default.
ReadirisTM 14 – User Guide Resolution Readiris retains the original resolution by default. You can also choose to reduce the resolution to a lower dpi (between 50 and 300). Note that you cannot increase the resolution. PAGE SIZE In Readiris the page size of the documents you scan and open does not necessarily have to be the same as the page size of your output documents.
Section 8: Saving Documents Select Use input images size to generate output documents that have the exact same size as the original files. If you want to use a standard page size - in case you want to print your documents for instance - select Use first fitting size from standard size list. Then select your preferred page sizes. Now sort the selected page sizes in the order of your preference. Readiris tries to use the first page size in the list.
ReadirisTM 14 – User Guide PDF Type Select the PDF type from the Type list: Text. This file type contains the recognized text, but does not contain the original image of your document. Any images in the original document are included as graphics in the PDF file. Text-Image. This file type is the opposite of PDF Image-Text. It contains the original image in the background, and the recognized text on top of the image. Note: any recognition mistakes will be visible in this format. Image-Text.
Section 8: Saving Documents Image. When you select this file type, Readiris doesn't execute the text recognition on your document. Your PDF file will not be text-searchable, it only contains the image of your original document. Version In this drop-down list you can select which PDF version you want to generate. It takes Adobe Acrobat 5.0 and higher to open PDF 1.4 documents. It takes Adobe Acrobat 6.0 and higher to open PDF 1.5 documents. It takes Adobe Acrobat 7.0 and higher to open PDF 1.6 documents.
ReadirisTM 14 – User Guide Create bookmarks Bookmarks are types of links inside a PDF document, which contain representative information about the section they are linked to. Bookmarks give structure to your PDF documents. They are grouped in the Bookmarks panel in the Navigation pane. In Readiris, the option Create bookmarks creates a bookmark for each text zone, image zone and table zone inside a PDF file.
Section 8: Saving Documents Good size generates the smallest possible documents. Good quality generates slightly larger documents of higher quality. Custom (Readiris Corporate only) allows you to set the right balance between minimal size and maximal quality by means of the slider. PDF PASSWORDS (This section applies to Readiris Corporate only) The PDF documents you generate with Readiris can be passwordprotected.
ReadirisTM 14 – User Guide want to change these settings, you must enter the permissions password. The Readiris security settings are similar to the standard protection features offered by Adobe Acrobat. Note that in Readiris the open document password and permissions password must be different.
ReadirisTM 14 – User Guide SECTION 9: PROCESSING BATCHES OF DOCUMENTS BATCH PROCESSING (This section applies to Readiris Corporate only) When you are processing entire batches of image files you can use Readiris' Batch Processing folder. Batch Processing executes the recognition on all scanned images in a specific folder. Indicate to Readiris in which folder your documents are located, start the processing and all your documents will be converted to the required output format.
Section 9: Processing Batches of Documents Select an Image input folder. This is the folder to which you scan the documents. Select an Output format and destination. The configurations you apply in the Format and Destination group are available here. Tip: see the topic Saving Documents for more information. Select a Text output folder. This is the folder where your processed documents will be stored.
ReadirisTM 14 – User Guide If you want Readiris to overwrite existing output files in the Text output folder, select Overwrite text files. If you want Readiris to delete the original images from the Input after processing, select Delete images after processing. When you are done selecting the options, click OK for Readiris to start Batch processing the folder. Readiris processes the images of all supported file formats. You cannot limit the recognition to files of a specific file format.
Section 9: Processing Batches of Documents Select an Image input folder. This is the folder to which you scan the documents. Select an Output format and destination. The configurations you apply in the Format and Destination group are available here. Tip: see the topic Saving Documents for more information. Select a Text output folder. This is the folder where your processed documents will be stored.
ReadirisTM 14 – User Guide Watched Folder Options In case you want to process the underlying subfolders of the Watched Folder, select Process subfolders. If you want Readiris to overwrite existing output files in the Text output folder, select Overwrite text files. If you want Readiris to delete the original images from the Watched Folder after processing, select Delete images after processing. When you are done selecting the options, click OK for Readiris to start monitoring the Watched Folder.
ReadirisTM 14 – User Guide HOW TO HOW TO CONFIGURE YOUR SCANNER IN READIRIS Readiris supports all Twain 1.9 compliant scanners, all Image Capture compliant scanners, and all IRIScan scanners. Before you can use a scanner, however, its drivers need to be installed on your Mac. Image Capture scanners Connect your scanner to your Mac with a USB cable and power it on. You are asked to install or update the necessary software. Click Install to install the driver.
How To Install your scanner's Twain driver. In general, drivers can be found on the CD-ROM provided with your scanner and on the website of your scanner manufacturer. They are not provided by I.R.I.S. Note that some scanner drivers may not work under the latest versions of Mac OS. See the documentation supplied with your scanner to find out which platforms are supported. If necessary, contact your scanner manufacturer. IRIScan scanners Connect your *IRIScan scanner to your Mac and power it on.
ReadirisTM 14 – User Guide If your scanner is not listed, its driver has not been installed successfully. Note that the IRIScan settings at the bottom are only available if an IRIScan Express 2 scanner is connected. Once the scanner has been configured you can start scanning, using the default scanner settings. HOW TO RECOGNIZE BARCODES In Readiris Corporate you can also recognize barcodes.
How To Important note (Readiris Corporate only): Readiris automatically recognizes barcodes to separate documents in a batch, but the barcodes zones themselves are not recognized as barcodes. Recognizing barcodes manually Scan or Open your document. Click the Layout icon in the Image and Layout Editing toolbar. Then click the Barcode icon in the menu that appears, and draw a frame around the barcode zone. Close the Layout tool and process your document.
ReadirisTM 14 – User Guide Recognizing barcodes to separate document batches (This section applies to Readiris Corporate only) Barcodes can be used as separators to separate documents in a document batch. Readiris can automatically look for barcode pages and mark them as cover page, indicating the beginning of a new document. On the Settings menu click Document Separation and Indexing. Select Detect cover pages with a barcode. If necessary, indicate specific content Readiris should look for.
How To If the scanned documents are too bright, or too dark, Readiris will have trouble recognizing them. Luckily there is a feature that allows you to adjust the quality of scanned documents. See the section Adjusting the Image Quality to learn how to do so. the scanner settings If you are using a scanner to scan documents, the image quality is also linked to the scanner settings.
ReadirisTM 14 – User Guide If Readiris does not detect your image is a digital camera image: Ctrl-click the page thumbnail. Select Digital Camera Image. Deskewing Digital Camera Images When photographing documents with a digital camera, it may happen that the documents are shot from an angle, which gives them a 3D effect and renders the recognition impossible. To solve this issue, you can deskew your digital camera images: Open your digital camera image.
How To Drag the corners one by one in the direction of your text. Click Apply to deskew the image. Tips for making digital camera images Always select the highest image resolution. Enable the macro mode of the camera to take close-ups. Enable the document mode of the camera (if any) Only use optical zoom, not digital zoom. Hold the camera directly above the document. Avoid photographing documents at an angle. Produce stable images. Use a tripod if necessary.
ReadirisTM 14 – User Guide HOW TO SEPARATE DOCUMENT BATCHES (This section applies to Readiris Corporate only) When you are scanning entire stacks of paper - on a scanner equipped with a document feeder for instance - it can be useful to indicate where one document ends and another begins. That way, Readiris can generate a separate output file for each document. This avoids your having to scan only one document at a time. Example Let's say you're scanning a stack of 30 pages.
How To To access the document separation options: Click the Settings menu and click Document Separation and Indexing. Indicate which separation method you are going to use: Detect blank pages or Detect cover pages with a barcode. When you are using barcode pages as cover page, you can indicate specific data your barcodes should contain in order for Readiris to consider them to be barcode pages. Insert your company name for instance, I.R.I.S. in our case, in the field containing.
ReadirisTM 14 – User Guide In case you want Readiris to generate an XML index file containing detailed information on the processed documents, select the option Generate an XML index. An XML index file will be created per document. The index file contains detailed information such as the detected barcode separator, the page range, the output file name and the cover page text (if selected). To include the text of the cover pages in the XML index, select the corresponding option.
How To The page thumbnail in the Pages panel not displays the cover page icon. Note: in Thumbnail view, each cover page is put on a different line, to facilitate the overview. Click the Save button to process the documents.
ReadirisTM 14 – User Guide HOW TO SEPARATE BATCHES OF IMAGE FILES (This section applies to Readiris Corporate only) When you are processing batches of image files and don't want Readiris to convert them into a single output file, you can use cover pages to separate them. To do so: Import all the images you want to process. In the Pages panel, indicate at which page you want Readiris to start a new document: Select the page. Then Ctrl-click it and click Cover page.
How To On the Settings menu, click Document Processing and Indexing. Then select Recognize cover pages. HOW TO RECOGNIZE FORMS Note that Readiris is not designed to recognize complex forms. Readiris recognizes documents by converting pictures of text characters and numbers into actual text and numbers. Forms, on the other hand, contain many graphic elements such lines, boxes, check boxes and the like, which complicate Readiris tasks.
ReadirisTM 14 – User Guide HOW TO PROCESS LOW-RESOLUTION IMAGES A resolution of 300 to 400 dpi is required to obtain optimal results in Readiris. When you try to scan or open images of a resolution lower than 200 dpi or higher than 600 dpi, Readiris will display a warning. When you are faced with these kind of images, the best thing you can do is re-can the images in an appropriate resolution.
How To On the Readiris menu, click Preferences. Click the General tab. Select the option Process as 300 dpi. When this option is selected, Readiris treats the images as if they had a 300 dpi resolution. Tip 2 (Readiris Corporate only) Make sure that favor OCR accuracy over speed when processing low-quality documents: Click the language list on the top toolbar and select Other languages. Make sure the option Favour recognition accuracy over speed is selected.
ReadirisTM 14 – User Guide INDEX 3 300 dpi ............................ 21, 31 A C changing interface language .15 character pitch ......................50 accuracy vs. speed ................ 45 color image ...........................63 activation ................................ 8 color type ..............................98 adjusting image quality ........ 63 compression ........................100 Asian documents .................. 45 contrast .................................
Index Dropbox................................ 85 E editing zones......................... 69 Image Capture ......................16 image files ............................38 improving recognition results ............................................117 Evernote ............................... 85 indexing ..............................121 Excel output ................... 79, 95 installation ..............................7 F interactive learning ...............53 factory settings .....................
ReadirisTM 14 – User Guide P S page analysis .................. 31, 69 saving as image file ..............88 page deskewing .................... 31 saving settings ......................28 page orientation 31 scanner configuration .........113 page sizes ............................. 99 scanner settings.....................34 Pages panel ........................... 13 scanning documents .............34 password-protected PDF output.................................. 104 secondary languages ....
Index uninstalling Readiris ............ 11 updates.................................. 10 user interface ........................ 13 W watched folder ....................109 Z user interface language......... 15 zoning templates ...................76 user lexicons ......................... 57 zooming ................................