Scanner User Guide
Table of Contents Table of Contents Read this first................................................. 1 Important safety instructions ......................................1 Disclaimer ...................................................... 3 Copyright ....................................................... 3 Notes about copyrighted materials .............................3 Disposal of this product..............................................3 Introduction ..................................................
ii Table of Contents More information .......................................... 15 Suitable and unsuitable types of originals ..................15 Cropping on scanned images......................................15 Supported memory card types ....................................16 File naming and storage rules.....................................16 Care and maintenance .................................. 17 Cleaning the scanner ..................................................
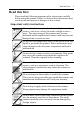
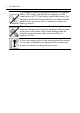
Read this first 1 Read this first Please read the following important safety instructions carefully before using this scanner. Failure to observe these instructions may result in personal injuries or damages to this scanner. Important safety instructions Do not place this scanner under direct sunlight or near heat sources, such as in a closed car under sunlight or near a stove.
2 Read this first This scanner contains a rechargeable built-in Li-Polymer battery. The battery should only be charged via USB connection to a PC. If the battery needs replacement, the operation should only be performed by an authorized and qualified service person. Do not attempt to replace the battery yourself.
Disclaimer 3 Disclaimer I.R.I.S. SA makes no representations or warranties, either expressed or implied, with respect to the contents of this publication. I.R.I.S. SA reserves the right to revise this publication and to make changes from time to time in the contents thereof without obligation to notify any person of such revision or changes. Copyright Copyright I.R.I.S. SA. All rights reserved.
4
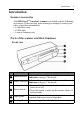
Introduction 5 Introduction Scanner accessories Your IRISCardTM Anywhere scanner is provided with the following accessories. If there are any items missing or damaged, contact your place of purchase immediately. • 1 calibration card • 1 USB cable • 1 sensor cleaning swab Parts of the scanner and their functions Front view No. Name 1 2 3 Function/description Status indicator Indicates the operating status of the scanner. See Indicators on page 7 for details. Indicates the power status of the scanner.
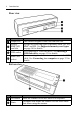
6 Introduction Rear view No. Name 1 2 Output slot SD/xD/ MMC/MS card slot 3 USB socket 4 Mini USB socket Function/description The scanned original comes out from this slot. Accepts the following types of memory cards: SD, xD, MMC and MS. See Supported memory card types on page 16 for details. For connecting a USB flash drive. See Inserting a USB flash drive on page 13 for details. For connecting the scanner to a computer via the USB cable. See Connecting to a computer on page 12 for details.
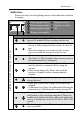
Introduction 7 Indicators Please see below for the lighting patterns of the indicators and their meanings. :Blinking green slowly :Steadily on green :Blinking green rapidly :Steadily on yellow :Blinking yellow slowly :Off :Blinking yellow rapidly Lighting patterns and their functional meanings Power Status Scanning current original. Please wait until the process is complete before scanning another one.
8 Using the scanner The battery power is extremely low. Please charge the battery immediately. The battery is being charged when scanner power is off. The battery is being charged when scanner power is on. Using the scanner Step 1: Preparation Peel off the tape that secures the paper guide. NOTE: This step is only required when you use the scanner for the first time. Step 2: Charging the battery You charge the battery by connecting the scanner to a computer. 1.
Using the scanner 9 Step 3: Inserting a memory card or connecting a USB flash drive Insert an unlocked (writable) memory card into the memory card slot, or connect a USB flash drive to the USB socket of the scanner. NOTE: • If both a USB flash drive and a memory card connected to the scanner, the scanner will only send the scanned image to the USB flash drive, as the USB flash drive has a higher file storage priority than the memory card. • The scanner only accepts FAT16 and FAT32 file systems.
10 Using the scanner Step 5: Making a scan 1. With the side to be scanned facing upward and in the correct orientation as indicated by the orientation mark, place one edge of the original on the scanner and adjust the paper guide so that the original is aligned with the left side of the feeding slot. Insert the original into the feeding slot. WARNING: Do not scan glossy photos in humid environments (humidity higher than 70% RH).
Using the scanner 11 NOTE: • Do not remove the memory card or USB flash drive (if connected) while the indicators are blinking. • A fully charged battery can sustain up to 150 scans of 4” x 6” size photos to the memory card. This is a factory test value for your reference, and actual battery performance may vary. • This scanner only supports output images in JPEG (.jpg) format, and the date/time attribute will not be added.
12 Connecting to a computer Connecting to a computer By connecting the scanner to a computer, you can access the scanned images on the memory card or use the scanner as a memory card reader, so that you can freely copy, paste or delete files using the computer. System requirements • Operating system: any operating system that supports USB mass storage (e.g. Windows, Mac, Linux, Unix, ...) • USB port supported: USB 1.1 and 2.0 Connecting the scanner 1.
Inserting a USB flash drive 13 6. To safely disconnect the scanner from the computer: For Windows users: a. On Windows System Tray, click the hardware removal icon as indicated below. Hardware removal icon b. Click to select the Safely remove USB Mass Storage Device option that appears. c. When the following message displays on-screen, you can safely remove your hard disk. d. Unplug the scanner from your computer. For Mac users: a. Click and drag the Volume icon to the Trash. b.
14 Inserting a USB flash drive 2. Refer to Step 4: Turning the scanner on on page 9 to turn on the scanner. The USB flash drive will be recognized by the scanner. NOTE: • If the USB flash drive contains multiple partitions, only the first partition will be recognized. • You can also connect the scanner to a computer to access the files on the USB flash drive. The USB flash drive will be recognized as a removable disk drive. 3. Refer to Step 5: Making a scan on page 10 to scan an original. 4.
More information 15 More information Suitable and unsuitable types of originals This scanner is designed to obtain the best scanning results for the following types of originals: • 3.5” x 5” and 4” x 6” photos • Business cards Do not use the following types of originals for scanning. Otherwise the scanner will malfunction, the original may become jammed in the slot or the image auto-cropping function will not work properly. • Photos/business cards thicker than 0.
16 More information Supported memory card types • MS (MemoryStick) • MS Pro • MS Pro Duo (adapter required) • MS Duo (adapter required) • MMC (MultiMediaCard) • RS-MMC (adapter required) • xD (extreme Digital, H-type and M-type) • SD (SecureDigital) • Mini SD (adapter required) • micro SD/T-Flash (adapter required) File naming and storage rules ....
Care and maintenance 17 Care and maintenance Cleaning the scanner In order to maintain the best image quality and prevent dust accumulation, clean the outer casing, image sensor and roller inside the scanner regularly (about every 50-100 scans, or whenever unwanted vertical/horizontal lines appear on scanned images). WARNING: When cleaning, use only the recommended and supplied tools. Do not use any tools other than those supplied to clean the image sensor inside the scanner.
18 Care and maintenance 3. Gently slide the sensor cleaning swab to the other end of the output slot. 4. Repeat step 3 five or six times consecutively. NOTE: Do not apply too much force on the swab. 5. Slide the sensor cleaning swab to the left end of the output slot, and then remove it from the slot. Store the sensor cleaning swab in a safe place and keep it away from dust.
Care and maintenance 19 Storing the scanner If the scanner will not be used for a long time, follow the instructions below to store the scanner for future use. 1. Disconnect the scanner from the computer. 2. Place the scanner and accessories in a box or bag to keep them from accumulating dust. 3. Place the box or bag in a cool and dry place where it is inaccessible to small children. After long-term storage, it is recommended that you clean and calibrate the scanner before use.
20 Troubleshooting Troubleshooting Problem: There are strange lines on the scanned image, or the image is not clear. Solution: Please ensure the following: • Are there scratches on the original, or is the original clean? Remove any stains or dust from the original before scanning. • Has the scanner been used for a long period of time without cleaning and calibration? Refer to Cleaning the scanner on page 17 and Calibrating the scanner on page 18 to clean and calibrate the scanner and then try again.
Troubleshooting 21 Problem: The scanner feels warm to the touch. Solution: It is normal for the scanner to emit a small amount of heat (around 30-45 C) after prolonged use. However, if there are strange odors coming out from the scanner or the scanner feels hot to the touch, disconnect the scanner immediately from the power supply or the computer/ digital photo frame. Problem: The scanner does not respond to any operations. Solution: An internal error may have occurred.
22 Specifications Specifications 300 dpi x 300 dpi (fixed) 24-bit 157.4 (L) x 43 (H) x 54.5 (D) mm Dimensions (approx. value) (scanner only) Weight (approx. value) 230g (scanner only) See Supported memory card types on Supported memory card types page 16 Supported output image format JPEG (.jpg) USB or compatible with the USB 2.