
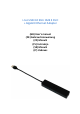
Datasheet


DRIVER INSTALLATION*
*The driver version is subject to change due to the driver updated.
Note: DO NOT connect the device to your computer before completing the installation of driver!
DRIVER INSTALLATION FOR ETHERNET PORT
Windows Operating System
Put the received CD into the CD/DVD driver. In the directory for the given OS Windows find
<Setup.exe> and start the installation by double-clicking on the file. Or you can download the
drivers on www.i-tec-europe.eu.
Wait for the program to install the drivers.
Click <Finish> to complete the installation.
Mac Operating System (backward compatible on USB 2.0)
Put the received CD into the CD/DVD driver. In the directory find *.dmg file and start the
installation by double-clicking on the file. Or you can download the drivers on www.i-tec-
europe.eu.
Wait for the program to install the drivers.
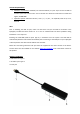
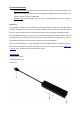
CONNECTION TO A NOTEBOOK / PC
Connect the USB cable to a USB port on your notebook / PC.
Then start the automatic installation of USB ports in various systems – it is recommended to be
connected to the Internet for online download of newer versions of drivers.
Restart your notebook / PC.
Connect the adapter to an available network when the installation procedure is completed.
Connect one end of the Ethernet cable into the RJ-45 port of the device and the other end into
an active element of your network - HUB, switch, router (preferably with Gigabit speeds for
maximum speed adapter). If necessary, restart your notebook / PC.
VERIFYING THE DRIVER FOR ETHERNET PORT
To verify the driver of the adapter, follow the steps below to open the Device Manager on
Windows®
Following the path as below to open the device manager
Windows® 10: Start / Device Manager