MANUAL DE USUARIO / USER MANUAL / MANUEL D’INSTALLATION / BENUTZERHANDBUCH ES EN FR DE organizador técnico de cables Technical organizer cable
índice /table of contents table des matières / Inhaltsverzeichnis Manual de Usuario ......................................03-08 ES User manual ......................................09-14 EN Manuel d’installation ......................................15-20 FR DE Montageanleitung ......................................21-26 características técnicas /technical specifications spécifications techniques /technische Spezifikationen Eléctrico Tipos de conexiones Tensión nominal: 230V a.c monofásico.
antes de comenzar ES before starting EN Instalador : Este producto debe ser instalado por un especialista cualificado. La instalación tiene que estar protegida con un magnetotérmico para proporcionar la protección contra sobrecarga, cortocircuitos y derivación a tierra. El no obedecer esta norma, puede ser peligroso. No desmontar el producto. Este producto debe utilizarse exclusivamente en instalaciones interiores. Installer : This product must be installed by a qualified specialist.
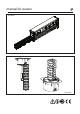
manual de usuario 01 1 A click 2 3 ES Unión de anillos La longitud standard del Orgatech es de 1m. Para conseguir la longitud deseada de la instalación, se pueden juntar varias tiras Orgatech hasta conseguir la distancia deseada. Para realizar la unión de los anillos, enfrentar el pivote macho con el pivote hembra y deslizar verticalmente como se muestra en la fig.1 hasta oír el clic de anclaje, lo que indica que la unión se ha realizado con éxito.
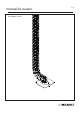
3-4 manual de usuario ES 05 Fijando los anillos Una vez instaladas las piezas de sujeción en la superficie, hay que hacer coincidir los agujeros de los anillos con los pivotes de las piezas de anclaje. Una vez hecho esto se presionan los anillos hasta que los pivotes queden introducidos en los agujeros de los anillos, se escuchara un clic. importante:los dos pivotes deben ser introducidos a la vez en los anillos.
manual de usuario ES Kit duplo Unit mesa Unit suelo
manual de usuario Intro pared Como bandeja pasacables 5-6
manual de usuario Columna ES Minicolumna
manual de usuario Con bajante a suelo 7-8
user manual 01 1 A ESEN Connecting rings To achieve the desired length of installation, you can connect several Orgatech strips until you reach the desired length. click 2 3 To connect the rings, place the male and female pivot bolts so that they are facing each other and slide vertically, as shown in diagram 1, until you hear the click of the clip, which indicates that they have been correctly connected.
9 - 10 user manual 05 Fixing the rings Once the clips have been fixed to the surface, line up the holes of the rings with the pivot bolts of the clip. Once you have done this, press the rings until the pivot bolts are inserted inside the holes of the rings; you will hear a click. Important: the two pivot bolts must be inserted into the rings at the same time. 06 07 08 Once you have inserted all of the rings in the respective pivot bolts of the clips, the system is fully installed.
user manual ESEN Duplo kit Table unit Floor unit
user manual 11- 12
user manual Column ESEN Minicolumn
user manual With downspout to the floor.
Manuel d´ installation 01 1 A Union des anneaux La longueur standard de la vertèbre Orgatech est de 80cm. Afin d’obtenir la longueur souhaitée au sein de son installation, plusieurs vertèbres Orgatech peuvent être unies jusqu’à obtenir la longueur désirée.
15 - 16 Manuel d´ installation 05 Fixation des anneaux Une fois les pièces de fixation installées sur la superficie, faites coïncider les trous des anneaux avec les pivots des pièces d’ancrage. Ensuite, exercez une pression sur les anneaux jusqu’à ce que les pivots soient correctement introduits dans leurs trous respectifs. Un « clic » nous indiquera le bon déroulement de l’opération. Important : Les pivots doivent être insérer en même temps que les anneaux.
Manuel d´ installation ESFR Kit duplo Unit mesa Unit suelo
Manuel d´ installation Intro pared Como bandeja pasacables 17 - 18
Manuel d´ installation Columna FR Minicolumna
Manuel d´ installation Con bajante a suelo 19 - 20
Benutzerhandbuch 01 1 A VERBINDEN DER KETTENGLIEDER Um die gewünschte Länge der Einheit zu erreichen, können Sie beliebig viele Kettenglieder miteinander verbinden.Um die Ringe miteinander zu verbinden, rasten Sie die an den Kettengliedern befindlichen Kugelgelenke in einander, bis Sie ein deutliches Klickgeräusch hören, so wie in Abb. 1 dargestellt.
21 - 22 Benutzerhandbuch 05 Nachdem alle Clips befestigt wurden, positionieren Sie die Kettenglieder über den Clips und rasten Sie diese ein, bis Sie ein deutliches Klickgeräusch hören. 06 Wichtig: Die zwei Befestigungszapfen der Ringe sollten immer gleichzeitig in die Clips eingerastet werden. 07 A Erzeugen von Abzweigungen Das System gestattet es, mehrfache Abzweigungen zu erzeugen, die für die Kabeldistribution ggf. erforderlich sind.
Benutzerhandbuch ESDE Kit duplo Tischeinheit Unit suelo
Benutzerhandbuch Wandmontage Kabelführung 23 - 24
Benutzerhandbuch Columna DE Minicolumna
Benutzerhandbuch Con bajante a suelo 25 - 26