info 580 Division Street Campbell CA, 95008 Phone (408) 538-2500 Fax (408) 538-2599 Copyright C) 1996 All rights reserved. No portion of this document may be reproduced without prior written authorization. The Info Technician Copyright 1994, 1995, 1996 All Rights Reserved The material in this document is for informational purposes only and is subject to change without notice.
Tbble of Contents Chapter I Intr oduction Introduction welcome Using this manual Assistance ................................................................................... 1-1 What is TWAIN? ......................................................................... 1-2 A note about application software ................................. 1-2 Package contents System requirements PC and compatibles system requirements 1-4 Mac and compatibles system requirements 1-4 Chapter 2 Scanner Installation ............
Chapter I introduction welcome Thank you for purchasing an Info ImageReader Scanner. This product is the result of our efforts to develop high technology computer peripherals that are easy to use, affordably priced, and that enhance your computing experience. Using this manual This manual includes complete instructions for scanner installation, use, and maintenance. Note that “use,” in this context, refers to scanner operation independent of tasks performed in conjunction witl application software.
Wha AIN? hatt is TW TWAIN? TWAIN is the interface that links the scanner with scanning software applications. -TWAIN is an industry standard that enables you to use the ImageReader with any TWAIN-compliant software application. With the introduction of Windows 95, the TWAIN specification bat been overhauled to take advantage of the 32-bit architecture. When you install our scanner driver under Windows 95, you will have two TWAIN sources - one for 16-bit applications and one for 32-bit applications.
ability to scan text, it is not designed to specifically identify individual characters as does OCR software. Any image scanned using a graphics program can only be saved in a graphics file format. It cannot be saved as an editable text file. OCR: Software in this category is designed to recognize alphanumeric characters in preparation for export to word processing and desktop publishing applications. In other terms, it creates text files. OCR software will not provide image editing capabilities.
When you are scanning with the TWAIN interface, the number labeled image size (calculated in bytes) provides the working file size that is the result of the selected scanning mode, resolution, and image size. Take careful note of this information. equir ements PC and compa tib les system rrequir compatib tibles equirements 386,processororlOO%co patible;486orhigherrecommended MS DOS 5. 0 or later with Windows 3.
Chapter 2 Scanner Installation PC and compatibles installation Installation of the scanner is comprised of few steps and designed to be as easy as possible. The following instructions walk you through installing the interface card into your PC, and connecting the scanner and cable. It is important to note that both the scanning hardware and its supporting software (e.g. Info Technician and the included applications) must be installed in order for the scanner to operate.
4. Use the slot cover’s screw to retain the interface card. Replace the housing and secure all screws. 5. Reconne t the power source to your computer and any other peripheral equipment., Connecting the scanner If you have other SCSI devices installed on your system, set the scanner to a unique SCSI ID. Attach the 50-pin SCSI terminator block to the port on the scanner, and connect the SCSI cable to the terminator block.
Installing the de vice dr device driiver Run the Info Technician to install the scanner drivers. To do so: 1 . Insert disk 1 of the Info Technician into the computer’s floppy drive. 2.In Windows Program Manager, select the Run command from he File menu. If you are using Windows 95, select Run from the Start menu on the desktop. 3. Type A:\SETUP at the command line and click OK. Substitute the appropriate drive letter if the disk is not in the A drive. 4. Follow the on screen directions.
before you turn it on for the first time. Failure to do so may cause damage to the scanner, and will void your warranty. Simply turn the dial on the bottom of the scanner to the unlock position. Turn on the scanner, then start-up your system. Installing the dr driiver This scanner interfaces with your Mac software through a Plug-in driver. You can use this scanner with any program that is Plug-in Module (PIM) compatible. To install the Plug-in driver: 1 . Insert the Plug-in disk into the floppy drive. 2.
Chapter 3 Using your scanner Scanning ffea ea tur es and contr ols eatur tures controls Before scanning images, it is important to understand the scanners basic hardware features as well as the software controls. Har dwar ea tur es Hard aree ffea eatur tures Power This scanner requires its own power source (use the cable provided), and there is an on/off power switch on the unit. Always turn the scanner on before you turn the computer on. This allows the computer to “see” the scanner when it is booting up.
Paper condition If the sheet to be scanned has any of the following conditions, please take the following precautions before scanIning. · * · Remove paper clips, pins or staples Let wet paper dry first Avoid scanning documents with correction fluid (dry or otherwis This avoids scratching or marring the scanning glass, and ensures years of beautiful scans. Softw ar ols Softwar aree contr controls The Info Technician loads a TWAIN-compliant driver.
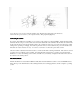
Pr w Windo w Preevie view indow The interface window’s right side displays Prescan images. The Crop Box around the perimeter is used to select the area you want to scan. Position the pointer over a square, click, hold, and drag the border to adjust the scanning area. The slider bar on the vertical ruler is also a convenient tool. This slider tells the scanner how far down the page to scan. You can shorten the time it takes to prescan by adjusting this slider to 11" when scanning letter size documents.
Z On-line graphics: If you are scanning an image to be used orim-line, such as the Internet, a BBS or in a multimedia presentation, you ne,odn’t scan any higher than 100 dpi. This is because a monitor’s resolution is either 72 dpi (Mac), or 96 or 120 dpi (PC), and is not capable of displaying a higher resolution. Images scanned at 300 dpi and viewed on a monitor will appear three times as large as the actual image.
Flip This command creates a mirror image of the item scanned. In ver se Inv erse This command reverses an image’s display. Black pixels will be white, and white pixels will become black. The resulting image is like a photo negative of the original. Brightness and Contrast These controls adjust the brightness and contrast of the image you are about to scan. Increasing the contrast will sharpen the image, but cause it to look dark.
numbers. This will produce an image with greater clarity. If you wish to expand one part of the histogram, rike where there are a large grouping of pixels, move the middle triangle toward that part. Since there are always 128 channels between the middle triangle and the end point triangles, adjusting them closer together gives the pixels in that region more channels to work with, and maximize the detail captured.
Bac kg Backg kgrround (Mac) Check this box to enable scanning in the backgroud while you do other work. This mimics true multitasking, however scanning speed is slowed considerably. w Pr Preegcan Vie iew Check this item to restore the prescan image to its unaltered appearance with out resetting the image adjustments. Original Scan Media Select which media you are scanning. Reflective is pieces like photographs, documents, magazines, etc., and indicates items will be placed on the scanning glass.
Zoom The scanner zooms in on the portion of the image selected with the crop box, and displays the enlarged area in the Prescan window. This enables you to select a smaller portion of the image to scan, while giving you the ability to focus in on the detail you want to capture. Click the Prescan View checkbox to restore the image in the Prescan window. Setup Opens the SCSI diagnostic table so you can check or change the configuration of your scanner.
Windo ws 95 or la ter indows later Select either Info Scanner or Info Scanner (TWAIN-32) from the Source list, depending on what type of application you are scanning into. Note: If you are using a 16-’blt 6ppfld@tioh, and-select info Scanner (TWAIN32) as your source, you may get a TWAIN error and not be able to scan. Be sure to select the correct source to use with 32-bit applications and 16-bit applications. Refer to Coqpter 1, What is TWAIN for more information, 4. Click OK.
5. When you are satisfied with the selected settings, click Scan. The image is scanned using the selected settings, and transf erred into the application’s workspace. 6. Click Cancel to close the scanning interface window. You are returned to the application, and the scanned image is displayed in the workspace. You may now manipulate, save, print, or fax the image. Other scanning ffea ea tur es eatur tures Your ImageReader scanner is capable of scanning all types of documents and images.
Appendix A Troub leshooting oubleshootin Scanner mak es a loud hen tur ned on makes loud,, ggrrinding noise w when turned Confirm that you have unlocked the scanner. The dial on the bottom of the scanner locks and unlocks the scanning mechanism for transport. No scanner is displa yed on m y SCSI cchain hain ta ble my tab display Verify that your SCSI chain is properly terminated on both ends. Check the SCSI cable, terminator and connections by disconnecting them and reattaching them.
For PC and compa tib les onl y compatib tibles only When scanning is initiated, a blank SCSI table displays Click the Check button to verify the system sees the scanner. If the table remains blank, shut down your system, including the scanner, When the entire system is powered down, turn on the scanner first, wait a couple of seconds, then restart your system. Open the SCSI diagnostic table and see if the scanner is displayed. If it does, your system is working properly and you can now scan.
Scanner car caree Info ImageReader scanners are designed to provide years of trouble free service. To assist in realizing this end, follow the guidelines listed below. 1. Keep the scanner as dust free as possible. Dust particles are a scanner’s worst enemy. 2. If necessary, clean the scanner glas’s with a soft lens cloth. 3. Do not scan documents with correction fluid. This will cause spotting on the scanner glass. 4. Do not scan documents with paper clips or staples. The lens may become scratched. 5. .
Limited tw o yyear ear w ar two war arrranty Info warrants this scanner to be free of manufacturing defects, both materials and workmanship, for a period of two years from the date of original purchase. This warranty applies only to the original purchaser. In the event of a defect, Info will repair this product free of charge, including parts, labor, and return postage.
FCC rradio adio fr equenc y interf er ence sta tement frequenc equency interfer erence statement This equipment has been tested and found to comply with the limits for a Class B digital device, pursuant to Part 15 of the FCC rules.