Business Audio Speaker User's Guide OPTIONS by IBM
Note: If you are using this product in the United States, Canada, or Puerto Rico, be sure to read the information under Appendix B, “Product Warranty” on page 2-3 before using this information and the product it supports. For all other countries, the warranty terms and conditions applicable in the country of purchase are available from IBM or your reseller.
Contents Product Registration About This Book . . . . . . . . . . . . . . . . . . . . . . iv . . . . . . . . . . . . . . . . . . . . . . . . Part 1: Quick Installation Guide Part 2: Appendixes v . . . . . . . . . . . . . . . . . . . . . . . . . . . . . . . . . . . . . . . . . . . . . . . . 1-1 . . . . . . . . . . . . . . . . . . . . . . . . . . . . . . . . . . . . . . . . . . . . . . . . . . . . . . . . . 2-1 Appendix A. Help and Service Information Step 1: Problem Solving . . . . . . . . . .
Product Registration Thank you for purchasing OPTIONS by IBM. Please take a few moments to register your product and provide us with information that will help IBM to better serve you in the future. Your feedback is valuable to us in developing products and services that are important to you, as well as in developing better ways to communicate with you. Register your option on the IBM Web site at: http://www.pc.ibm.
About This Book This book contains installation and usage instructions for the Business Audio Speaker, and includes the following parts: Part one contains installation instructions in the following languages: English German French Spanish Japanese Italian Brazilian Portuguese Part two contains help and service information, the product warranty, notices, and trademarks. Note: The illustrations in this manual might be slightly different from your hardware.
vi Business Audio Speaker
Part 1: Quick Installation Guide In addition to this manual, your option package includes: Product Description The Business Audio Speaker is a monaural (non-stereo) accessory speaker that you can attach to the side of some IBM monitors with the included accessory mounting bar. The accessory bar comes in three parts and is adjustable to fit a wide range of monitor sizes. The speaker also has two headphone jacks and a pass-through microphone input jack.
Installation Instructions Refer to the following illustration as you read the instructions for installing and using the speaker. .1/ Volume control knob .2/ Microphone jack .3/ Headphone jack 1 .4/ Headphone jack 2 .
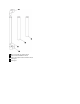
Installing the Business Audio Speaker Assembling the Mounting Bar Before installing the speaker, assemble the accessory mounting bar which will fit onto your monitor. Refer to the following illustration in order to locate the accessory bar and determine which pieces to put together in order to fit your monitor. When you have located the piece which fits your monitor size, assemble the bar by firmly pushing the endpieces into the ends of the bar.
1 2 3 4 5 Piece used with 17 inch monitors Piece used with G52S monitors Piece used with 14 and 15 inch monitors End piece End piece
Attaching the Speaker to the Monitor To install the Business Audio Speaker, follow these steps. 1. First, attach the mounting bar to either side of the monitor. This is done by pressing the elbow-shaped endpieces into the indentions which are on the sides of your monitor. 2. Next, mount the speaker on the bar using the mounting clips. Press the speaker's mounting clips onto the accessory bar until they snap into place. Make sure that the accessory bar stays firmly attached to the monitor. 3.
Using the Business Audio Speaker You can mount the accessory bar and speaker on either the left or right side of your monitor. The volume control for the speaker is always on the outside of the speaker, whether you mount the speaker on the left or right. Refer to the illustration on page 1-2 in order to locate the features described in this section. Listening to Audio Output There are two headphone jacks on the speaker .3/, .4/. Plug headphones into headphone jack “1” .3/ to mute the speaker.
Using the Business Audio Speaker On Your Desktop The speaker can be used without attaching it to your monitor. To use it as a stand-alone desktop speaker, you may want to remove the mounting clips from the side of the speaker. To detach the mounting clips, follow the steps below. To re-attach them, perform the actions shown in illustration 1, then the actions shown in illustration 2. 1. Firmly grasp the clip, which should be in the position shown in illustration 2 below. 2.
Quick Installation (German) Product Description The Business Audio Speaker is a monaural (non-stereo) accessory speaker that you can attach to the side of some IBM monitors with the included accessory mounting bar. The accessory bar comes in three parts and is adjustable to fit a wide range of monitor sizes. The speaker also has two headphone jacks and a pass-through microphone input jack.
Installation Instructions Refer to the following illustration as you read the instructions for installing and using the speaker. .1/ Volume control knob .2/ Microphone jack .3/ Headphone jack 1 .4/ Headphone jack 2 .
Installing the Business Audio Speaker Assembling the Mounting Bar Before installing the speaker, assemble the accessory mounting bar which will fit onto your monitor. Refer to the following illustration in order to locate the accessory bar and determine which pieces to put together in order to fit your monitor. When you have located the piece which fits your monitor size, assemble the bar by firmly pushing the endpieces into the ends of the bar.
.1/ Use this piece with 17 in. monitors .2/ Use this piece with G52S monitors .3/ Use this piece with 14 and 15 in. monitors .
Attaching the Speaker to the Monitor To install the Business Audio Speaker, follow these steps. 1. First, attach the mounting bar to either side of the monitor. This is done by pressing the elbow-shaped endpieces into the indentions which are on the sides of your monitor. 2. Next, mount the speaker on the bar using the mounting clips. Press the speaker's mounting clips onto the accessory bar until they snap into place. Make sure that the accessory bar stays firmly attached to the monitor. 3.
Using the Business Audio Speaker You can mount the accessory bar and speaker on either the left or right side of your monitor. The volume control for the speaker is always on the outside of the speaker, whether you mount the speaker on the left or right. Refer to the illustration on page 1-9 in order to locate the features described in this section. Listening to Audio Output There are two headphone jacks on the speaker .3/, .4/. Plug headphones into headphone jack “1” .3/ to mute the speaker.
Using the Business Audio Speaker On Your Desktop The speaker can be used without attaching it to your monitor. To use it as a stand-alone desktop speaker, you may want to remove the mounting clips from the side of the speaker. To detach the mounting clips, follow the steps below. To re-attach them, perform the actions shown in illustration 1, then the actions shown in illustration 2. 1. Firmly grasp the clip, which should be in the position shown in illustration 2 below. 2.
Product Registration Thank you for purchasing OPTIONS by IBM. Please take a few moments to register your product and provide us with information that will help IBM to better serve you in the future. Your feedback is valuable to us in developing products and services that are important to you, as well as in developing better ways to communicate with you. Register your option on the IBM Web site at: http://www.pc.ibm.
Quick Installation (French) Product Description The Business Audio Speaker is a monaural (non-stereo) accessory speaker that you can attach to the side of some IBM monitors with the included accessory mounting bar. The accessory bar comes in three parts and is adjustable to fit a wide range of monitor sizes. The speaker also has two headphone jacks and a pass-through microphone input jack.
Installation Instructions Refer to the following illustration as you read the instructions for installing and using the speaker. .1/ Volume control knob .2/ Microphone jack .3/ Headphone jack 1 .4/ Headphone jack 2 .
Installing the Business Audio Speaker Assembling the Mounting Bar Before installing the speaker, assemble the accessory mounting bar which will fit onto your monitor. Refer to the following illustration in order to locate the accessory bar and determine which pieces to put together in order to fit your monitor. When you have located the piece which fits your monitor size, assemble the bar by firmly pushing the endpieces into the ends of the bar.
.1/ Use this piece with 17 in. monitors .2/ Use this piece with G52S monitors .3/ Use this piece with 14 and 15 in. monitors .
Attaching the Speaker to the Monitor To install the Business Audio Speaker, follow these steps. 1. First, attach the mounting bar to either side of the monitor. This is done by pressing the elbow-shaped endpieces into the indentions which are on the sides of your monitor. 2. Next, mount the speaker on the bar using the mounting clips. Press the speaker's mounting clips onto the accessory bar until they snap into place. Make sure that the accessory bar stays firmly attached to the monitor. 3.
Using the Business Audio Speaker You can mount the accessory bar and speaker on either the left or right side of your monitor. The volume control for the speaker is always on the outside of the speaker, whether you mount the speaker on the left or right. Refer to the illustration on page 1-17 in order to locate the features described in this section. Listening to Audio Output There are two headphone jacks on the speaker .3/, .4/. Plug headphones into headphone jack “1” .3/ to mute the speaker.
Using the Business Audio Speaker On Your Desktop The speaker can be used without attaching it to your monitor. To use it as a stand-alone desktop speaker, you may want to remove the mounting clips from the side of the speaker. To detach the mounting clips, follow the steps below. To re-attach them, perform the actions shown in illustration 1, then the actions shown in illustration 2. 1. Firmly grasp the clip, which should be in the position shown in illustration 2 below. 2.
Product Registration Thank you for purchasing OPTIONS by IBM. Please take a few moments to register your product and provide us with information that will help IBM to better serve you in the future. Your feedback is valuable to us in developing products and services that are important to you, as well as in developing better ways to communicate with you. Register your option on the IBM Web site at: http://www.pc.ibm.
Quick Installation (Spanish) Product Description The Business Audio Speaker is a monaural (non-stereo) accessory speaker that you can attach to the side of some IBM monitors with the included accessory mounting bar. The accessory bar comes in three parts and is adjustable to fit a wide range of monitor sizes. The speaker also has two headphone jacks and a pass-through microphone input jack.
Installation Instructions Refer to the following illustration as you read the instructions for installing and using the speaker. .1/ Volume control knob .2/ Microphone jack .3/ Headphone jack 1 .4/ Headphone jack 2 .
Installing the Business Audio Speaker Assembling the Mounting Bar Before installing the speaker, assemble the accessory mounting bar which will fit onto your monitor. Refer to the following illustration in order to locate the accessory bar and determine which pieces to put together in order to fit your monitor. When you have located the piece which fits your monitor size, assemble the bar by firmly pushing the endpieces into the ends of the bar.
.1/ Use this piece with 17 in. monitors .2/ Use this piece with G52S monitors .3/ Use this piece with 14 and 15 in. monitors .
Attaching the Speaker to the Monitor To install the Business Audio Speaker, follow these steps. 1. First, attach the mounting bar to either side of the monitor. This is done by pressing the elbow-shaped endpieces into the indentions which are on the sides of your monitor. 2. Next, mount the speaker on the bar using the mounting clips. Press the speaker's mounting clips onto the accessory bar until they snap into place. Make sure that the accessory bar stays firmly attached to the monitor. 3.
Using the Business Audio Speaker You can mount the accessory bar and speaker on either the left or right side of your monitor. The volume control for the speaker is always on the outside of the speaker, whether you mount the speaker on the left or right. Refer to the illustration on page 1-25 in order to locate the features described in this section. Listening to Audio Output There are two headphone jacks on the speaker .3/, .4/. Plug headphones into headphone jack “1” .3/ to mute the speaker.
Using the Business Audio Speaker On Your Desktop The speaker can be used without attaching it to your monitor. To use it as a stand-alone desktop speaker, you may want to remove the mounting clips from the side of the speaker. To detach the mounting clips, follow the steps below. To re-attach them, perform the actions shown in illustration 1, then the actions shown in illustration 2. 1. Firmly grasp the clip, which should be in the position shown in illustration 2 below. 2.
Product Registration Thank you for purchasing OPTIONS by IBM. Please take a few moments to register your product and provide us with information that will help IBM to better serve you in the future. Your feedback is valuable to us in developing products and services that are important to you, as well as in developing better ways to communicate with you. Register your option on the IBM Web site at: http://www.pc.ibm.
Quick Installation (Japanese) Product Description The Business Audio Speaker is a monaural (non-stereo) accessory speaker that you can attach to the side of some IBM monitors with the included accessory mounting bar. The accessory bar comes in three parts and is adjustable to fit a wide range of monitor sizes. The speaker also has two headphone jacks and a pass-through microphone input jack.
Installation Instructions Refer to the following illustration as you read the instructions for installing and using the speaker. .1/ Volume control knob .2/ Microphone jack .3/ Headphone jack 1 .4/ Headphone jack 2 .
Installing the Business Audio Speaker Assembling the Mounting Bar Before installing the speaker, assemble the accessory mounting bar which will fit onto your monitor. Refer to the following illustration in order to locate the accessory bar and determine which pieces to put together in order to fit your monitor. When you have located the piece which fits your monitor size, assemble the bar by firmly pushing the endpieces into the ends of the bar.
.1/ Use this piece with 17 in. monitors .2/ Use this piece with G52S monitors .3/ Use this piece with 14 and 15 in. monitors .
Attaching the Speaker to the Monitor To install the Business Audio Speaker, follow these steps. 1. First, attach the mounting bar to either side of the monitor. This is done by pressing the elbow-shaped endpieces into the indentions which are on the sides of your monitor. 2. Next, mount the speaker on the bar using the mounting clips. Press the speaker's mounting clips onto the accessory bar until they snap into place. Make sure that the accessory bar stays firmly attached to the monitor. 3.
Using the Business Audio Speaker You can mount the accessory bar and speaker on either the left or right side of your monitor. The volume control for the speaker is always on the outside of the speaker, whether you mount the speaker on the left or right. Refer to the illustration on page 1-33 in order to locate the features described in this section. Listening to Audio Output There are two headphone jacks on the speaker .3/, .4/. Plug headphones into headphone jack “1” .3/ to mute the speaker.
Using the Business Audio Speaker On Your Desktop The speaker can be used without attaching it to your monitor. To use it as a stand-alone desktop speaker, you may want to remove the mounting clips from the side of the speaker. To detach the mounting clips, follow the steps below. To re-attach them, perform the actions shown in illustration 1, then the actions shown in illustration 2. 1. Firmly grasp the clip, which should be in the position shown in illustration 2 below. 2.
Product Registration Thank you for purchasing OPTIONS by IBM. Please take a few moments to register your product and provide us with information that will help IBM to better serve you in the future. Your feedback is valuable to us in developing products and services that are important to you, as well as in developing better ways to communicate with you. Register your option on the IBM Web site at: http://www.pc.ibm.
In addition to this manual, your option package includes: Quick Installation (Italian) Product Description The Business Audio Speaker is a monaural (non-stereo) accessory speaker that you can attach to the side of some IBM monitors with the included accessory mounting bar. The accessory bar comes in three parts and is adjustable to fit a wide range of monitor sizes. The speaker also has two headphone jacks and a pass-through microphone input jack.
Installation Instructions Refer to the following illustration as you read the instructions for installing and using the speaker. .1/ Volume control knob .2/ Microphone jack .3/ Headphone jack 1 .4/ Headphone jack 2 .
Installing the Business Audio Speaker Assembling the Mounting Bar Before installing the speaker, assemble the accessory mounting bar which will fit onto your monitor. Refer to the following illustration in order to locate the accessory bar and determine which pieces to put together in order to fit your monitor. When you have located the piece which fits your monitor size, assemble the bar by firmly pushing the endpieces into the ends of the bar.
.1/ Use this piece with 17 in. monitors .2/ Use this piece with G52S monitors .3/ Use this piece with 14 and 15 in. monitors .
Attaching the Speaker to the Monitor To install the Business Audio Speaker, follow these steps. 1. First, attach the mounting bar to either side of the monitor. This is done by pressing the elbow-shaped endpieces into the indentions which are on the sides of your monitor. 2. Next, mount the speaker on the bar using the mounting clips. Press the speaker's mounting clips onto the accessory bar until they snap into place. Make sure that the accessory bar stays firmly attached to the monitor. 3.
Using the Business Audio Speaker You can mount the accessory bar and speaker on either the left or right side of your monitor. The volume control for the speaker is always on the outside of the speaker, whether you mount the speaker on the left or right. Refer to the illustration on page 1-41 in order to locate the features described in this section. Listening to Audio Output There are two headphone jacks on the speaker .3/, .4/. Plug headphones into headphone jack “1” .3/ to mute the speaker.
Using the Business Audio Speaker On Your Desktop The speaker can be used without attaching it to your monitor. To use it as a stand-alone desktop speaker, you may want to remove the mounting clips from the side of the speaker. To detach the mounting clips, follow the steps below. To re-attach them, perform the actions shown in illustration 1, then the actions shown in illustration 2. 1. Firmly grasp the clip, which should be in the position shown in illustration 2 below. 2.
Product Registration Thank you for purchasing OPTIONS by IBM. Please take a few moments to register your product and provide us with information that will help IBM to better serve you in the future. Your feedback is valuable to us in developing products and services that are important to you, as well as in developing better ways to communicate with you. Register your option on the IBM Web site at: http://www.pc.ibm.
Quick Installation (B.Port.) Product Description The Business Audio Speaker is a monaural (non-stereo) accessory speaker that you can attach to the side of some IBM monitors with the included accessory mounting bar. The accessory bar comes in three parts and is adjustable to fit a wide range of monitor sizes. The speaker also has two headphone jacks and a pass-through microphone input jack.
Installation Instructions Refer to the following illustration as you read the instructions for installing and using the speaker. .1/ Volume control knob .2/ Microphone jack .3/ Headphone jack 1 .4/ Headphone jack 2 .
Installing the Business Audio Speaker Assembling the Mounting Bar Before installing the speaker, assemble the accessory mounting bar which will fit onto your monitor. Refer to the following illustration in order to locate the accessory bar and determine which pieces to put together in order to fit your monitor. When you have located the piece which fits your monitor size, assemble the bar by firmly pushing the endpieces into the ends of the bar.
.1/ Use this piece with 17 in. monitors .2/ Use this piece with G52S monitors .3/ Use this piece with 14 and 15 in. monitors .
Attaching the Speaker to the Monitor To install the Business Audio Speaker, follow these steps. 1. First, attach the mounting bar to either side of the monitor. This is done by pressing the elbow-shaped endpieces into the indentions which are on the sides of your monitor. 2. Next, mount the speaker on the bar using the mounting clips. Press the speaker's mounting clips onto the accessory bar until they snap into place. Make sure that the accessory bar stays firmly attached to the monitor. 3.
Using the Business Audio Speaker You can mount the accessory bar and speaker on either the left or right side of your monitor. The volume control for the speaker is always on the outside of the speaker, whether you mount the speaker on the left or right. Refer to the illustration on page 1-49 in order to locate the features described in this section. Listening to Audio Output There are two headphone jacks on the speaker .3/, .4/. Plug headphones into headphone jack “1” .3/ to mute the speaker.
Using the Business Audio Speaker On Your Desktop The speaker can be used without attaching it to your monitor. To use it as a stand-alone desktop speaker, you may want to remove the mounting clips from the side of the speaker. To detach the mounting clips, follow the steps below. To re-attach them, perform the actions shown in illustration 1, then the actions shown in illustration 2. 1. Firmly grasp the clip, which should be in the position shown in illustration 2 below. 2.
Product Registration Thank you for purchasing OPTIONS by IBM. Please take a few moments to register your product and provide us with information that will help IBM to better serve you in the future. Your feedback is valuable to us in developing products and services that are important to you, as well as in developing better ways to communicate with you. Register your option on the IBM Web site at: http://www.pc.ibm.
56 Business Audio Speaker
Part 2: Appendixes Copyright IBM Corp.
Appendix A. Help and Service Information During the warranty period, you can get toll-free technical support 24 hours a day, 7 days a week, to answer any questions about your new IBM option. If you need warranty service, return or exchange is available. In addition, if your IBM option is installed in an IBM computer, you might be entitled to service at your location. Your technical support representative can help you determine the best alternative.
the number is not provided, contact your IBM reseller or IBM marketing representative. Appendix B. Product Warranty Support 24 hours a day, 7 days a week Canada 1-800-565-3344 U.S.A. / Puerto Rico 1-800-772-2227 Additional Technical Support Resources Online technical support is available during the life of your product. Online assistance can be obtained through the IBM PSG Automated Fax System, the PSG Web page, and the PSG Electronic Bulletin Board System.
installed. Regardless of the Machine's production status, IBM's warranty terms apply. The IBM Warranty for Machines IBM warrants that each Machine 1) is free from defects in materials and workmanship and 2) conforms to IBM's Official Published Specifications. The warranty period for a Machine is a specified, fixed period commencing on its Date of Installation. The date on your receipt is the Date of Installation, unless IBM or your reseller informs you otherwise.
IBM does not warrant uninterrupted or error-free operation of a Machine. The warranties may be voided by misuse, accident, modification, unsuitable physical or operating environment, improper maintenance by you, removal or alteration of Machine or parts identification labels, or failure caused by a product for which IBM is not responsible.
Appendix C. Notices Appendix D. Trademarks References in this publication to IBM products, programs, or services do not imply that IBM intends to make these available in all countries in which IBM operates. Any reference to an IBM product, program, or service is not intended to state or imply that only that IBM product, program, or service may be used.
IBM Part Number: 05L1596 Printed in U.S.A.