
Datasheet


{ The hardware test runs for about 1 minute. During that time, proper operation of the cartridge load/unload
mechanism is verified, and a static test is performed on the drive's electrical components.
{ The write/read test runs for about 3 minutes.
Interpreting the Test Results:
6. Test Passed:
When self-testing has completed successfully and no problems were detected, the cartridge is unloaded from the drive
and all LEDs are off. Proper function of both the drive and tape cartridge have been verified.
Note: When the yellow Fault LED ( ! ) remains on and ›C› is displayed, it indicates that self-testing has completed
successfully -- but cleaning is required. Clean the drive by inserting an IBM Cleaning Cartridge (P/N 35L2086). The
drive is no longer in diagnostic mode, and has been returned to normal operation.
7. Drive Failure:
When a drive problem is detected, the cartridge will remain loaded inside the drive and the yellow Fault LED ( ! ) will
flash and "5" is displayed. Replace the tape drive.
8. Media Failure:
When a media problem is detected, the cartridge will remain loaded inside the drive, the yellow Fault LED ( ! ) will
remain on, and "7" is displayed. Repeat self-test using another tape cartridge, and replace the defective media.
9. Incorrect Cartridge:
When the drive has determined that an incorrect tape cartridge was inserted, the cartridge is unloaded, the Fault LED
( ! ) will remain on, and "P", "7" or "J" is displayed. Self-testing cannot be performed if the inserted of the following:
{ Write-protected (as indicated by "P")
{ Damaged (indicated by "7")
{ Media type that is not write-compatible with the drive (indicated by "J")
Press the eject button to end self-test and return the drive to normal operating mode. Then return to step 1 and run the
self-test using a suitable cartridge. Return to Normal Operation:
10. Following a self-test failure, the tape cartridge will remain loaded inside drive, and the drive will remain in diagnostic
mode. Press the eject button to unload tape cartridge and return drive to normal operation.
VXA-2 and VXA-320 Tape Drive Self Test(IST)
Performing the IBM VXA-2 and VXA-320 Internal Self Test (IST) The IBM VXA-2 & VXA-320 Internal Self Test (IST)
Prerequisites
z VXA-2 Tape Drive: Firmware code v2123 or higher
z VXA-320 Tape Drive: Firmware code v3209 or higher
z One VXA Cleaning cartridge
z One unused, brand new VXA X23 data cartridge
IST Procedure
z Clean the tape drive
z Press the blue eject button for 7 seconds
z When the Ready LED blinks rapidly, insert a new X23 data cartridge
The tape drive performs the IST which can take up to 15 minutes
After successful completion the media may or may not be ejected
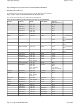
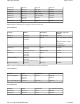
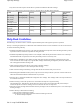
IST Status and results
The chart below indicates the tape drives LED status.
z Fields left blank indicate that the according LED is off
z If the IST passes: i.e. all LEDs are turned off and the tape is ejected - then the tape drive has no hardware fault and no
further drive tests are required
Direct the customer to troubleshoot the SCSI bus, OS & software configuration to determine the cause of failure
Page 58 of 93Tape Help Package
5/20/2008file://C:\tem
p
\TAPEWHDR.html