T85A.book Page 1 Saturday, October 10, 1998 3:53 PM These user’s setup instructions cover typical user environments. The on-screen messages may differ depending on the level of your hardware and software. In some cases you may need to vary the setup procedures. For more information, refer to your computer or operating system manuals or consult your system administrator or dealer. Ces instructions de configuration d’exploitation s’appliquent aux environnements d’utilisation types.
T85A.book Page c Saturday, October 10, 1998 3:53 PM DANGER To avoid shock hazard: • • • • • • Do not remove the covers. Do not operate this product unless the stand is attached. Do not connect or disconnect this product during an electrical storm. The power cord plug must be connected to a properly wired and grounded power outlet. Any equipment to which this product will be attached must also be connected to properly wired and grounded power outlets.
T85A.book Page d Saturday, October 10, 1998 3:53 PM GEVAAR Ga als volgt te werk om het gevaar van een elektrische schok te voorkomen: • • • • • • Verwijder in geen enkel geval de kap. Stel dit produkt alleen in werking als de voet is bevestigd. Sluit dit apparaat niet aan op, of verbreek de aansluiting van dit apparaat niet van een contactdoos tijdens onweer. Het netsnoer moet worden aangesloten op een geaarde contactdoos met correcte bedrading.
T85A.book Page e Saturday, October 10, 1998 3:53 PM PERIGO Para evitar o perigo de choques eléctricos: • • • • • • Não retire as coberturas. Não utilize este produto antes de montar a base. Não ligue nem desligue este produto durante uma tempestade eléctrica. O cabo de alimentação deve ser ligado a uma tomada eléctrica devidamente ligada à terra. Qualquer equipamento ligado a este produto deve estar ligado a tomadas eléctricas devidamente ligadas à terra.
T85A.book Page f Saturday, October 10, 1998 3:53 PM VAARA Sähköiskun vaaran välttämiseksi: • • • • • • Älä avaa laitteen kansia missään tilanteessa. Älä käytä laitetta, ellei jalustaa ole kiinnitetty. Älä kytke laitetta pistorasiaan tai irrota sitä pistorasiasta ukonilman aikana. Virtajohto on kytkettävä asianmukaisesti johdotettuun ja maadoitettuun pistorasiaan. Kaikki muutkin laitteet, joihin tämä tuote on liitetty, on kytkettävä asianmukaisesti johdotettuihin pistorasioihin.
FRANÇAIS DEUTSCH ESPAÑOL ITALIANO JAPANESE COMPL & WARR English ENGLISH T85A.
T85A.book Page 2 Saturday, October 10, 1998 3:53 PM First Edition (Nov/1998) This publication could contain technical inaccuracies or typographical errors. Changes are made periodically to the information herein; these changes will be made in later editions. IBM may make improvements and/or changes in the product(s) and/or program(s) at any time.
2 2 2 2 3 4 4 5 5 DEUTSCH Setup . . . . . . . . . . . . . . . . . . . . . . . . . . . . . . . . . . . . . . . . . . . . . . . . . . . . . . . . . . . . . Hardware Requirements . . . . . . . . . . . . . . . . . . . . . . . . . . . . . . . . . . . . . . . . . . Workplace Preparation . . . . . . . . . . . . . . . . . . . . . . . . . . . . . . . . . . . . . . . . . . . Working Practices . . . . . . . . . . . . . . . . . . . . . . . . . . . . . . . . . . . . . . . . . . . . . . . Handling Instructions . . . .
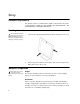
Setup Hardware Requirements This monitor requires a computer with a suitable on-board video sub-system or Video Adapter card that can support SXGA 1280 x 1024, XGA 1024 × 768, SVGA 800 x 600, or VGA 640 x 480 at 60 Hz. Handling Instructions Do not support the monitor within the screen area. The Liquid Crystal Display is glass and can be damaged by rough handling or excessive pressure. 1. Lift the monitor by placing both hands under the lower part of the cover. 2.
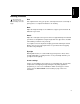
ENGLISH Rest Take regular breaks. Vary your posture, stand up and stretch occasionally as prolonged use of computer workstations can be tiring. Back Hands Adjust the seat height so that your forearms are approximately horizontal and your wrists are straight when using the keyboard. Your upper arms should be relaxed with your elbows near your body. Use a light touch on the keyboard, keeping your hands and fingers relaxed. Allow a space in front of the keyboard to rest your wrists when not typing.
Connecting your Monitor Be sure to read the ‘Safety Information’ at the front of this User Guide before carrying out this procedure. 1. Turn off your PC and all attached devices. 2. Connect the signal cable (D-SUB type) to the video port on the back of your computer. This port might be directly attached to your computer (figure A), or it might be part of a video adapter card (figure B).
ENGLISH Adjusting the Monitor Position FRANÇAIS Viewing Angle ESPAÑOL DEUTSCH You can tilt the screen backward and forward as shown below. Caring for your Monitor • Remove finger marks and grease with a damp cloth and mild detergent; do not use solvents or abrasives. • Never use flammable cleaning material to clean your IBM monitor or any other electrical apparatus. JAPANESE Gently wipe the covers and the screen with a soft cloth.
Configuring your Monitor Automatic Setup The Setup Utility included on the setup diskette is for displaying dot patterns. They do not replace or modify the display driver. When you first use your monitor you must perform Automatic Setup (AUTO SETUP). This procedure sets up your monitor to process the video signals from your computer without image discoloration or smearing. After you perform AUTO SETUP, the settings are stored and used each time you turn on the monitor.
Locate the operating system installed on your PC in the table below and follow the appropriate instructions. You may choose to run AUTO SETUP for each operating system that you use. This means that if you sometimes use your monitor while running any version of Windows and sometimes also use it from within DOS (not a DOS window), you must run AUTO SETUP for both Windows and DOS. You may run versions of AUTO SETUP in any order.
Auto Setup for DOS If the monitor is in standby mode (STANDBY ON), it may automatically turn off while you are waiting for it to warm up. If this happens, switch off the monitor and switch it on again after a few seconds. 1. Turn on the monitor first; then the PC. If your system goes into standby mode again, reboot your system and change the system Bios Setup Utility to DISABLE Power Saving. Refer to your system manual. 2. Wait approximately 15 minutes, until the monitor warms up. 3.
ENGLISH If the monitor is in standby mode (STANDBY ON), it may automatically turn off while you are waiting for it to warm up. You can disable the Windows energy saving feature by clicking on the START button and selecting SETTINGS, CONTROL PANEL, DISPLAY, SCREEN SAVER. Make sure that the ENERGY 1. 2. Wait approximately 15 minutes, until the monitor warms up. SAVING FEATURES OF MONITOR 3. Drag the icon bar and tool bar, if they are displayed, to the bottom of the screen. 4.
10. Press the ESC key to return to Windows. You have completed the monitor setup for Windows. If you use other operating systems, perform the appropriate AUTO SETUP for those systems, also: see Auto Setup OS/2 on page 11 and Auto Setup for DOS on page 8.
ENGLISH Turn on the monitor first; then the PC. If the message CHECK SIGNAL CABLE is displayed, or if nothing is displayed check: • that the video interface cable is connected properly. • the correct video adapter card is installed. • the correct supported display mode is selected for your PC. Wait approximately 15 minutes, until the monitor warms up. 3. Insert the diskette labelled ‘IBM Monitor Installation Disk’ into the diskette drive. 4. Select OS/2 SYSTEM, SYSTEMS SETUP, SYSTEM.
If the screen flickers, repeat the setup several times until the flicker is minimised, or adjust it manually by following Manual Setup on page 13. 16. When finished, the OSD main menu returns. Press the Exit button to exit from the OSD. 17. Press the ESCAPE key to return to the OS/2 Window. You have completed the monitor setup for OS/2. If you use other operating systems, perform the appropriate AUTO SETUP for those systems, also: see Auto Setup for Windows 3.
If the monitor is in standby mode (STANDBY ON), it might automatically turn off while you are waiting for it to warm up. 1. Have your computer and monitor turned on for at least 15 minutes until the monitor and video adapter have warmed up. 2. You may wish to start the program you most often use so that you can adjust for a “typical” screen. To disable the Windows energy saving feature by clicking on the START button and selecting SETTINGS, CONTROL PANEL, DISPLAY, SCREEN SAVER.
9519A-E2.
ENGLISH This feature allows you to secure the current control settings, while allowing the user to adjust Brightness and Contrast, so that they cannot be inadvertently changed. You can unlock the OSD controls at any time by using the same procedure. COMPL & WARR JAPANESE ITALIANO ESPAÑOL DEUTSCH Push and hold the button for 10 seconds to Lock or to Unlock. When locked, a “CONTROLS LOCKED” message will be displayed.
On-screen display (OSD) controls The settings adjustable with the user controls are viewed through the OnScreen Display (OSD). Press any of the OSD buttons to activate the OSD. The LCD monitor needs time to become thermally stable the first time you turn it on each day. Thus, to achieve more accurate adjustments for parameters, allow the LCD monitor to warm up (be On) for at least 15 minutes before making any screen adjustments.
ENGLISH • • IMAGE LOCK (continued) COLOR Select the preset Color mode you find most comfortable and then fine tune the colors using the User submenu, if necessary. Fine Coarse PRESET Use the Arrow buttons to adjust away the interference. If satisfactory results are not obtained using the Fine adjustment, use the Coarse adjustment and then use Fine again. This function may change the width of the display image. Use the H-Position function to center the display image on the screen.
OSD Icon IMAGE EFFECT LANGUAGE Sub-menu(s) Select this icon to optimize the display for the type of software you are using. Scaling smooths an image which may help the eye to see more detail. Filtering sharpens text by adding a fine, contrasting line around each character so that it is easier to recognize. SCALING ON - Turns Scaling on. OFF - Turns Scaling off. FILTER ON - Turns Filtering on. OFF - Turns Filtering off. The language chosen affects only the language of the OSD.
The display mode the monitor uses is controlled by the computer. Therefore, you should refer to your computer documentation for details on how to change display modes. The image size, position and shape may change when the display mode changes. This is normal and the image can be readjusted using AUTO SETUP and the monitor controls. Unlike CRT monitors, which require a high refresh rate to minimize flicker, TFT technology is inherently flicker-free.
Factory Set Display Modes If your computer has previously been used with a CRT monitor and is currently configured to a display mode outside the range that the Flat Panel monitor can display, you may need to re-attach the CRT monitor temporarily until you have reconfigured the computer, preferably to 1280 x 1024 at 60Hz. Addressability Refresh Rate Horizontal Frequency 640 × 350 70 Hz 31.5 kHz 640 × 480 75 Hz 37.5 kHz 640 × 480 72 Hz 37.8 kHz 640 × 480 66 Hz 35.0 kHz 640 × 480 60 Hz 31.
ENGLISH Power Indicator Screen On Steady green Normal DPMS Standby Steady amber DPMS Suspend DPMS Off State Restoring Operation Compliance Blank Press a key or move the mouse. ENERGY STAR® and NUTEK Flashing amber (0.5 sec. interval) Blank Press a key or move the mouse. ‡ ENERGY STAR® and NUTEK Flashing amber (1 sec. interval) Blank Press a key or move the mouse.
Troubleshooting If you have a problem setting up or using your monitor, you may be able to solve it yourself. Before calling your retailer or IBM, try the suggested actions that are appropriate to your problem. Problem For image problems, you may want to run AUTO SETUP again before consulting to this section. In most cases, AUTO SETUP can fix the problems. See Auto Setup for the PC on page 7 for details.
ENGLISH The monitor is in the Power Management Suspend or Off state Press any key on the keyboard or move the mouse to restore operation. Check the Power Management software on your computer. Image appears to be smeared There are noises in the video signal Select IMAGE LOCK menu in the OSD. Then select MANUAL to adjust FINE/ COARSE settings. Image appears to be discolored The Color setting may be incorrect A few dots are missing, discolored, or inappropriately lighted.
Further Help If you are unable to correct the problem yourself, you may seek further help as follows: Call the IBM HELPCENTER. In the US call 1-800-772-2227 In Canada call 1-800-565-3344 In other countries contact your dealer or retailer. If possible, stay by your computer. Your Technical Support Representative may wish to go through the problem with you during the call. More help, late-breaking news and details of the latest accessories for these products may be found on the worldwide web at: http://www.
ENGLISH Carefully insert the head of a flathead (–) screwdriver into the slot visible along either side of the cable cover (a) and pry it off. DEUTSCH FRANÇAIS 2. a b d 4. Gently lift the stand cover (c) along the top and then slide it backwards and off the stand. 5. Remove the signal cable and the power cord from the monitor by disconnecting the corresponding adapters. Carefully cut the plastic tie to free the power cord and remove the screw holding the power cord clamp. 6.
11. Put the hinge cover back on, making sure that the straight side is at the top. 12. Insert the three tabs at the top of the cable cover into the slots in the back of the monitor and push the cover into place. To obtain the correct cables and/or to get further instructions on installing them, call the IBM HELPCENTER at the above numbers or contact your dealer, retailer, or other IBM authorized Servicer. Installing a 13W3 Cable 13W3 cables are most often used with workstations.
19.8 lb. (9.0 Kg) Tilt / Swivel Tilt: Swivel: – 4° / + 41° – 230° / + 90° Image Viewable Image Size: Maximum Height: Maximum Width: Pixel Pitch: 18.1” (459.7 mm) 287 mm 359 mm 0.281 mm (H) × 0.281 mm (V) Power Input Supply Voltage: Max Supply Current: 90 - 260 Vac 60/50 ± 3 Hz 1.5 A at 120 Vac Power Consumption Normal Operation: DPMS Stand-by: DPMS Suspend: DPMS off: < 48 W < 5W < 5W < 5W Video Input Input Signal: Horiz. Addressability: Vert.
Display Mode Ranges 28 Addressability Refresh Rate / Range (±1 Hz) Horizontal Frequency / Range (±500 Hz) 640 x 350 70 Hz 31.5 kHz 640 x 480, VGA 60 / 59 - 61 Hz 31.5 / 30.5 - 35.0 kHz 640 x 460 66 Hz 35.0 kHz 640 x 480, VGA 72 / 71 - 73 Hz 37.9 / 36.5 - 39.9 kHz 640 x 480, VGA 75 / 74 - 76 Hz 37.5 / 36.8 - 43.0 kHz 720 x 400 70 Hz 31.5 kHz 800 x 600 56 Hz 35.2 kHz 800 x 600, SVGA 60 / 59 - 61 Hz 37.9 /37.5 - 43.0 kHz 800 x 600, SVGA 72 / 71 - 73 Hz 48.1 / 45.2 - 51.
This equipment has been tested and found to comply with the limits for a Class B digital device, pursuant to Part 15 of the FCC Rules. These limits are designed to provide reasonable protection against harmful interference in a residential installation. This equipment generates, uses, and can radiate radio frequency energy and, if not installed and used in accordance with the instructions, may cause harmful interference to radio communications.
T85Acomp.book Page II Monday, November 16, 1998 8:00 PM For units intended to be operated at 230 volts (U.S. use): Use a UL listed and CSA certified cord set consisting of a minimum 18 AWG, type SVT or SJT, three conductor cord, a maximum of 4.5 meters (15 feet) in length and a tandem blade, grounding type attachment plug rated 15 amperes 250 volts. For units intended to be operated at 230 volts (outside the U.S.): Use a cord set with a grounding type attachment plug rated 13 amperes (minimum), 250 volts.
)5$1d$,6 '(876&+ This product has been tested and found to comply with the limits for Class B Information Technology Equipment according to CISPR 22 / European Standard EN 55022. The limits for Class B equipment were derived for typical residential environments to provide reasonable protection against interference with licensed communication devices.
T85Acomp.book Page IV Monday, November 16, 1998 8:00 PM Warranty For European warranty terms and conditions, refer to the enclosed IBM Warranty statement, Part Number 72H9623. Statement of Limited Warranty The warranties provided by IBM in this Statement of Limited Warranty apply only to Machines you originally purchase for your use, and not for resale, from IBM or your reseller.
Warranty Service To obtain warranty service for the Machine, you should contact your reseller or call IBM. In the United States, call IBM at 1-800-772-2227. In Canada, call IBM at 1-800-565-3344. You may be )5$1d$,6 If you transfer a Machine to another user, warranty service is available to that user for the remainder of the warranty period. You should give your proof of purchase and this Statement to that user. However, for Machines which have a life-time warranty, this warranty is not transferable.
T85Acomp.book Page VI Monday, November 16, 1998 8:00 PM For European warranty terms and conditions refer to enclosed IBM warranty statement Part Number 72H9623. Référez-vous à la garantie IBM N° de référence 72H9623 pour les condtions de garantie européennes. Die europäischen Garantiebedingungen finden Sie in der beigefügten IBMGewährleistungserklärung, Teilenummer 72H9623.
'(876&+ Monitor - Pearl White Monitor - Stealth Black Power Supply Video I/F Cable (White) Video I/F Cable (Black) (63$f2/ 9519-AW1 9519-AG1 ,7$/,$12 T85A Model Type 9519 21L4364 21L4365 21L4403 21L4505 21L4507 -$3$1(6( The following parts are for use by IBM service, or IBM authorised dealers, to support the customer warranty. Parts are for service use only. &203/ :$55 Service Information )5$1d$,6 (1*/,6+ T85Acomp.