
User Guide
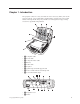


Chapter 3. Using the projector with a video device
This chapter explains how to connect a video device to the projector and display
video images.
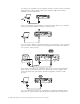
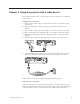
Standard video connections
1. Plug the video cable’s yellow connector into the video-out connector on the
video device.
2. Plug the other yellow connector into the yellow Video connector on the
projector.
3. Plug a white connector into the left audio out connector on the video device.
4. Plug a red connector into the right audio out connector on the video device.
5. Plug the remaining white connector into the left audio in connector on the
projector.
6. Plug the red connector into the right audio in connector on the projector.
computer 1
computer 2
computer 2
video
monitor
network
serial control
audio in
audio in
audio in
audio out
R
R
L
L
Y
Pr
Pb
s-video
computer in
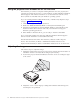
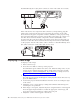
7. Connect the black power cable to the connector on the back of the projector
and to your electrical outlet. The Power LED on the keypad turns solid.
computer 1
computer 2
computer 2
video
monitor
network
serial control
audio in
audio in
audio in
audio in
audio out
R
R
L
L
Y
Pr
Pb
s-video
computer in
Note: Always use the power cable that shipped with the projector.
Optional video connections
If the video device uses a round, four-prong S-video connector, plug an S-video
cable (sold separately) into the S-video connector on the video device and into the
S-video connector on the projector. Use the video cable’s audio connectors as
© Copyright IBM Corp. 2003 9