
User Guide


Appendix
B.
Troubleshooting
The
following
table
provides
troubleshooting
information
for
the
projector.
In
some
cases,
more
than
one
possible
solution
is
provided.
Try
the
solutions
in
the
order
they
are
presented.
When
the
problem
is
solved,
you
can
skip
the
additional
solutions.
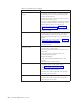
Table
B-1.
Troubleshooting
Problem
Solution
No
image
appears
on
the
screen.
v
Make
sure
your
computer
and
projector
are
turned
on.
v
If
the
Blank
screen
is
shown,
press
the
Blank
button
on
the
remote
control.
v
Verify
the
settings
on
your
notebook
or
desktop
PC.
v
Turn
off
all
equipment
and
power
up
again
in
the
correct
order.
See
“Starting
and
shutting
down
the
projector”
on
page
2-1.
The
image
is
blurred
v
Adjust
the
Focus
on
the
projector.
See
“Adjusting
the
image”
on
page
2-4.
v
Press
the
Auto
button
on
the
remote
control
or
the
projector.
v
Ensure
the
projector-to-screen
distance
is
within
the
range
specified.
The
image
is
wider
at
the
top
or
bottom
(trapezoid
effect).
v
Position
the
projector
so
it
is
as
perpendicular
to
the
screen
as
possible.
v
Use
the
Keystone
button
on
the
remote
control
or
projector
to
correct
the
problem.
See
“Adjusting
the
image”
on
page
2-4.
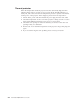
The
image
is
reversed
or
upside
down.
Check
the
Projection
setting
on
the
Setup
menu
of
the
OSD.
See
“View
menu”
on
page
5-4
The
image
is
streaked.
v
Set
the
Frequency
and
Tracking
settings
on
the
Setup
menu
of
the
OSD
to
the
default
settings.
See
“Navigating
the
OSD”
on
page
5-1.
v
To
ensure
the
problem
is
not
caused
by
a
connected
PC’s
video
card,
connect
to
another
computer.
The
image
is
flat
with
no
contrast
Adjust
the
Contrast
setting
on
the
Main
menu
of
the
OSD.
See
“Navigating
the
OSD”
on
page
5-1.
The
color
of
the
projected
image
does
not
match
the
source
image
Adjust
the
Color
Temp.
and
Gamma
settings
on
the
ColorMgr
menu
of
the
OSD.
See
“Color
menu”
on
page
5-2.
©
Copyright
IBM
Corp.
2004
B-1