NOTEBOOK COMPUTER RT-686 & RT-686EX USER’S GUIDE
Copyright © 2001 All rights reserved. No part of this publication may be reproduced, transmitted, transcribed, stored in a retrieval system, or translated into any language, or computer language, in any form, or by any means, electronic, mechanical, magnetic, optical, chemical, or other, without the prior written permission of the manufacturer.
Warranty This warranty gives you specific legal rights. You may also have other right that may vary from state to state or country to country. One-Year Limited Warranty The company warrants its computer hardware products against defects in materials and workmanship for a period of one year from delivery of the products. During the warranty period, the company reserves the right to either repair or replace products that prove to be defective.
EMC Notice FCC Warning! This equipment generates, uses, and can radiate radio frequency energy and if not installed and used in accordance with the instructions, may cause interference to radio communications. This equipment has been tested and found to comply with Class B digital devices, pursuant to Part 15 of the FCC rules that are designed to provide reasonable protection against such interference when operated in a commercial or residential environment.
EFT: EN61000-4-4 Surge: EN61000-4-5 CS: EN61000-4-6 Power-Frequency Magnetic Field: EN61000-4-8 Voltage Dips, Interruptions: EN61000-4-11 UL, TÜV AC Adapter (TÜV includes EN60950 LVD)
Power Conservation This computer consumes much less power than conventional computers. However, you still can reduce power consumption by properly configuring the Power Management Setups. It is recommended that you enable the power saving functions even when you are not running with the battery. Power Management generally does not degrade the system performance while saving power. Please read the power saving features and the setting procedures described in this manual before setting your computer.
CONTENTS GETTING STARTED ............................................................................................. 1 UNPACKING ........................................................................................................................... 1 QUICK OPERATION ............................................................................................................. 2 CONTROLS AND INDICATORS ........................................................................................
FAX/MODEM CARD ......................................................................................................... 20 LAN CARD .......................................................................................................................... 20 DVD ROM DRIVE .......................................................................................................... 20 CD-RW DRIVE ..................................................................................................................
POWER MANAGEMENT .................................................................................................. 29 PNP/PCI CONFIGURATIONS ........................................................................................ 32 DEFAULTS ............................................................................................................................. 32 SECURITY ..............................................................................................................................
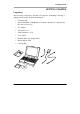
Getting Started GETTING STARTED Unpacking The following components come with your computer. If anything is missing or damaged please notify the dealer immediately.
Getting Started Quick Operation • Turn loose the battery screw to remove the battery insulation sheet then fix the battery again. • Attach the AC adapter to charge battery for at least 10 minutes. • Turn ON the computer by pressing the power switch momentarily. • Turn OFF the computer by either of the following: 1. Press power switch for 4 seconds makes a “Hard” power off. System shut down immediately without saving any data or parameters. 2.
Getting Started Controls and Indicators Controls and Indicators (Upper) 1. IrDA 2. PCMCIA 3. KB Number Lock 4. KB Caps Lock 5. KB Scroll Lock 6. HDD in use 7. Secondary Battery Charge 8. Primary Battery Charge 9. Power indicator 10. Power switch 11.
Getting Started 12. Touch pad 13. Touch pad right button Controls and Indicators (Right) FDD Configuration: 1. FDD in use 2. Diskette eject button CD-ROM Drive Configuration: 1. CD-ROM eject button 2. CD-ROM in use Battery Configuration: (optional) No special control and indicator.
Getting Started Controls and Indicators (Left) 1. Phone Jack 2. External Speaker 3. External Keyboard 4. Microphone 5. External PS/2 6. USB 7. LAN Jack 8. PCMCIA slots 9. IrDA 10. PCMCIA card eject button External Device Connectors (Rear) 1. DC Power Jack 2. Serial Port COM1 3. External CRT Monitor Port 4. Docking Port 5.
Getting Started 6. Serial Port COM2 (or COM3 by optional configuration) *: The port is a dual function port and default as printer output. System will detect which device is attached and switch to proper output automatically. Hot swap is possible under most conditions. However, if not able to hot swap, please re-boot computer with the new device attached.
Useful Information USEFUL INFORMATION Location A clean and moisture-free environment is preferred. Make room for air circulation. Avoid areas with: • Sudden or extreme changes in temperature. • Extreme heat. • Strong electromagnetic fields (near television set, motor rotation area, etc.). • Dust or high humidity. However, if it is necessary to work in a hostile environment, please regularly maintain your computer by cleaning dust, water, etc. to keep it under optimal condition.
Useful Information Operating Systems The computer is compatible with most operating systems (OS). However, not all functions are 100% compatible. For example, ACPI, APM, Smart Battery, etc. are not available on DOS, Windows NT, and other non-Microsoft OS. Consequently “Suspend”, “Hibernation”, “Battery Gauge” etc. would not work under such operating systems.
Useful Information Battery The computer will automatically switch to the battery power when the AC adapter is disconnected. Battery Power Saving Tips The computer comes with an intelligent power-saving feature. You may extend the battery life by: • Setup power saving functions in BIOS Power Management Setup. • Setup power saving functions in Operating System Power Management options (e.g. Windows 98/2000/ME Power Management Options). • Lower the intensity of the display by brightness control.
Useful Information Note: Battery characteristic varies depending on factors such as ambient temperature, charging method, load current, aging, etc. For example, at low temperature the chemicals of the battery are more inactive, thus decreases the output power. The battery gauge can only be taken as a reference. Please do not expect it to show the exact amount of the power remaining. There is no memory effect on Lithium Ion battery cells.
Useful Information The ROM BIOS Power On Self Test (POST) Each time the computer powers on, it automatically performs a self-test of its memory and hardware devices. Suspend/Resume The system can enter suspend mode by either pressing the power switch or staying idle till Suspend Timeout. Windows “Suspend”, ”Standby” can also activate the function. Please refer “BIOS Setup Power Management“ for details. Note: Suspend/Resume works under both AC adapter and battery mode.
Useful Information Replacing Modules Caution! You must turn the power OFF before replacing the FDD, CD-ROM, and HDD modules. To remove the modules: 1. Turn OFF the computer or hibernate (suspend to disk). 2. Disconnect all cables from the computer. 3. Use a coin to turn loose the screws on the modules. 4. Remove the battery from the compartment. 5. Push the latch knob to release the CD-ROM or HDD module and push them outward. 6. Remove the module from the computer.
Components and Functions COMPONENTS AND FUNCTIONS Keyboard The keyboard is functionally equivalent to a full size desktop keyboard. A sample key layout is shown below. The Numeric Keypad The numeric keypad functions like an electronic calculator. It is embedded in the main keyboard, with the numeric figures printed on the upper right of their respective keys. The keypad has keys for the digits 0 through 9, the decimal point ( .
Components and Functions Keyboard Backlight (optional) Press [Fn] [F5] key for approximately 1 second turns keyboard backlight ON or OFF. Floppy Disk Drive The computer comes with a 3.5" 1.44MB floppy disk drive (FDD). The 1.44MB FDD can also read and write 720KB double side double density diskette. It is recommended that high density (2HD marking) diskette been used only. FDD can be removed and swapped with CD-ROM drive or 2nd battery.
Components and Functions Please note FDD cable is different from printer adapter cable. Hard Disk Drive The Hard Disk Drive (HDD) is a 2.5” type standard IDE interface data storage device. HDD and FDD, CD-ROM drives are removable. This provides convenience and security. They can ONLY be removed while the power is OFF. Note: NEVER drop your HDD, FDD, CD-ROM module or expose them to high temperature, high humidity, or any hazardous environment. NEVER try to disassemble the module.
Components and Functions Read from CD-ROM drive The CD-ROM drive may be designated as drive D: or higher depending on your configuration. You may access it in DOS or Windows the same way you would for the floppy disk drive or hard disk drive. The CD-ROM is a read-only device. Any command attempting to write onto it will be denied. Please avoid shock or vibration while the CD-ROM drive is active.
Components and Functions Note: Do not lift up the computer while engaging. 5. Lock the computer. There is 1 PCI slot on the DockUnder-Office. Maximum card dimensions is 260mm (L: length, including L-bracket thickness) x 115mm (W: width, including gold fingers) x 24 mm (H: height, including PCB 1.6mm, components side 17mm, solder side 5mm). The maximum power rating of PCI card is +5V 1A, +3.3V 1A, +12V 100mA, -12V 100mA.
Components and Functions To install expansion card in DockUnder-Office: 1. Unplug the AC adapter. 2. Release and remove the computer. 3. Remove the screws fixing the upper and lower covers of the DockUnder. 1. Open the upper cover. 2. Install the expansion card into the slot and fix the L-bracket. 3. Assemble the upper cover. 4. Attach the computer and perform functions test. Note: You may have to free IRQ for your expansion card by disabling unused device in BIOS Setup “Integrated Peripherals”.
Components and Functions *: Optional devices.
Optional Devices OPTIONAL DEVICES Memory Card The memory card will expand your memory to facilitate better system performance. The cards are available as following: 32MB, 64MB, 128MB 2nd Battery A Lithium Ion rechargeable 2nd battery may install into the CD-ROM/FDD compartment. It has the same capacity of primary battery and Smart Battery compliance. The computer’s internal charger can detect 2nd battery and perform charging accordingly. Fax/Modem Card V.90 56K Fax/Modem card.
Optional Devices Capacitive touch screen needs a ground loop between human body and screen panel’s ground terminal. Otherwise it would not activate when touched with one hand. It is generally OK if the AC adapter is attached or the computer/panel is mounted on a vehicle’s metal parts. Holding the computer/panel with the other hand will form the loop, too. PCMCIA Cover Besides the attached PCMCIA rubber cover, there is an optional cover with a metal frame that can be fixed by screws.
Specifications SPECIFICATIONS CPU Intel Mobile Pentium III CPU runs at 2 speeds: High speed (AC adapter mode), Low speed (Battery mode) The CPU speed switches automatically. Memory System memory Minimum: 64MB Expandable: 128MB, 192MB, 256MB, 384MB, 512MB Cache memory Internal level-1 32KB, level-2 256 KB Video memory 8MB Display The display is a SVGA compatible LCD (Liquid Crystal Display) of 800 x 600 dots (horizontal x vertical) or 1024 x 768 dots with 16M true color.
Specifications Keyboard Number of keys: 89 Key travel: 2.5 mm (standard) 1.5 mm (optional backlight) Function: Emulates standard 101/102-key keyboard Floppy Disk Drive Standard: Size: 3.5" Capacity: 1.44MB (formatted) Rotation: 300 RPM Transfer Rate: 500KB/sec Average Access: 94 ms (with settling) Hard Disk Drive Type: Interface: 2.5” IDE Ultra DMA 33 compliant CD-ROM Drive Speed: Interface: 24 x (ATAPI) Data transfer rate: 16.
Specifications I/O ports • Parallel port • Two Serial ports • External CRT monitor port • External Keyboard port • External PS/2 port • Audio ports (External Speaker, Microphone) • RJ11 Phone jack for internal Fax/Modem (optional) • RJ45 jack for internal LAN card (optional) • 2 type II or 1 type-III PCMCIA slots • Printer/External FDD port • Docking port • USB port (Universal Serial Bus) AC Adapter Voltage: AC 90 - 240 V Frequency: 50/60 Hz Output Voltage: DC 19V Maximum Powe
Specifications Application Car or Truck installation Battery Primary Battery: Type: 9 x 18650 cells Lithium Ion Capacity: Dimension: 10.8V 5400mAH 103 mm(W) x 73 mm(D) x 38 mm(H) Weight: 435 g (0.95 1b.) 2nd Battery (optional): Type: 9 x 18650 cells Lithium Ion Capacity: 10.8V 5400mAH Dimension: 150 mm(W) x 90 mm(D) x 20 mm(H) Weight: 560 g (1.2 1b.) System Unit Dimensions and Weight Width: Depth: 312mm (12.3”) 246mm (9.7”) Height: 62.5mm (2.5” ) Weight : 4.7Kg (10.3 lb.
Specifications Packing: Carton: Unbleached paper Cushion: Recyclable PE Carrying bag: Recyclable PE Fiber User's Guide: Paper Please recycle the parts according to local regulations.
BIOS Setup BIOS SETUP Press [Del] at boot up to enter BIOS setup. Use arrow keys to select options and [PgUp] [PgDn] to modify them. When finished, move to ”Save & Exit Setup” and press [Enter] then press “Y”. Main You may set time, date, HDD, FDD parameters in Main Setup. Set IDE Primary Master (HDD) and IDE Secondary Master (other IDE devices, such as CD-ROM drive) as “Auto”. Since the HDD is detected automatically, you usually do not need to setup its parameters.
BIOS Setup Advanced Includes Advanced BIOS Features, Integrated Peripherals, Power Management, and PnP/PCI Configurations. PnP: Plug and Play devices. Advanced BIOS Features You may set a quicker boot up (minimized self test procedure) or define boot up drive sequence, boot up status, etc. in this window.
BIOS Setup Security option: “Setup”: Password prompt at BIOS Setup. Only authorized user may perform setup. “System”: Password prompt at boot up. Only authorized user may boot up the computer. Integrated Peripherals Serial, Parallel, and other ports’ modes are defined by this setup. You may disable some devices to free IRQ when necessary.
BIOS Setup The Power Management supports various operating systems (OS). Doze and SpeedStep are OS-independent. Other options work in accordance with the OS power management components. Windows 2000/ME would enable ACPI mode while Windows 95 enables APM mode. Other OS (DOS, Windows NT, etc.) without ACPI or APM would apply generic power management.
BIOS Setup Power Management Functions: BIOS Power Management Setup Power Management (DOS, Windows NT, or others) Max Saving Min Saving Fixed shortest timeout for Doze, Standby, Suspend, HDD Fixed longest timeout for Doze, Standby, Suspend, HDD HDD Power down POS (CPU halt, PCI clock stop, LCD OFF) SpeedStep Support User Define Doze (CPU halt) When disabled CPU always run at battery mode speed (low speed) HDD Power down ACPI/APM (Windows 98, 2000, ME, or other OS with ACPI/APM) Windows (OS) takes
BIOS Setup The system will create a partition on the HDD to store memory data with file size of 136MB. You must specify a file size larger than your system memory plus video memory (8MB). For instance, if system memory is 128MB you should at least set 136MB. Type ZVHDD /? for more information. PnP/PCI Configurations You only need to set this option when using a non-Windows OS.
BIOS Setup You may load the factory setup parameters by this option. Default setup is usually the most fail-safe setting. Be sure to set your personal setup if there are additional devices installed. Security Set Password: Set the password for the user who works with this computer. Security setup options are available in Advanced BIOS Features.
BIOS Setup Choose “Save & Exit Setup” when you are sure of the setup. Choose “Exit Without Saving” when setup change is not needed.
Utilities and Drivers UTILITIES AND DRIVERS Note: Most device drivers are available in Windows 98/2000/ME. Only when the default driver does not work properly you need to install the factory bundled drivers. Driver installation is necessary for DOS, Windows NT, or other nonMicrosoft OS. The utility CD includes most drivers. Re-install drivers or perform “Driver Update” to replace the Windows default drivers.
Utilities and Drivers 1600x 1200x 256 color * * 1600x 1200x 64K color * * *: By Panning. The table lists typical display modes only. The system also supports standard video modes with lower resolution and color. Windows 98/2000/ME/NT Driver Installation: Insert the Driver CD into the CD-ROM. Click Display in Control Panel then select Settings, follow prompt to complete driver installation.
Utilities and Drivers Windows 98/2000/ME/NT can also detect new PCMCIA cards or by Add Hardware. You simply insert your PCMCIA card and click the icon, then follow the prompt to complete the installation. Audio Driver In Windows 98/2000/ME click System → Hardware → Device Manager → choose Sound, video and game controllers, then choose audio device to update driver. In Windows NT, Click Multimedia → Peripheral → Driver to install it.
Maintenance/Service MAINTENANCE / SERVICE Cleaning Wipe the exterior with a clean, soft, and lint-free cloth. If there is difficulty to remove dirt, apply non-ammonia, non-alcohol based glass cleaner onto the cloth. An air gun is recommended for cleaning water and dust. For salty water please clean with fresh water then blow-dry with an air gun. Be sure not to turn the computer up side down while there is water being applied.
Maintenance/Service • Send ALL parts of your configuration, including hardware/software, if possible. • Include DETAILED descriptions of the problems you encountered, and the list of your hardware/software configuration.
Recycled / Recycleable Printed in Taiwan