
Laptop User Manual

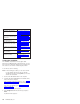
Table Of Contents
- Contents
- ThinkPad s30, s31 Hardware Maintenance Manual
- Read This First
- Product Overview
- Related service information
- Checkout Guide
- Symptom-to-FRU Index
- Numeric Error Codes
- Error Messages
- No Beep Symptoms
- LCD-Related Symptoms
- Keyboard-Related Symptoms
- Indicator-Related Symptoms
- Power-Related Symptoms
- PC Card (PCMCIA)-Related Symptoms
- CompactFlash Card-Related Symptoms
- Speaker-Related Symptoms
- Power Management-Related Symptoms
- Peripheral-Device-Related Symptom
- Intermittent Problems
- Undetermined Problems
- CE Utility Program Diskette
- Running the Diagnostics
- FRU Removals and Replacements
- FRU Service Procedures
- 1010 Battery ASM
- 1020 Keyboard ASM
- 1030 Hard Disk Drive ASM
- 1035 Hard Disk Drive FPC ASM
- 1040 Suspend Board ASM
- 1045 Suspend Board Cable ASM
- 1050 Modem Card ASM
- 1055 Modem Cable ASM
- 1060 Wireless Card ASM (s30 only)
- 1065 IEEE 1394/LAN Card ASM
- 1070 IEEE 1394/LAN Card Cable ASM
- 1075 DIMM Card ASM
- 1080 Upper Cover ASM
- 1085 Speaker ASM
- 1090 Palm Rest ASM
- 1100 Fan ASM
- 1130 PCMCIA Slots
- 1140 System Board
- 1145 Power Board ASM
- 1150 LCD Bezel ASM
- 1155 LCD Rear Cover ASM
- 1160 LCD Inverter ASM
- 1170 LCD FPC ASM
- 1180 LCD Panel ASM
- 1185 Hinge ASM
- 1190 Hinge ASM (Wireless—s30 only)
- 1195 Base ASM
- Computer Parts Listing
- LCD Unit Parts Listing
- Service Tools
- Notices
- Trademarks

3. At the prompt, press F11. (The option to press F11
appears for only a few seconds. You must press F11
quickly). The Product Recovery program main menu
appears.
4. If you are using Windows 2000 Professional, you will
be prompted to select the appropriate operating system
setting. This menu does not appear for Windows 98
SE.
5. Select System Utilities from the main menu. Press
Enter.
6. Select Create a Recovery Repair diskette. Press Enter.
7. Follow the on-screen instructions.
8. When the process is completed, label the diskette as
the Recovery Repair diskette and save it for future use.
To use the recovery repair diskette
1. Shut down and turn off the computer.
2. Attach the external diskette drive to the computer.
3. Insert the Recovery Repair diskette into the drive; then
turn on the computer.
4. Follow the on-screen instructions.
Checkout Guide
Use the following procedure as a guide for computer
problems.
Note: The diagnostic tests are intended to test only IBM
products. Non-IBM products, prototype cards, or
modified options can give false errors and invalid
system responses.
1. Obtain the failing symptoms in as much detail as
possible.
2. Verify the symptoms by attempting to recreate the
failure by running the diagnostic test or by repeating
the same operation.
Note: To run the diagnostics, refer to “Running the
Diagnostics” on page 27.
3. Use the following table with the verified symptom to
determine which page to go to. Search the symptoms
column and find the description that best matches your
symptom; then go to the page shown in the ″Go to″
column.
ThinkPad s30, s31
9