IBM Solutions Builder Express Portfolio Collaborative Portal Implementation Guide Version 2.2.
Note Before using this information and the product it supports, read the information in Appendix. Notices. If you are not an IBM Business Partner, you are only authorized to use these materials for your internal use and for the sole purpose of evaluating products and services from IBM and the IBM Business Partner. You may not make the materials available to any third party. Fourth Edition (April 2007) Copyright International Business Machines Corporation 2006, 2007. All rights reserved.
Preface How to Use Starting Point Assets This set of solution enablement materials provides a starting point that helps you develop and deploy a solution for a particular type of customer problem. It provides a framework around which you can build similar solutions that meet your customer's unique needs. Comments Welcome Your comments are important to us. Please send your feedback about this and other IBM Solutions Builder starting points directly to us at sbuilder@us.ibm.
Legend Used to identify worksheets, sample code, or other reusable files that are provided with this specific solution. Used to identify areas where there is more than one implementation option for the solution. Used to identify tasks or places that require special attention. Used to identify websites referenced in this solution. Used to identify IBM Redbooks referenced in this solution. What's New in Version 2.2.1 of this Solution Starting Point Version 2.2.
she was with IBM Global Services in the Philippines for four years. There, she worked in the telecommunications and construction industries, serving as technical support for the Customer Care & Billing System and as a technical analyst for Ariba Buyer. She holds a bachelor's degree in Computer Science from the University of the Philippines, as well as a master's degree in Electronic Commerce from Carnegie Mellon University in Pittsburgh.
Contents Collaborative Portal Implementation Guide ..............................................................................i Preface ........................................................................................................................................iii How to Use Starting Point Assets ................................................................................................................................. iii Legend ...........................................................
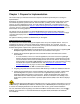
Chapter 1. Prepare for Implementation This section helps you understand and execute steps that should be performed prior to starting the implementation. Specifically, this solution illustrates how to design and implement a collaborative portal solution. Portals are websites targeted at specific audiences and communities, providing content, collaboration, and services, as well as applications access, for target audiences delivered in a customized manner. The implementation steps described in Chapter 2.
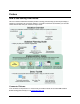
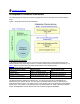
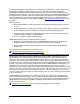
www.ibm.com/redbooks Development Environment Architecture The following diagram depicts the systems and applications that are described in this Solution Starting Point. Figure 1. Development Environment Architecture Server Naming Conventions In this Solution Starting Point, servers are referred to by product name, function, DNS host name and Domino domain name, depending on context.
Development Tools It is recommended to use the IBM Lotus Component Designer V6 (formerly IBM Workplace Designer) or IBM WebSphere Portlet Factory for developing portlets to use with IBM WebSphere Portal Express V6.0. IBM Lotus Component Designer V6 ships with IBM WebSphere Portal Express V6.
It complements WebSphere Portal with tools and technology to rapidly create, customize, maintain, and deploy portlets. WebSphere Portlet Factory's ease of use and advanced development features dramatically streamline the entire portlet development process. This acts to speed WebSphere Portal deployments and increase ROI. The Portlet Factory runtime component is included with IBM WebSphere Portal Express V6.
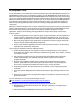
Required Materials Checklist The following is a list of the items you need to gather to complete the task of installing and configuring the solution: Table 2. Required Materials Checklist Item Category Hardware Server machines: ● Portal Server ● Domino Mail and Directory Server ● Sametime Connect Server Note: For more information about these servers, refer to the Solution Architecture section of the Overview Guide.
4. Download the following required files, and the applicable optional files: Table 3. Required files for IBM WebSphere Portal Express Product Name and description IBM WebSphere Portal Express V6.0 Quick Start Guide Filename C97Q2ML IBM WebSphere Portal Express Quick Start and Server Install, V6.0 (W, IL, I - Setup) C97Q3ML IBM WebSphere Application Server Network Deployment for Windows, V6.0.2.15 (W-1) C97Q4ML IBM DB2 UDB, Express Edition for Windows, V9.1.
Table 4. Optional files Product Name and description IBM Lotus Domino 7.0.1 Language Pack for Windows 2000/2003 and i5/OS Spanish Filename C8990ES IBM Lotus Domino 7.0.1 Language Pack for Windows 2000/2003 and i5/OS French C8990FR IBM Lotus Domino 7.0.1 Language Pack for Windows 2000/2003 and i5/OS Italian C8990IT IBM Lotus Domino 7.0.1 Language Pack for Windows 2000/2003 and i5/OS Danish C89UVDA IBM Lotus Domino 7.0.
http://publib.boulder.ibm.com/infocenter/wpdoc/v6r0/topic/com.ibm.wp.exp.doc/wpf/inst_exp_prod.ht ml If you choose to install a non-collaborative portal without the instant messaging or other IBM Lotus Domino based products, you may choose to use IBM WebSphere Portal Express by itself. The solution example and solution use cases provided in this Solution Starting Point and additional Industry Supplements require a collaborative portal and do not work in a portal-only environment.
Server Information Worksheet Install the operating systems on all the required servers. Use the following table to record your values. A separate spreadsheet of this table is packaged with this Solution Starting Point. Table 5.
purposes, you may want to set all servers to the same time zone, and the same time and date. You need to adjust the session timeout value for the Domino directory server to accommodate requirements from your customer. A Domino directory is a collection of user and resource information, such as user names, user IDs, passwords, server names and information used by software programs for lookup and authentication.
1. On the system that will be used as the portal server, create a Windows user ID and make this user a member of the Administrators group to provide it with administrative rights. 2. Assign the following user rights to the user account: ● Act as part of the operating system ● Log on as a service User rights are maintained with the Local Security Policy tool. To view or modify the user rights: 1.
Chapter 2. Install and Configure Essential Solution Software This section describes how to install and configure the products required to implement this solution. Task Summary Perform the tasks as listed in the table below in the order listed and on the machine identified. A separate spreadsheet of this table is packaged with this Solution Starting Point for your use. To ensure each task is completed, you may want to print out this table and use it as a checklist. Table 8.
Install IBM WebSphere Portal Express Perform this task on the Portal Server. This section is a guide for the installation of IBM WebSphere Portal Express. Detailed installation steps are located in the Information Center provided on the setup CD. IBM WebSphere Portal Express is installed on the Portal Server. For more information, see the main product website at: http://www.ibm.
● IBM WebSphere Portal Express requires IBM WebSphere Application Server in order to function. In this Solution Starting Point, it is assumed that IBM WebSphere Application Server is not already present in the network, and therefore it is installed with the portal software.
Table 10. IBM WebSphere Portal Express Installation Parameters Setup type Installation Directory ● ● ● 1 Run WebSphere Application Server as a service System Logon User ID Password Typical C:\IBM\PE Values: ● Selected ● wpsadmin ● N/A Node Name (of Portal Server machine) Host Name (fullyqualified hostname of Portal Server machine)
Preparing the Silent Installation Copy the files on the WebSphere Portal CDs to the local hard drive, or a network share. Use a directory structure similar to c:\cdimg\w-setup, c:\cdimg\w-1, etc. Copy the installresponse.txt file to a temporary location such as c:\temp, and then using a text editor, modify the following key values. Table 11 below identifies the installation value and options chosen for this response file.
Note: 1. This user should have logon as a service, act as part of the operating system, and belong to the Administrators group. It was created in Create User IDs on page 10. Starting the Silent Installation Execute the following command to perform the installation silently using the response file: c:\w-Setup\cdSetup\install.bat-options c:\temp\installresponse.
Sametime Connect Server This section describes how to set up the IBM Lotus Domino Server for Directory and Web mail services. Before You Begin IMPORTANT: It is critical that all servers are set up for the same time and date in order for singlesign on to work. IBM Lotus Domino Server installation must be completed as a prerequisite for setting up Web mail, Domino applications, the LDAP directory services, instant messaging, and e-meetings.
Configure the Directory Server For this installation, you configure the Directory Server as the first Domino server in the Domino domain. Key Parameters If desired, use this table to record information you provide during the configuration for later reference. A separate spreadsheet of this table is packaged with this Solution Starting Point. Table 13.
5. The wpsadmin ID and password are used to administer two servers in the Domino domain: the Directory Server and IBM Lotus Sametime Connect. 6. This option enables Web Browsers (HTTP services), Internet Mail Clients (SMTP, POP3, and IMAP services), and Directory Services (LDAP services) on the server. 7. The server's TCP/IP host name. It is recommended that you use the following convention: servername.your_organization_domain_name.
b. In the TCP/IP line, verify that the Host Name field shows the fully qualified host name for the server. c. If needed, modify the fully qualified internet host name for this Domino server in the box below the port settings (should match the entry in step b above). d. After you click OK, you are taken back to the Domino network settings page where you can click Next. 11. Keep the default security settings. 12. Verify the settings summary and click Setup. 13. Click Finish to exit the configuration wizard.
Special Considerations For demonstration, evaluation, or development purposes, it is easiest to install the clients on one of the Domino-based servers if you have a Windows environment. In a production environment, however, you should install the Domino Administrator client along with Lotus Notes on a machine other than the server.
7. Start the Domino Administrator client (there is an icon on the desktop, or use the Start menu). The Notes client configuration wizard appears. 8. On the Welcome screen, click Next. 9. On the User Information screen, enter the administrator's name (for example, wpsadmin) and the master domino server name (for example, directory/mycompany). Check the box to indicate that you want to connect to a Domino server. Click Next. 10. Respond to the password prompt with the administrator's password. 11.
Figure 2. Registration Screen in Domino Administrator 3. Click Server... to open the Server registration tool. 4. On the Choose a Certifier panel, click Server... and select the directory server. a. Select Supply certifier ID and password and click Certifier ID... b. Navigate to c:\Lotus\Domino\data and select the certifier ID (cert.id). c. Click OK and enter the certifier password when prompted. d. On the Certifier Recovery Information Warning, check the box to not show future warnings and click OK.
5. Click Continue. 6. Fill in the registration details for each new server: a. Server name (for example, sametime) b. Verify that the server administrator is correct. Tip: You can select the LocalDomainAdmins group for the Server Administrator name field. This allows everyone who is in the LocalDomainAdmins group to administer the server. Once you have created new users, you can add the appropriate names to this group to grant them administrator rights to the server.
7. On the Basics tab, set or verify the following values: ● Connection type: Local Area Network ● Source server: master server (for example, directory/mycompany) ● Destination Server: name of server group (for example, MyCompanyServers) 8. Click Save & Close. Update Server Configurations In the Domino Administrator client: 1. Go to the Configuration tab and select Server -> All Server Documents in the navigation tree. 2. For the two servers listed (directory andsametime): a.
3. In the SSO configuration document make the following entries: a. Configuration name: LtpaToken (default) b. Organization: Leave this blank. c. DNS Domain: Enter the Internet domain that all of your servers share. d. Domino Server Names: Select and add all of the servers (directory and sametime) from the directory (this uses the proper hierarchical name for each server). e. Click Keys...
Figure 3. Register Person Screen in Domino Administrator Client 7. Enter the First Name (test) and Last Name (user1) of the user. Note that the short name defaults to tuser1. 8. Under Mail System select Domino Web Access. Click Yes to accept the registration settings changes. 9. Enter the Password. 10. Click the ID Info tab and select a certifier (/mycompany) in the Certifier Name list. 11. Click the green checkmark button to add test user1 to the registration queue. 12.
2. Go to the Mail tab and click New. Click Yes to the security warnings to download and run Domino Web Access Control. 3. Select new message from the Mail tab to open the e-mail editor window. In the e-mail editor, click the To: button to bring up the Select Addresses dialog. Select mycompany's Directory in the Search dropdown list. Select user2, test and click the To: button. Click OK to close the Select Addresses dialog. 4. Enter a subject and some text. Click Send and File...
5. Select The server ID file is stored on a floppy disk, CD or network drive and browse to the ID file created when the server was registered on the master Domino server. 6. The server name is determined from the ID file. 7. When prompted to specify Internet services, select only Web Browsers (HTTP services). 8. On the Domino network settings page, click the Customize button to configure the port drivers and host name: a. Deselect NetBIOS ports. b.
Set up the IBM Lotus Sametime Connect Perform this task on the Sametime Connect Server. This section describes how to set up the IBM Lotus Sametime Connect. As with the Directory Server, installation of a standard IBM Lotus Sametime Connect (Sametime) server is straightforward. The procedure for installing a Sametime server into a Domino infrastructure is provided below. IMPORTANT: Sametime requires that the Domino executables and data files reside on the same drive.
c. Add UserInfoServlet to the list of servlets on this line and separate it from the other servlet names with a blank space. d. Restart the Domino and Sametime servers. Note: Even after the console says, "Sametime Server: Running", some services are still being loaded in the background. Use the Windows Services applet to monitor the status of all the Sametime services (prefixed by "ST"). Update stpolicy.
start before attempting verification. Check Windows Services to make sure all the Sametime services (prefaced with "ST") have started. Verification When you enter the URL for the Sametime server, for example: http://sametime.mynetwork.com you should see the Welcome to Sametime screen. When you attempt to do something that requires authentication (for example, administer the server) you should see the Log On to Sametime SSO login screen.
Verify Sametime Meetings Note: You need to have Java Virtual Machine (JVM) enabled for the selected browser for the Sametime Meetings to work. Ensure your browser meets this requirement or go to http://www.java.sun.com to download and install the Sun JVM. During our testing of this solution, both versions 1.4 and 1.5 were used and they functioned. Go to: http://java.sun.com/j2se/1.4.2/download.html or http://java.sun.com/j2se/1.5.0/download.
Turn Off Secrets and Tokens Database for Domino By default, Domino tries to use the Sametime Secrets and Tokens authentication. If you want to enable Domino to use SSO, you must turn this off. Although not technically required, it is strongly recommend that you do this because SSO is a critical new support feature across all of the products starting in version 6.5, including the Notes client. To convert to SSO: 1. Add the following line to the Directory Server Notes.ini file: iNotes_WA_SametimeToken=0 2.
Configure IBM WebSphere Portal Express Server to Use Domino Directory This task needs to be performed on the following systems: Directory Server Portal Server The next sections take you through the various steps necessary to connect Secure Portal to the Domino Collaborative Servers using the Lotus Collaborative Components to enable users to experience single sign-on (SSO) between the Portal Server and Domino E-mail and Sametime Connect Server (Sametime).
Note: 1. Enter each value on a separate line in the entry field. 4. Click Save & Close. 5. Click Groups in the navigation pane and click Add Group. 6. Enter wpsadmins as the group name and add wpsadmin and wpsbind as members. 7. Click Save & Close. 8. Repeat steps 5 to 7 to add the three groups and do not add any new users in them at this time. You must ensure that the administrator group, wpsadmins, has the proper permissions and roles in the Domino Directory. 1.
1. In the Domino Administrator client, go to the Configuration tab and navigate to Server -> All Server Documents. (Be sure to switch back to the Directory server using File -> Open Server...) 2. Edit the configuration document for the Directory server (directory/mycompany). 3. On the Internet Protocols tab, select the HTTP tab, and ensure that the following settings are specified: a. Host Name - The fully-qualified host name of the server; for example, directory.mynetwork.com. 4.
Table 17. Configure IBM WebSphere Portal Express Server to Use Domino Directory LDAP PortalAdminIdS wpsadmin The short name for the IBM WebSphere Portal hort Express Server administrator. PortalAdminPwd Password for wpsadmin The password for the IBM WebSphere Portal Express Server administration.
Detailed Steps for the Advanced Configuration Wizard 1. Select the task you want to perform. Choose the Enable LDAP security radio button. 2. Specify the Portal Express Server Administrator user ID and password used during the IBM WebSphere Portal Express installation. Enter as cn=user_id,o=organization_name. 3. You should see the message, "Before continuing, the WebSphere Application Server must be stopped. To stop the server and start the configuration task, click Next.
● Password: enter the same password used for ID used to install IBM WebSphere Portal Express 11. You will see message, "Validating input, please wait." Go back to correct any input not validated; otherwise, you will see message, "IBM Portal Express is ready to run the following configuration, and the list of values you have entered." Review the list and ensure all values are correct, then click Next to proceed.
Table 18. Values for Collaborative Components Properties Property LCC.Sametime.Enable d Example Value true Description LCC.Sametime.Server sametime.mynetwork.c om The Lotus Sametime server name. LCC.Sametime.Protoc ol http The protocol used to connect to the Lotus Sametime server. LCC.Sametime.Port 80 The port number for the Lotus Sametime server. LCC.DominoDirectory .Enabled true Is Lotus Domino Directory enabled in the environment? LCC.DominoDirectory .Server directory.mynetwork.
5. Expand the Authentication mechanisms section. 6. Click Single Sign on (SSO) in the Additional Properties section. 7. Make sure you check the boxes for Enabled and Interoperability Mode, and fill in the Domain name (for example, mynetwork.com). Note: Make sure there is no leading dot (.) in the domain name. Click OK. 8. Select the LTPA link. 9. Within the Key File Name field, provide a file name in which to save the SSO key (for example, portalsso.key). 10. Select to Export the Keys. 11.
Verification Procedure You can validate the SSO function with these steps: 1. Open a browser to http://portal.mynetwork.com:10038/wps/portal. Log in to the portal as the one of the test users ( Test User 1 - test user1). Verify that the upper right displays "Log Out: tuser1." (Do not click on it.) 2. To verify SSO with both Domino servers, keep the browser window open and switch to the Directory Server: http://directory.mynetwork.com/mail/tuser1.nsf Verify the upper left displays "Welcome tuser1." 3.
Enable the Mail Portlet in Messaging Perform the following steps to enable the Mail portlet in Messaging: 1. Login to the portal using a Portal Administrator ID (for example, wpsadmin) and password. 2. Go to the Messaging Welcome page. 3. Click the Mail tab. 4. Move the mouse pointer to the top of the Mail portal window and you will see a downward pointing triangle on the right corner. Click on the triangle to see a down-drop list and select configure from the list. 5.
11. In the new file, at the end of the line, add the internet password for the user ID (that was entered for CS_SERVER_DOMINO_DIRECTORY_1.userid). 12. Save and close the new file as dominobind.txt in the directory. 13. Open a command prompt to the \bin directory. 14. In the same directory, run the following command (type as one line with a space character separating it): PropFilePasswordEncoder dominobind.txt CS_SERVER_DOMINO_DIRECTORY_1.encryptedpwd 15.
Enable Lotus Sametime in Domino Integration Perform the following steps to enable Lotus Sametime in Domino integration: 1. Stop the IBM WebSphere Portal Express server by going to the \bin directory and enter the following command in a command prompt window: stopserver.bat WebSphere_Portal -user -password 2. Go to the \shared\app\config directory and locate the CSEnvironment.properties file. 3. Make a backup copy of this file before editing it. 4.
Chapter 3. Create Demo Users Perform this task on the Directory Server. You need to create the following users for the demo use cases. Table 19.
11. Click Migrate and click OK to close the message that indicates the number and status of the users queued for registration. (There should be 9.) 12. Click Done. 13. The people queued for registration now appear in the Registration status box. Click Register All. A status bar appears showing the progress, which may take from 10 to 30 seconds per user depending on processor speed. 14. After the process completes, a message appears informing you of the registration status.
Chapter 4. Using the Solution This section contains a set of use cases that can be followed to ensure the solution is installed and configured correctly. They can also be used as the basis for a demonstration to customers. These use cases help you to understand how to use the portal that you have implemented from the point of view of the end users. You can follow the navigation as it is laid out in this section to become familiar with the portal.
specific clients and now can be accessed using a single browser access point. Explain that employees can use their customized environment with all required applications, from everywhere, when they can access the portal. The easiest way to do this is to center your navigation on what each user role can see. For each one, describe the available features for a normal end user and for a content manager user and how they can access and use the portal.
The rest of these examples present the different views in the portal that the employees have, depending on their role. Collaboration Scenario Collaboration addresses many aspects of communication within the business environment including email, instant messaging, and online e-meetings. Collaboration enables virtual teams to form and dissolve as needed to tackle business problems and effectively manage projects. Online e-meetings are especially useful for participants in different locations.
3. Click Send. 4. On Vic's client machine, respond Tomorrow from 3-4 would be perfect. and click Send. HR Policy Education Using e-meetings This section demonstrates how an e-meeting is used to educate store managers on updated HR policies. Create an e-meeting The following steps demonstrate how team members can create an e-meeting and hold a discussion. 1. Log in to the portal as HR Advisor, Kristen Baker. 2. Select Launch -> Domino Integration. Select the My Team tab. 3.
Chapter 5. Customize the Solution When you are developing a solution to satisfy the customer requirements some form of customization is usually involved. This section helps you understand and implement common customizations for this solution and how to create a unique theme and skin for your portal. Creating New Themes Perform this task on the Development Client.
add it to styles.jsp. You can change the style definitions. However, make sure that you do not delete any style sheets or remove any style classes. 4. To add the theme, use the Themes and Skins portlet under Administration -> Portal User Interface. 5. Edit the properties of a test page and set the page to use the new theme that you created. Note: Be sure to use a test page for the new theme to work out any problems before setting the default page to the new theme.
b. Select the Content Root page title to select the Content Root page. c. At the Content Root page, click New Label. d. Create a label called My Favorites. e. Assign privileged user access to all authenticated users. f. Click OK when you have finished. g. Click Portal Settings -> Custom Unique Names. h. Assign wps.My Favorites as a unique name to the My Favorites label you just created. i. Click OK when you have finished. j. Click Administration -> Portal User Interface -> Manage Pages. k.
/installedApps/cellname/wps.ear/wps.war/skins/markup_ type/MySkin Note: To avoid problems with the directory name, do not use DBCS characters. 2. Copy all of the files and subdirectories from another skin directory into the new directory. For example, you could copy the files from the /IBM skin. Note: If you are using the portlet context menus then the portletContextMenu.
Appendix. Notices This information was developed for products and services offered in the U.S.A. IBM may not offer the products, services, or features discussed in this document in other countries. Consult your local IBM representative for information on the products and services currently available in your area. Any reference to an IBM product, program, or service is not intended to state or imply that only that IBM product, program, or service may be used.
Such information may be available, subject to appropriate terms and conditions, including in some cases, payment of a fee. The licensed program described in this information and all licensed material available for it are provided by IBM under terms of the IBM Customer Agreement, IBM International Program License Agreement, or any equivalent agreement between us. Any performance data contained herein was determined in a controlled environment.
Java and all Java-based trademarks are trademarks of Sun Microsystems, Inc. in the United States, other countries, or both. Linux is a trademark of Linus Torvalds in the United States, other countries, or both. UNIX(R) is a registered trademark of The Open Group in the United States and other countries. Adobe and Adobe Acrobat are trademarks of Adobe Systems Incorporated. Bowstreet is a trademark of Bowstreet, Inc. The IBM logo is a registered trademark of IBM Corporation.