TN5250 Terminal Emulation User’s Guide
TN5250 Terminal Emulation User’s Guide
Contents Overview Introduction . . . . . . . . . . . . . . . . . . . . . . . . . . . . . . . . . . . . . . . . . . . . . v About This Guide. . . . . . . . . . . . . . . . . . . . . . . . . . . . . . . . . . . . . . . . . v About TN5250 Terminal Emulation . . . . . . . . . . . . . . . . . . . . . . . . . . . v Product Features . . . . . . . . . . . . . . . . . . . . . . . . . . . . . . . . . . . . . v The TN5250 Connection. . . . . . . . . . . . . . . . . . . . . . . . . . . . . . . .
ii Contents Edit Key Conflict Menu . . . . . . . . . . . . . . . . . . . . . . . . . . . . . . . . . .2-15 Help Menu . . . . . . . . . . . . . . . . . . . . . . . . . . . . . . . . . . . . . . . . . . . .2-16 3 Terminal Keyboard Keyboard Layouts . . . . . . . . . . . . . . . . . . . . . . . . . . . . . . . . . . . . . . .3-1 5250 Keyboard . . . . . . . . . . . . . . . . . . . . . . . . . . . . . . . . . . . . . .3-1 Terminal Keyboard . . . . . . . . . . . . . . . . . . . . . . . . . . . . . . . . . . .
Contents iii 2-9 2-10 2-11 2-12 Edit Keys Menu . . . . . . . . . . . . . . . . . . . . . . . . . . . . . . . . .2-13 Auto Key Entry Menu . . . . . . . . . . . . . . . . . . . . . . . . . . . . .2-14 Edit Key Conflict Menu . . . . . . . . . . . . . . . . . . . . . . . . . . . .2-15 Main Menu - TN5250 - Help . . . . . . . . . . . . . . . . . . . . . . . .2-16 3-1 3-2 IBM-Style 5250 Keyboard Layout. . . . . . . . . . . . . . . . . . . . .3-1 Terminal Keyboard Layout . . . . . . . . . . . . . . . . . . . .
Copyright Notice © 1998 ALL RIGHTS RESERVED. This manual and the software and firmware described in it are copyrighted. You may not reproduce, transmit, transcribe, store in a retrieval system, or translate into any language or computer language, in any form or by any means, electronic, mechanical, magnetic, optical, chemical, manual or otherwise, any part of this publication without express written permission. Trademarks IBM is a registered trademark of International Business Machines.
Control No. 075B License Agreement YOU SHOULD CAREFULLY READ THE FOLLOWING TERMS AND CONDITIONS BEFORE USING THIS SOFTWARE (TOGETHER WITH ANY SUPPLIED DOCUMENTATION, HEREAFTER “SOFTWARE”), WHICH IS COPYRIGHTED BY LICENSOR. USING THIS SOFTWARE INDICATES YOUR ACCEPTANCE OF THE FOLLOWING TERMS AND CONDITIONS. Grant You may use the Software only in or in conjunction with Your hardware (Terminal).
Overview Introduction The TN5250 Terminal Emulation User’s Guide, explains how to configure and use the TN5250 emulation on your terminal. This emulation is an option for terminals. About This Guide This guide is organized into three chapters and two appendixes: ◆ Chapter 1, “Getting Started,” explains TN5250 terminal emulation connection definitions, connections, and emulator sessions.
vi Overview The TN5250 Connection To operate TN5250 emulation, you must connect to an AS/400 server operating with OS/400 Version 1, release level 3.0 or higher. Additionally, you must be operating the emulator across a TCP/IP network, using an IBM 8209 or equivalent TCP/IP attachment. When you use TN5250 terminal emulation, you are communicating directly with the AS/400 server. This communication is accomplished with the IBM AS/400 system internet protocol.
Overview Command and Key Sequence Format vii Table 2 lists the command and key sequence formats used in this guide. Table 2 Command and Key Sequence Format Conventions Convention Description command < xxx > Command format. The right and left angle brackets indicate the boundaries of the parameter list. Alt + x Key sequence format. To enter this type of key sequence, press the keys simultaneously in the sequence shown. The operation is performed only when the last key is pressed.
1 Getting Started This chapter discusses how to initiate TN5250 terminal emulation and explains: ◆ Downloading the TN5250 terminal emulation option. ◆ Defining and using TN5250 connections. ◆ Opening and exiting sessions. Read this chapter carefully before attempting to connect to a TN5250 server. Downloading TN5250 Option Firmware The downloading of the TN5250 is similar to a flash download, and is done through the serial port, the parallel port, the Remote Administration tool, or the PCMCIA card.
1-2 Chapter 1 You will connect to the host you specified in the connection definition selected. Connection definitions appearing in the Connections list can be edited. To edit: 1 Select the connection that you want to edit from the Connections list. 2 Click on the Setup command button in the Connections dialog box. 3 Click on the Properties command button in Connection Setup dialog box. The Connection Properties dialog box displays. Use this dialog box to edit your preexisting connection definition.
Getting Started 1-3 6 Enter a server name and any command options (see Table 1-1, TN5250 Command Options), in the Server Name entry field. ❖ Note The port command option (for example 5250) should be included in the server name entry. ❖ Note If the TN5250 terminal type is grayed out, check with your Administrator to see if the TN5250 application firmware has been downloaded to your terminal. 7 If you wish to activate the reverse video display, click the Reverse Screen button.
1-4 Chapter 1 Table 1-1 ❖ ❖ Sessions TN5250 Command Options, Continued Option Description -terminal Specifies the type of terminal format for the data you receive from the host. Specify terminal type as: ◆ IBM 3179-2 ◆ IBM 5251-11 ◆ IBM 3196-A1 ◆ PC-XT ◆ NVT This option overrides terminal negotiations. -port <#> Specifies the host port you want to use. -? Displays the command option summary. -version Displays the version number and environment variable settings.
Getting Started Emulator-Opened Sessions 1-5 If you have specified an IP address in your connection definition, then once connected the Pass Through Screen displays (see Figure 1-2). Figure 1-2 Pass Through Screen Pass Through Screen Type choices, Press Enter.
1-6 Chapter 1 3 In the Open Session menu with the Tab key select: a Session: Enter a name for your session. b Host Name: (skipping Auto Start) Enter the address of the server. c Port Number: Specify 23 or other appropriate number. 4 Skip IBM Terminal Type, and press Ctrl. Your initial session will be opened. ❖ Ending a Session Note The maximum number of simultaneous open sessions is three.
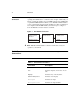
2 The Menu System The TN5250 menu system is used to: ◆ Control sessions ◆ Invoke utility functions ◆ Map keyboards Additionally, the TN5250 menu system includes a help section. The help section is discussed in Help Menu at the end of this chapter, and presents additional information about emulator menus and functions. Main Menu Figure 2-1 shows the TN5250 Main Menu that displays after connecting with an emulator-opened session. From this menu, you can access any TN5250 function.
2-2 Chapter 2 Figure 2-1 Main Menu - Emulator-Opened Sessions Main Menu - TN5250 >> >> >> >> >> Sessions About TN5250 Utilities Screen Attributes Keyboard Mapping Exit TN5250 Right Ctrl:Current Selection Tab:Next Field F3:Exit Menu Figure 2-2 F1:Help Main Menu - User-Opened Sessions Main Menu - TN5250 >> >> >> >> >> Open Session About TN5250 Utilities Screen Attributes Keyboard Mapping Exit TN5250 Right Ctrl:Current Selection Tab:Next Field F3:Exit Menu Menu Control Keys F1:Help Menus are invoke
The Menu System 2-3 The keys that appear at the bottom of each menu allow you to navigate through the menus. These are menu control keys, and are described in Table 2-1. Table 2-1 Sessions Menu Menu Control Keys Key Description F1 Invokes the help system. F2 Edits a key. F3 Exits to the menu. F4 Displays a list of current information. F5 Refreshes the connection information. F6 Saves a connection definition. F12 Returns to the previously viewed menu. Page Up Moves to the previous page.
2-4 Chapter 2 Invoke the Sessions menu by: 1 Position the cursor next to Sessions. 2 Press Ctrl (right). The Sessions menu displays. Figure 2-3 shows the Sessions menu. The menu displays a list of preexisting connection definitions.
The Menu System 2-5 Table 2-2 describes the functions in the Sessions menu. Table 2-2 Open Session Menu Sessions Menu Functions Function Description 1=Create Use this function to create a new session. New sessions are created in the Open Session menu (refer to Open Session). Once the data is entered in the Open Session menu, press F3. A new session will display in the Sessions menu. 2=Copy Copy duplicates a session. Press Ctrl (right).
2-6 Chapter 2 Figure 2-4 Open Session Menu Open Session *Session Auto Start ______________________________ no____ [Default Values] *Host Name *DFLT__________________________ OCS_Gateway Port Number *DFLT 23 *IBM Terminal Type *CALC____________ IBM-5251-11 Right Ctrl:Current Selection F1:Help F3:Exit Menu F5:Refresh F6:Save Tab:Next Field F4:List F12:Prev Menu The parameters displayed in this menu appear as data entry fields.
The Menu System ❖ About TN5250 Menu 2-7 Note For the Session, Auto Start, Host Name, and IBM Terminal Type data fields, user-selectable lists are available. To invoke a list, position the cursor at the appropriate field, then press F4. The About TN5250 menu displays the release information for your terminal emulator software. Invoke this menu by: 1 Position the cursor next to About TN5250 in the Main menu. 2 Press Ctrl (right). Figure 2-5 shows the About TN5250 menu.
2-8 Chapter 2 Utilities Menu The Utilities menu displays the Set Local Parameters function. Invoke this menu by: 1 Position the cursor next to Utilities in the Main menu. 2 Press Ctrl (right). Figure 2-6 shows the Utilities menu. Figure 2-6 Utilities Menu Utilities >> Set Local Parameters Right Ctrl:Current Selection F3:Exit Menu F1:Help F12:Prev Menu Set Local Parameters lets you control some additional local terminal features. Table 2-4 describes the functions of the Set Local Parameters menu.
The Menu System Table 2-4 Remapping Local Parameter Keys 2-9 Set Local Parameters Functions Function Key Sequence Echo Char Ctrl + E Echoes a character. This function sets the local echoing (local display) of characters that you enter at the keyboard. You can set the emulator to either display or not display entered characters. Session Escape Ctrl + ] Escapes a session. This function lets you escape from your current session. When invoked, the main menu displays.
2-10 Chapter 2 Screen Attributes Menu The terminal emulator will display IBM TN5250-style screen attributes, depending on the local terminal type setting and application that you are using. The Screen Attributes menu displays these TN5250-style attributes. Invoke the menu by: 1 Position the cursor next to Screen Attributes in the Main menu. 2 Press Ctrl (right). Figure 2-7 shows the Screen Attributes menu.
The Menu System Keyboard Mapping Menu 2-11 You can view your emulator’s current key mappings (sequences) by accessing the Keyboard Mapping menu. Invoke this menu by: 1 Position the cursor next to Keyboard Mapping in the Main menu. 2 Press Ctrl (right). Figure 2-8 shows the Keyboard Mapping menu.
2-12 Chapter 2 Table 2-5 describes the functions of the Keyboard Mapping menu. Table 2-5 Keyboard Mapping Functions Function Description Host Function Keys Lists the host system control keys. Cursor Control Keys Lists the keys that control cursor movement. Screen Control Keys Lists the keys that control the terminal screen. Local Function Keys Lists the local session control keys. Text Assist Keys Lists the keys that control text. Key Map Verification Verifies terminal emulator keys.
The Menu System 2-13 Keys can be edited or changed by using the F2 key, entered in the Keyboard Mapping menu. Position the cursor next to the key you want to edit, in any of the key mapping menus, and press F2. This key invokes the Edit Keys menu. With this menu, you can change or remap any of the emulator keys displayed in the Keyboard Mapping menu. Figure 2-9 shows the Edit Keys menu.
2-14 Chapter 2 Auto Key Entry Menu Key sequences can be entered automatically. To do this, enter the Auto Key Entry mode by pressing F2 in the Edit Keys menu. The Auto Key Entry menu appears. Figure 2-10 shows the Auto Key Entry menu. Figure 2-10 Auto Key Entry Menu Auto Key Entry \ Exit Auto Key Entry To use this menu: 1 Position the cursor next to the key you want to remap. 2 Press F2. 3 Type in your change. 4 Press the \ key. 5 Select Save, then press Ctrl (right).
The Menu System 2-15 If you attempt to map two functions to the same key, the Edit Key Conflict menu appears. See Figure 2-11. Edit Key Conflict Menu Figure 2-11 Edit Key Conflict Menu Edit Key Conflict Please select key to DELETE: Right Ctrl:Open Selection F1:Help Tab:Next Field F12:Prev Menu F3:Exit Menu The Edit Key Conflict menu displays both the key function that you are attempting to map, and the key that is currently mapped to the key sequence.
2-16 Chapter 2 Help Menu The Help menu can be invoked from all top level and secondary menus by pressing F1. Figure 2-12 shows the Main Menu - TN5250 - Help menu. Figure 2-12 Main Menu - TN5250 - Help Main Menu - TN5250 - Help The Main Menu lists commands for operating and navigating in TN5250. Operating commands are displayed near the top of the window.
3 Terminal Keyboard The TN5250 emulation automatically remaps the terminal keyboard to the IBM 5250 terminal functionality. “Terminal Keyboard” discusses: ◆ The differences between the IBM 5250 keyboard and your terminal’s keyboard. ◆ Terminal keyboard features. Keyboard Layouts This section compares the layout of the IBM 5250 keyboard with your terminal’s keyboard. 5250 Keyboard Figure 3-1 shows the IBM-style 5250 keyboard layout.
3-2 Chapter 3 Terminal Keyboard Figure 3-2 shows the terminal keyboard layout. Figure 3-2 Esc ~ Terminal Keyboard Layout F1 F2 F3 F4 F5 F6 ! # $ % ^ & 1 2 3 Q W 4 E 5 R 6 7 Y Tab Caps Lock Shift Ctrl A S Z D X T F C G V * 8 U H B F7 ( ) 9 0 O I J N F8 K M F9 _ - | \ Print Scroll Pause Screen Lock Sys Rq Insert Break Home Page Up Delete End Page Down Enter ? / Shift Alt Alt F12 Back Space } ] : ; > .
Terminal Keyboard Table 3-1 3-3 TN5250 Keys, Continued TN5250 Key Function Delete Deletes a character where the cursor is positioned. Double Speed Left Moves cursor four positions to the left. Double Speed Right Moves cursor four positions to the right. Dup Duplicates the last field. Enter Executes commands, or accepts data and/or selected options currently on the screen. Er Inp Clears all modified fields.
3-4 Chapter 3 Table 3-1 ❖ Host Function Keys TN5250 Keys, Continued TN5250 Key Function Sys Req Allows the display to enter the system request state. Test Req Gives you access to the terminal’s set-up and diagnostic routines. Note For a more detailed description about IBM 5250 keys, refer to the IBM 5250 Information Display System Functions Reference Manual. Table 3-2 lists the host function keys and your terminal’s equivalent key or key sequence.
Terminal Keyboard Table 3-2 3-5 Host Function Keys, Continued TN5250 Key Terminal Key(s) Alternate Terminal Key(s) Cmd8 F8 none Cmd9 F9 none Cmd10 F10 none Cmd11 F11 none Cmd12 F12 none Cmd13 (shift) F1 none Cmd14 (shift) F2 none Cmd15 (shift) F3 none Cmd16 (shift) F4 none Cmd17 (shift) F5 none Cmd18 (shift) F6 none Cmd19 (shift) F7 none Cmd20 (shift) F8 none Cmd21 (shift) F9 none Cmd22 (shift) F10 none Cmd23 (shift) F11 none Cmd24 (shift) F12 none H
3-6 Chapter 3 Cursor Control Keys Table 3-3 lists the TN5250 cursor control keys and your terminal’s equivalent cursor control key or key sequence. See “Keyboard Mapping” in the TN5250 main menu (discussed in Chapter 2) for further information.
Terminal Keyboard Table 3-4 Local Function Keys 3-7 Screen Control Keys, Continued TN5250 Key Terminal Key(s) Alternate Terminal Key(s) Forward Tab Tab none Insert Insert (keypad) Ins Roll Down Pg Up (keypad) PgUp Roll Up Pg Dn (keypad) PgDn Table 3-5 lists the IBM 5250 session keys, and your terminal emulation’s equivalent key. See “Keyboard Mapping” in the TN5250 main menu (discussed in Chapter 2) for further details.
3-8 Chapter 3 Text Assist Keys Table 3-6 lists the TN5250 text assist keys and your terminal’s equivalent key sequence. See “Keyboard Mapping” in the TN5250 main menu (discussed in Chapter 2) for further details.
Terminal Keyboard Table 3-6 TypeAhead Buffering 3-9 Text Assist Keys, Continued TN5250 Key Terminal Key(s) Alternate Terminal Key(s) Cmd Tab Alt o none Shift Tab Alt q none Applications such as data processing and word processing programs normally accept keystrokes as you enter information. However, these applications can lock your keyboard when data is being processed. When a keyboard locks, the II (Input Inhibited) indicator appears on the status line (see Appendix A).
A Error Messages This section describes the error messages that might display on your terminal screen during a TN5250 session. These error messages are grouped into three categories: Telnet Errors ◆ Telnet errors ◆ TN5250 internal errors ◆ Status Line errors Telnet errors are generated by Telnet communications software within a TN5250 terminal. These errors are related to initialization, start up, or connections during a session.
A-2 Appendix A Table A-1 Telnet Errors, Continued Message Cause Resolution TELNET: socket connection failed Unable to create a socket for the TCP/IP client. Possible TCP/IP network problem. See your system administrator. TELNET: Unable to connect to remote host Unable to make connection to the specified host. Either the supplied host name and the port number is not correct, or the host is unable to respond. Verify the host name and port number by executing telnet or ping.
Error Messages The Status Line A-3 The Status Line displays real-time system messages that appear during terminal emulation. This field resides at the bottom of your terminal screen, and consists of seven separate sections. Figure A-1 shows the Status Line. Figure A-1 SA MW Status Line IM II TN_5250-n HOST HELP: ALT? Table A-3 describes each section of the Status Line.
A-4 Appendix A Status errors and their descriptions are listed in Table A-4. Refer to the IBM 5394 Remote Control Unit Functions Reference Manual for further information. Table A-4 Status Line Errors Error Description 0000 Help key not allowed Either no system reference code appears, or the application does not support the key you pressed. 0001 Last keystroke not recognized The terminal cannot keep up with the rate of information entered. As a result, the last character entered is not recognized.
Error Messages A-5 Table A-4 Status Line Errors, Continued Error Description 0009 This field requires numeric characters You attempted to enter non-numeric characters into a field designated numeric. Valid characters for this field are: ◆ Zero (0) through nine (9). ◆ Blank ( ), comma (,), period (.), plus (+), and minus (-). ◆ (pad) 1 key. The (pad) 1 key is used to duplicate these characters in the field. 0010 Only characters 0-9 allowed The key pressed is not valid for a signed numeric field.
A-6 Appendix A Table A-4 Status Line Errors, Continued Error Description 0019 Dup key not allowed in this field You pressed the (pad) 1 key when it is not allowed in this field. 0020 Function Ctrl key invalid in this field You pressed a function key that is not allowed in this field. Press an escape key sequence (field keys) to exit this field, before pressing any more function keys or key sequences. 0021 Mandatory enter field, must enter data The cursor is positioned in a mandatory exit field.
B Troubleshooting Aids Answer the following questions and record the information before you contact technical support. This information can then be used by support engineers, to help you with your problem.
Index-1 Index A G About this guide vii About TN5250 vii Auto key entry menu 2-14 Guide viii C Help menu 2-16 Command options 1-3 Connection properties dialog box 1-2 Connections viii command options 1-3 definitions, preexisting 2-4 new 1-2 preexisting 1-1 Conventions viii Creating sessions 2-5 Cursor control keys 3-6 I D Downloading firmware 1-1 E Edit key conlict menu 2-14 Edit keys menu 2-13 Emulator-opened sessions 1-5 Ending a session 1-6 Errors status line A-3 Telnet A-1 TN5250 A-2 F Feature
Index-2 open session menu 2-5 screen attributes menu 2-10 sessions menu 2-3 TN5250 menu 2-7 utilities 2-8 O Open session menu 2-5 functions 2-6 P Pass through screen 1-5 R Remapping local parameter keys 2-9 Requirements viii S Screen attributes menu 2-10 Screen control keys 3-6 Sessions 2-3 emulator-opened 1-5 ending 1-6 menu 2-3 menu functions 2-5 starting 1-4 user-opened 1-5 Set local parameters functions 2-9 Status line A-3 errors A-3 Summary menu system 2-1 sessions 2-3 T Telnet errors A-1 Termina
883554-02 Rev. A June 1998 Printed in U.S.A.