IBM ThinkPad 380XD/385XD Setup Guide
IBM IBM ThinkPad 380XD/385XD Setup Guide
First Edition (November 1997) IBM might not be offering the products, services, or features discussed in this document in all countries, and the information is subject to change without notice. Consult your local representative for information on the products, services, and features available in your area.
Contents Checking Your Items . . . . . . . . . . . . . . . . . . . . . . . . . . . . . . . . . . . . . . . Setting Up Your Computer Setting Up Windows 95 . . . . . . . . . . . . . . . . . . . . . . . . . . . . . . . . . . . 5 . . . . . . . . . . . . . . . . . . . . . . . . . . . . . . . . . . . . . 11 Registering Your Computer . . . . . . . . . . . . . . . . . . . . . . . . . . . . . . . . . . . 15 Shutting Down Windows 95 . . . . . . . . . . . . . . . . . . . . . . . . . . . . . . . . . . 17 .
iv IBM ThinkPad 380XD/385XD Setup Guide
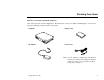
Checking Your Items Welcome to the world of ThinkPad computers! First, remove the items from the shipping box. Match the items, one by one, with the following figures. If any item is missing or damaged, contact your place of purchase. Computer Battery Pack AC Adapter Power Cord Note: In some countries, a 3-pin power cord (different from the one shown) comes with your computer. In this case, make sure you read the electrical safety notice on page 3. Copyright IBM Corp.
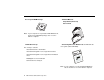
Recovery CD-ROM Package ThinkPad Manuals Setup Guide (this book) User's Guide Note: If your computer is not preloaded with Windows 95, the Recovery CD-ROM package does not come with the computer.
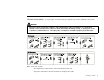
Electrical Safety Notice: If a 3-pin power cord came with your computer, you need to follow this safety notice. DANGER Electrical current from power, telephone, and communication cables is hazardous. To avoid shock hazard, connect and disconnect cables as shown below when installing, moving, or opening the covers of product or attached devices. The 3-pin power cord must be used with a properly grounded outlet. Note: In the U.K., by law: The telephone line cable must be connected after the power cord.
4 IBM ThinkPad 380XD/385XD Setup Guide
Setting Up Your Computer You are now ready to assemble and start your computer. 1 Turn the computer upside down. 2 Install the battery pack. a) Pull the battery-pack lock upward 1 . DANGER 1 The battery pack provided with your computer contains a small amount of harmful substances. To avoid possible injury: Keep the battery pack away from fire. Do not expose the battery pack to water or rain. Do not attempt to disassemble the battery pack.
c) Press the battery-pack lock downward 4 . 5 Connect the AC Adapter to the computer as shown. 4 1 3 Turn the computer over again. 4 Connect your printer. If you have a printer, open the connector cover of your computer, and connect the printer cable to the parallel port. Then turn the printer power on.
6 Open the liquid crystal display. a) Press the liquid crystal display (LCD) latches 1 and open the LCD 2 . b) Position the LCD so that it is convenient for viewing. The LCD opens up to 135°. Attention Do not force the LCD to open flat. 1 7 Turn the power on. a) Push and release the power switch to turn the computer 1 on. The power switch automatically snaps back to its original position.
After a single beep, the “Regional Settings” window appears. Congratulations if you have the window successfully displayed! Move on to the following chapter, “Setting Up Windows 95.” If any other window appears, a failure might have occurred in the computer. See the ThinkPad User's Guide. If you do not know how to operate with the TrackPoint III, see the following information.
Using the TrackPoint III The TrackPoint III is a unique device for moving the pointer on the screen. The left and right click buttons function like the left and right click buttons on a mouse. So you can perform all the mouse operations with the TrackPoint III. To move the pointer, press gently on the red-topped stick at the center of the keyboard with your left or right index finger in the direction you want it to move.
10 IBM ThinkPad 380XD/385XD Setup Guide
Setting Up Windows 95 Note: If the system stops while you are setting up Windows 95, turn the power off and then on again. The following window should be displayed on your screen: 3 1 From the list, select the language you will be using. Then click on Next. The “Keyboard Layout” window appears. 2 From the list, select the keyboard you will be using. Then click on Next. The “User Information” window appears: Copyright IBM Corp. 1997 Type your name (and company name, if necessary) in the fields.
12 4 Read the contents of the window. If you accept the agreement, click on I accept the agreement. Then click on Next. The “Certificate of Authenticity” window appears: 5 Look at the cover page of Introducing Microsoft Windows 95. On your “Certificate of Authenticity,” find the “Product ID” above the bar code. In the three input fields of the window, type that number. Then click on Next. The “Start Wizard” window appears. IBM ThinkPad 380XD/385XD Setup Guide 6 Click on Finish to start Windows 95.
8 Click on the tab for Date & Time and go to that page. Check that the date and time are correct. If not, adjust them. Click on Close. The first “Add Printer Wizard” window appears: 10 Look for your printer manufacturer in the Manufacturers list. If your manufacturer is listed: Note: If you do not have a printer, or want to set up a printer later, click on Cancel and skip the remaining steps. The setup is finished and you can start using your computer.
The third “Add Printer Wizard” window appears: 12 Type in a name you want for your printer, and click on Next. (You can use the name supplied.) The last “Add Printer Wizard” window appears. 13 Select Yes and click on Finish. A test page is printed. 14 Did the test page print correctly? Click on Yes if so. The Windows 95 desktop appears. Click on No if not. The “Windows Help” window appears. Follow this window and solve your printer problem.
Registering Your Computer After setting up Windows 95, take a few moments to complete the ThinkPad registration. The information provided by you will help IBM to better serve you in the future. To register with Windows 95 desktop, do the following: 1 Double-click on the Register icon ( Note: If your computer uses other operating system, go to the following web site to complete registration. http://www.us.pc.ibm.com/register ). 2 Follow the instructions on the screen to complete the registration.
16 IBM ThinkPad 380XD/385XD Setup Guide
Shutting Down Windows 95 When you are finished setting up Windows 95 and you want to shut down, do the following: 1 Click on Start at the bottom left corner of the screen. The following menu appears: 2 Click on Shut Down. A confirmation message appears. Shut down the computer? is the default selection. 3 Click on Yes if you want to shut down the computer. The power turns off automatically.
18 IBM ThinkPad 380XD/385XD Setup Guide
Getting More Information After you have completed setting up your computer and Windows 95, you can start using your computer: If you want to learn more about your computer, refer to the ThinkPad User's Guide.
Attention Your ThinkPad computer provides two ways to recover lost or damaged software, the Diskette Factory program and the Recovery CD. For details, refer to the ThinkPad User's Guide. If your computer is not preloaded with Windows 95, the Recovery CD does not come with the computer. Note: You can get support information through the IBM Internet home page, at the following URL: http://www.us.pc.ibm.
You can identify the hardware features on your computer here.
Rear View External battery indicator External suspend mode indicator Hard disk drive Security keyhole Connector cover PC Card eject buttons PC Card slots Volume control Microphone/line-in jack Headphone jack Power switch External-input-device connector Serial connector Power jack Parallel connector Universal serial bus (USB) port External-monitor connector 22 IBM ThinkPad 380XD/385XD Setup Guide
Bottom View (with Battery Pack Installed) Getting More Information 23
24 IBM ThinkPad 380XD/385XD Setup Guide
IBM Part Number: 05L2144 Printed in the United States of America 5L2144