PowerLine HD Ethernet Adapter quick install guide Model 503273 English Deutsch Español FRANçAIS POLSKI Italiano INT-503273-QIG-ML1-0407-04-0
PowerLine HD Ethernet Adapter • Quick Install Guide English Thank you for purchasing the INTELLINET NETWORK SOLUTIONS PowerLine HD Ethernet Adapter, Model 503273. This guide presents the basic steps to set up and operate this device. For detailed instructions and specifications, refer to the user manual on the CD enclosed with this product or at www.intellinet-network.com.
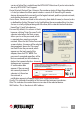
Utility Installation 1. Insert the included utility CD, then run the setup.exe program to begin the installation. (You can also run the Power Packet setup.exe Utility Setup.msi setup program using the CD’s autorun program.) 2. When the Welcome to the PowerPacket Utility Setup Wizard screen displays, click “Next.” 3. When the Select Installation Folder screen displays, click “Browse” to select a folder other than the one in the “Folder” field, and click “Next.
. When the Confirm Installation screen displays, click “Next”; when the Installation Complete screen displays, click “Close.” Accessing the PowerPacket Configuration Utility To open the configuration utility, double-click the PowerPacket Utility icon on your desktop or click to open the “PowerPacket Utility” listing in your Start menu. The Main screen will display initially, with tabs for three other menu/screen options — Privacy, Diagnostics and About — also described below.
version of either file is available on the INTELLINET Web site or if you’re instructed to do so by INTELLINET Tech Support. Device Detected / Network Type / Autoscan: The number or status of these three references is listed just above the lower-panel window: a count of all HomePlug AV remote devices discovered to be currently on the logical network; public or private network; and whether Autoscan is on or off.
Add: Click to add a remote device to the existing network. When the Add Device to Network screen displays, fill in the “Device Name” and “Password” text fields, then click “OK.” A confirmation box appears if the entries are correct. If a device isn’t found on the network, a notification prompt will appear, along with suggested solutions. Scan: Click to search for devices that are connected to the network. By default, the utility automatically scans every few seconds and updates the Local Devices list.
Set Local Device Only: Click to change the network name (network password) of the local device. If a new network password is entered, all the devices previously listed on the Main screen will no longer be present in the new network, effectively preventing the local devices from communicating with the devices in the “old” logical network. Devices previously set up with the same logical network (same network name) will appear in the device list after selecting this option.
PowerLine HD Ethernet Adapter • Kurzanleitung Deutsch Vielen Dank für den Kauf des INTELLINET NETWORK SOLUTIONS PowerLine HD Ethernet Adapter, Model 503273. Diese Kurzanleitung zeigt die grundlegenden Schritte zur Einrichtung und Inbetriebnahme dieses Geräts. Für genauere Anweisungen nutzen Sie bitte das beiliegende Handbuch auf CD oder auf www.intellinet-network.com.
Softwareinstallation 1. Legen Sie die Installations-CD ein, dann starten Sie die setup.exe, um mit der Installation zu beginnen (oder Power Packet setup.exe Utility Setup.msi nutzen Sie die Autostart-Funktion von Windows). 2. Nachdem der Startbildschirm des Installationsassistenten eingeblendet wurde, klicken Sie auf “Next.” 3. Möchten Sie in einem anderen Ordner als dem Standardordner installieren, klicken Sie auf “Browse”, ansonsten direkt auf “Next.
4. Im nächsten Schritt können Sie noch einmal alle Einstellungen überprüfen, klicken Sie dann auf “Next”; nach abgeschlossener Installation klicken Sie auf “Close.” Bedienung der PowerPacket Konfigurationssoftware Um die Konfigurationssoftware zu starten, doppelklicken Sie auf das PowerPacket-Icon auf Ihrem Desktop oder klicken Sie auf den “PowerPacket Utility”-Eintrag im Startmenü. Das Hauptmenü besteht aus drei Menüs — “Privacy”, “Diagnostics” und “About” — diese werden im Folgenden beschrieben.
dass eine neue Version für eine der beiden Dateien vorliegt, oder wenn dies von einem INTELLINET-Tech-Support-Mitarbeiter empfohlen wurde. Device Detected / Network Type / Autoscan: Die Anzahl oder der Status dieser drei Informationen wird hier aufgelistet: die Anzahl aller HomePlug-AV- Geräte, ob sie sich in öffentlichen oder privatem Netzwerk befinden und ob Autoscan aktiviert oder deaktiviert ist.
Add: Erweitert das vorhandene Netzwerk um ein Remote-Gerät. Füllen Sie im entsprechenden Menü die Felder “Device Name” [Gerätename] und “Password” aus, dann klicken Sie auf “OK.” Eine Bestätigungsnachricht erscheint, wenn die Eingaben korrekt waren. Wenn ein Gerät im Netzwerk nicht gefunden wurde, erscheint ein Hinweis, sowie Lösungsvorschläge. Scan: Sucht nach Geräten, die mit dem Netzwerk verbunden sind.
lokalen Geräte zu ändern. Wird ein neues Netzwerkpasswort eingegeben, werden alle Geräte, die zuvor im Hauptmenü aufgelistet wurden, nicht in das neue Netzwerk übernommen, was verhindert, dass die Geräte aus dem „neuen“ Netzwerk mit dem „alten“ Netzwerk kommunizieren. Geräte, die mit demselben Netzwerknamen eingerichtet wurden, erscheinen in der Liste, nachdem diese Option ausgewählt wurde.
Adaptador PowerLine Ethernet HD • Guía de Instalación Rápida Español Gracias por comprar el Adaptador PowerLine Ethernet HD INTELLINET NETWORK SOLUTIONS™, modelo 503273. Esta guía presenta los pasos básicos para instalar y operar este dispositivo. Para obtener instrucciones detalladas y especificaciones, consulte el manual de usuario en el CD adjunto ó en www.intellinet-network.com.
Utileria de Instalación 1. Inserte el CD de utilidades incluido, ejecute el programa setup.exe para comenzar la instalación. (También puede Power Packet setup.exe Utility Setup.msi ejecutar el programa desde el autorun del CD.) 2. Cuando se muestre la pantalla del asistente de PowerPacket, haga clic en “Next”. 3. Cuando en pantalla le muestre Seleccionar carpetas, haga clic en “Examinar” para seleccionar una carpeta distinta de la de la carpeta “default”, y haga clic en “Siguiente”.
4. Cuando se muestre en pantalla Confirmar instalación, haga clic en “Siguiente”, y cuando vea el mensaje instalación completa, haga clic en “Cerrar”. Acceso a la utileria de Configuración Para abrir la utileria de configuración, haga doble clic en el icono PowerPacket que se muestra en su escritorio o haga clic en abrir “PowerPacket Utility” listado en el menu inicio.
sabe que hay una nueva version disponible en el sitio Web de INTELLINET o si le dan instrucciones de hacerlo por Soporte Técnico INTELLINET. Dispositivo Detectado / Tipo de Red / Autoscan: El número o estatus se muestra arriba de la ventana inferior del panel: Muestra todos los HomePlug remotos encontrados en la red logica; publica o privada; y si el autoscan esta encendido o apagado.
Add: Haga clic para añadir un dispositivo a la red existente. Cuando al agregar el dispositivo se muestra en pantalla, escriba el nombre del dispositivo y la contraseña, y haga clic en “OK.” Un cuadro de confirmación aparecerá si la contraseña es correcta. Si un dispositivo no se encuentra en la red, aparecera una notificación con propuestas de notificación. Scan: Haga clic para buscar los dispositivos que estan conectados a la red.
Set Local Device Only: Haga clic para cambiar el nombre de red (contraseña de red) del dispositivo local. Si una contraseña nueva red se introduce, todos los dispositivos mencionados anteriormente en la pantalla principal ya no se listaran en la nueva red. Dispositivos configurados con la misma red lógica (mismo nombre de red) aparecerá en la lista de dispositivos después de seleccionar esta opción.
Adaptateur Ethernet Powerline HD • Guide d’installation rapide Français Merci d’avoir acheté l’INTELLINET NETWORK SOLUTIONS Adaptateur Ethernet Powerline HD, modèle 503273. Ce guide décrit les bases pour configurer et opérer cet appareil. Pour des instructions et spécifications détailées, veuillez lire le manuel de l’utilisation sur le CD inclus ou sur www.intellinet-network.com..
Installation du logiciel 1. 2. Insérez le CD de logiciel inclus, puis démarrez le setup.exe pour commencer l’installation. (Vous pouvez aussi utiliser le programme « autorun » de Windows). Dès que l’écran de bienvenue s’affiche, cliquez sur “Next.” Power Packet Utility Setup.msi setup.exe 3. À la prochaine étape, cliquez sur “Browse” si vous voudriez installer dans un autre dossier, autrement cliquez directement sur “Next”.
4. Dès que l’écran Confirmer l’installation s’affiche, cliquez sur “Next”; à l’écran Installation Complète, cliquez sur “Close.” Accéder le logiciel PowerPacket Afin de démarrer le logiciel de configuration double-cliquez sur le symbole sur votre bureau ou sur l’entrée“PowerPacket Utility” dans votre menu Démarrer. L’écran principal s’affiche avec trois autres menus/options — Privacy, Diagnostics et About — décrits ci-dessous.
ou si vous étiez instruit de le faire par un employé de support. Device Detected / Network Type / Autoscan: Le nombre ou état de ces trois références est listé sur la fenêtre au dessous: le nombre de tous les appareils à distance HomePlug AV identifiés actuellement sur le réseau logique; réseau publique ou privé; et si Autoscan est (dés)activé. Device Name: Les appareils sont listés dans cette colonne par leur nom défaut sauf si redéfini par cliquer sur “Rename”.
Add: Cliquez pour ajouter un appareil à distance au réseau existant. Quand l’écran « Add Device to Network » s’affiche, entrez les textes dans les champs nom d’appareil et mot de passe, puis cliquez sur“OK.” Une confirmation apparaît si les entrés sont corrects. Si un appareil n’est pas identifié sur le réseau, une notification apparaît avec des suggestions de dépannage. Scan: Cliquez pour rechercher des appareils qui sont connectés au réseau.
avant à l’écran principal ne seront plus présents sur le nouveau réseau, prévenant effectivement que les appareils locaux du « nouveau » réseau communiquent avec les appareils sur le « vieux » réseau. Les appareils installés avant avec le même réseau logique (même nom de réseau) apparaissent dans la liste d’appareils après avoir sélectionné cette option.
Bramka PLC HD Ethernet • Instrukcja szybkiej instalacji Polski Dziękujemy za zakup Bramki PLC HD Ethernet INTELLINET NETWORK SOLUTIONS™, Model 503273. Ta instrukcja prezentuje podstawowe kroki podłączenia i instalacji urządzenia. Aby uzyskać szczegółowe informacje techniczne oraz instrukcję użytkownika zapoznaj się zawartością płyty CD dołączonej do opakowania lub odwiedź stronę www.intellinetnetwork.com.
Instalacja programu konfiguracyjnego 1. Umieść w napędzie CD/DVD komputera dołączoną płytę CD, uruchom program „setup.exe”, aby rozpocząć Power Packet setup.exe Utility Setup.msi instalację. (Instalację można również uruchomić z autostartu płyty CD). 2. Gdy pojawi się ekran powitalny programu konfiguracyjnego, należy kliknąć „Next”. 3.
4. Gdy pojawi się okno potwierdzenia ustawień instalacyjnych, wciśnij „Next”, a po zakończeniu instalacji, kliknij „Close”. Dostęp do programu konfiguracyjnego Aby otworzyć program konfiguracyjny, należy dwukrotnie kliknąć muszą na ikonie Power Packet Utility, na pulpicie komputera lub poprzez wybór programu z menu Start. W głównym oknie programu wyświetlone zostanie karta „Main”, dostępne będą również trzy kolejne karty – „Privacy”, „Diagnostics” oraz „About” – również opisane poniżej.
dokonuj tylko po upewnieniu się, że na stronie internetowej INTELLINET znajduje się nowsze oprogramowanie lub, gdy aktualizacja jest zalecana przez wsparcie techniczne INTELLINET. Device Detected / Network Type / Autoscan: Ilość oraz status wykrytych bramek zostanie wyświetlony w dolnej części okna programu – liczba wszystkich wykrytych bramek w prywatnej lub publicznej sieci logicznej oraz autoskanowanie włączone lub wyłączone. Device Name: W kolumnie wyświetlone zostaną nazwy bramek.
Add: Kliknij przycisk „Add”, aby do istniejącej sieci dodać kolejną bramkę. Gdy pojawi się okno z nagłówkiem „Add Devices to Network”, należy uzupełnić pola tekstowe „Device Name” oraz „Password”, a następnie kliknąć „OK”. Jeśli urządzenie nie zostanie odnalezione w sieci, pojawi się powiadomienie oraz propozycja rozwiązania problemu. Scan: Kliknij, aby rozpocząć wyszukiwanie bramek podłączonych do sieci. Domyślnie narzędzie automatycznie skanuje sieć w poszukiwaniu nowych bramek co kilka sekund.
Gdy nowe hasło jest wpisane, wszystkie wcześniej widoczne bramki na karcie MAIN nie będą więcej widoczne w nowej sieci, skutecznie uniemożliwia to komunikację lokalnym bramkom z bramkami ze „starej” sieci logicznej. Bramki wcześniej utworzone w tej samej sieci logicznej (ta sama nazwa sieciowa) pojawią się na liście bramek po wybraniu tej opcji.
Adattatore Ethernet PowerLine HD • Guida rapida all’installazione Italiano Grazie per aver scelto l’Adattatore Ethernet PowerLine HD INTELLINET NETWORK SOLUTIONS™, modello 503273. Questa guida fornisce i passaggi basilari per settare e far funzionare la periferica. Per istruzioni e specifiche dettagliate, fare riferimento al manuale d’istruzione contenuto nel CD allegato al prodotto o al sito www.intellinet-network.com.
Installazione Utility 1. Inserire il CD dell’utility incluso, quindi far partire il programma setup.exe per cominciare l’installazione. Power Packet setup.exe Utility Setup.msi (Potete anche far partire il programma di settaggio utilizzando il CD con il programma di AutoRun). 2. Quando compare sul video il messaggio di benvenuto della guida di installazione del PowerPacket Utility Setup, cliccare “Next.” 3.
4. Quando compare “Confirm Installation”, cliccare “Next”; quando l’installazione risulta completata e appare “Installation Complete”, cliccare “Close.” Accesso a PowerPacket Configuration Utility Per aprire la configurazione dell’ utility, cliccare due volte sull’icona PowerPacket Utility sulla vostra desktop o cliccare per aprire “PowerPacket Utility” elencata nel menu di avvio.
richiedere un aggiornamento (e visualizza lo schermo sotto). NOTA: Procedere solo se conoscete che è disponibile una nuova versione di uno o l’altro file sul sito Web INTELLINET o se avete ricevuto istruzioni sul Supporto Tecnico INTELLINET.
Una cella di conferma apparirà se i dati inseriti sono stati correttamente. Se una periferica non viene individuata nella rete, apparirà un messaggio di notifica, insieme alle soluzioni suggerite. Scan: Cliccare per cercare le periferiche che sono connesse alla rete. Per impostazioni predefinite, l’utility automaticamente effettua delle scansioni ogni pochi secondi e aggiorna la lista delle periferiche locali.
virtuale (stesso nome rete) appariranno nella lista delle periferiche dopo la selezione di questa opzione. Set All Devices: Cliccare per cambiare la rete virtuale di tutte le periferiche che compaiono sullo schermo principale e le cui password sono state inserite per la stessa rete virtuale. Una finestra di dialogo apparirà per riportare il successo di questa operazione.
WASTE ELECTRICAL & ELECTRONIC EQUIPMENT Disposal of Electric and Electronic Equipment (applicable in the European Union and other European countries with separate collection systems) ENGLISH This symbol on the product or its packaging indicates that this product shall not be treated as household waste. Instead, it should be taken to an applicable collection point for the recycling of electrical and electronic equipment.
WARRANTY INFORMATION english: For warranty information, go to www.intellinet-network.com/warranty. deutsch: Garantieinformationen finden Sie unter www.intellinet-network.com/warranty. ESPAñOL: Si desea obtener información sobre la garantía, visite www.intellinet-network.com/warranty. FRANçAIS: Pour consulter les informations sur la garantie, visitez www.intellinet-network.com/warranty. Polski: Informacje dotyczące gwarancji znajdują się na stronie www.intellinet-network.com/warranty.
FEDERAL COMMUNICATIONS COMMISSION REGULATORY STATEMENT FCC Class B This equipment has been tested and found to comply with the limits for a Class B digital device, pursuant to Part 15 of Federal Communications Commission (FCC) Rules. These limits are designed to provide reasonable protection against harmful interference in a residential installation.
INTELLINET NETWORK SOLUTIONS™ offers a complete line of active and passive networking products. Ask your local computer dealer for more information or visit www.intellinet-network.com. All products mentioned are trademarks or registered trademarks of their respective owners. INTELLINET NETWORK SOLUTIONS™ bietet ein vollständiges Sortiment aktiver und passiver Netzwerkkomponenten. Für weitere Informationen wenden Sie sich bitte an Ihren Händler oder nutzen Sie die Webseite www.intellinet-network.com.