
User guide


17
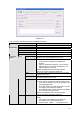
1/50s, 1/120s, …
z Customized zone: After you selected current
mode, you can see there is a period setup
interface. System can auto adjust in the period
you specified.
z Customized value: After you selected the mode,
you can see the time period setup interface. You
can input the shutter value in the current
interface.
Gain It includes two modes: auto/manual. You can check
the box to select the corresponding mode.
z In the manual mode, your input value is the actual
value.
z In the auto mode, the value ranges from 0 to the
setup value according to the actual environments.
Aperture It includes two options: auto/no-auto.
z In the auto mode, system can automatically
adjust the best aperture value according to the
current environments.
z In the non-auto mode, the aperture is all open.
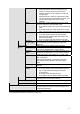
Exposure
compensation
There are 15 levels ranging from -7 to 7. You can set
the corresponding value to adjust the video total
brightness.
FPGA version FPGA software and hardware version number.
Mirror It is the pan rotation. You can check the box to enable
this function. Otherwise it is in normal mode.
Negative
video
It is to turn the bright part to the dark part and turn the
dark part to the bright part. You can check the box to
enable this function. Otherwise it is in normal mode.
WB It includes: disable, auto, sunny, cloudy, home, office,
night, customized.
In the customized mode, you need to put a white
paper before the lens and then click the Trigger
button.
Sharpness It is to set the video sharpness level. There are total
16 levels.
Day/night
mode
It includes: day/night/auto.
z In the auto mode, system automatically sets the
day or night mode according to the current
environments.
z In the day mode, the video is color.
z In the night mode, the video is black and white.
Others
Scene setting You can select the corresponding scene mode
according to the various environments.
Default Restore system default setup.
Save Save current setup
OSD Go to the main menu. Use the up/down button to the
corresponding item and then use the left/right button
to adjust the parameter.
System upgrade Select the upgrade file and update the system.
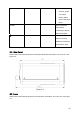
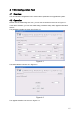
The OSD setup interface is shown as in Figure 4-4.