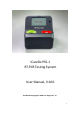
iCareDx PSS‐1 RT‐PCR Testing System User Manual, V:A01 This Manual Copyright © 2020 iCare Diagnostics, Inc 1
Revision history Revision Date A01 December 2020 Description Disclaimer 【iCare】、【iCare Dx】、【iCareCloud】、【OralCloud】, and their respective logos are registered trademarks of iCare Diagnostics International Co. Ltd (“iCare”), or one of its affiliate in Taiwan and other countries. All rights reserved. No part of this manual may be reproduced, stored in a retrieval system, or transmitted, by any means or in any form, without the prior permission of iCare.
Contents 1. Intended Use ………………………………............................................................... 4 2. Symbols Used in this Instruction Manual ……………....................................... 5 3. Unit Description............................................................................................ 6 4. Technical Specification …………...................................................................... 8 5. Safety Precautions and Limitations of Use …….........................................
1. INTENDED USE The PSS‐1 platform is a qualitative RT‐PCR test intended to detect the RNAs from SARS‐CoV‐2 virus that causes COVID‐19 from saliva specimens of symptomatic individuals. The PSS‐1 platform is for prescription use inly, and it tests symptomatic individuals who are suspected of COVID‐19 by a healthcare provider.
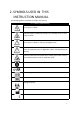
2. SYMBOLS USED IN THIS INSTRUCTION MANUAL The following advisory symbols are used in this manual. Table 1 Advisory Symbol Meanings Indicates a Risk of Electric Shock which could, if not avoided, result in serve injury or death. Indicates a Burn Hazard which could, if not avoided, result in serve injury or death. Indicates a hazardous situation which could, if not avoided, result in serve injury or death; or severely damage the unit.
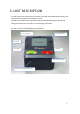
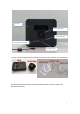
3. UNIT DESCRIPTION The PSS‐1 Real‐Time Thermal cycler provides a safe and controlled method heating and cooling the test samples placed within the PSS‐1. To protect the samples from evaporation and contamination during the heating and cooling of a PCR process the PSS‐1 are sealed using a clear Disk.
Rear Cover Unit Air Expelling Fan Power ON/OFFbutton Input connector fuse and switch Rear USB connector The PSS‐1 unit is designed to be used with accessories some of which are listed below: Disk Cartridge The other specialist accessories may be available at request. Please contact your distributor for details.
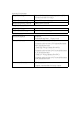
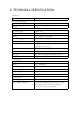
4. TECHNICAL SPECIFICATION Model Type Model Name PSS-1 Physical Unit Properties Dimensions (W x D x H) 230 mm x 200 mm x 210 mm Weight 2.2kg Console DC Power Input 12VDC ±5% ARM base CPU Qualcomm MSM8909 Platform Memory 1GB LPDDR3 / 8GB EMMC Color LCM display 6.5 inch TFT color display Touch Panel Capacitive touch panel Camera 5M Pixel for electrophoresis , 2M Pixel for barcode scan LED Blue LED for electrophoresis Audio 0.5W Speaker/Mic USB port USB 2.
Operating Environment Temperature Range +22 to +28 °C (Ambient temperatures above 25°C can reduce the rate of cooling) Relative Humidity Range 45% to 75% non-condensing Maximum Operating Altitude 2000 m above sea-level Storage and Transportation Temperature Range -10 to +40 °C Relative Humidity Range 5% to 95% non-condensing PCR Performance Thermal Ramp Rate Pre Heater Thermal Uniformity Maximum Ramp Rate 1.1°C per second 1. Cup Holder Heater (23->98°C): Uniformity achieved after 1.
5. SAFETY PRECAUTIONS AND LIMITATIONS OF USE It is essential that all users of this equipment have fully read and understood the following safety precautions and limitations of use before installing or operating the PSS‐1 unit. IMPORTANT The protection provided by this equipment may be impaired if it is not used in a manner described in this manual. It is essential that the user of this equipment is aware of the potential hazards associated with the unit and its accessories.
Care should be taken not to knock the LCD display. Do not use excessive force when touching the touch screen or operating the buttons. Unit Installation and Operating Environment The PSS‐1 unit is designed for indoor laboratory use only. The acceptable operating temperature range is 22ºC to 28ºC, with a relative humidity of 45% to 75% non‐ condensing, at a maximum altitude of 2000m above sea level.
There is a possible finger crush hazard due to the moving parts of the door. Care should be taken when closing the door. The unit must be installed and operated on a solid, stable and level working surface; ensuring that the ventilation holes under the unit and at the rear of the unit are not obstructed. General Operating Precautions Ensure that the power is switched off at both the AC mains supply outlet and at the back of the unit before inserting or removing the mains power cord.
Unit Maintenance and Serviceability There are no user or operator serviceable parts inside the unit. Do not remove the unit casework. Removal of the unit's casework will void the manufacturer’s warranty and may expose the user to a Risk of Electric Shock resulting in serious injury or death. Always switch off the unit and disconnect the power cord before performing any cleaning or decontamination procedure.
6. UNIT INSTALLATION Before installing the PSS‐1 unit, please check that the delivery is complete and that the unit and any accessory parts are intact and free from any signs of transportation damage. Also ensure that all external and internal packaging has been removed from the unit before installation. Please retain all packaging for future transportation and storage of the unit and its accessories.
3)Switch the mains power on at supply outlet first, and then switch the unit on using the power switch located at the rear of the unit. This can take 30seconds as the unit initializes the system and runs a basic‐settings. 4) Start‐up is complete when this screen is shown. 6.1 Basic settings when first time use the system For the first time to use this system, please follow the step to finish the basic setting: 1. Select Time Zone Scroll the screen to choose the time zone. Four time zones support here 2.
3. Setup Server Input the Server IP address and Port number Server IP:https://192.168.1.200 Port number : 443 4.
5. Use Terms Go through the use terms page and check the agreement.
7. UNIT OPERATION Please ensure that you have read and fully understood all of the Safety Precautions and Limitations of Use listed in Section 5 before attempting to operate the PSS‐1 unit. 7.1 User Touch Screen Display and Controls The unit’s user interface consists of a large high definition color LCD display which has an integrated touch screen that will support multi‐finger gestures. (The touch screen is designed to operate when wearing standard laboratory gloves.
• Connect the supply using the cable provided with the unit. Turn the power on at the wall (if switched) then turn the power button On. PSS-1 will wake up, and initialize its systems. Once a screen like the one in Figure 1 is visible the PSS-1 is ready to use. This is the HOME screen and can always be returned to by touching the QUIT at the bottom left of the other screens. From the HOME screen user can create a new experiment by touch .
Figure2 7.2.2 Running the Experiment • To create a new experiment touch the BEGIN TEST square or tile on the screen (PSS‐1 is fitted with a touch screen, it is quite sensitive and doesn’t need high force to operate). iCareDx provides clear step‐by‐step instruction and also video instruction. Please follow the steps to test. Step 1: Open Disk door and insert Disk Step 1-1. Slide Disk door down.
Step 1-2. Remove Disk from packaging. Pull tape off of Disk. Step 1-3. Insert Disk until it locks and you hear the bell. Step 1-4. Turn the Disk latch until lock full.
Step 1-5. Slide the Disk door up. Notice: If you select QUIT the test process in any step, the test kit you have used must be disposed of. Please refer to Test finish and test kit recycle.
Step 2: Prepare Saliva and put Saliva cup into Red holder Step 2-1. Please confirm the saliva sample has ready or not. If the answer is “No”, please remove Saliva cup, Buffer tube and the alcohol pad fr om packaging. If the answer is “Yes”, please just remove Buffer tube and the alcohol pad from packaging. Use front facing camera to scan the QR code on Saliva cup. Point the label towards camera, see it shown in the central of the screen. Hold steadily and slightly move back and forth until reading success.
COLLECT THE SALIVA Begin drooling into cup: Drool saliva to the indicated line, any air bubbles should be above the line.Collected saliva should be clear. There should not be phlegm, food particles, or any visible impurities. Saliva sample check If saliva does not look like these, redo collection by emptying Saliva cup and clicking BACK Notice: Important!! Before collecting saliva: Use fingers to lightly massage saliva glands. There should be increase in salivation.
Step 2-2. Clean Red holder with the alcohol pad. Step 2-3. Insert the Saliva cup into the Red holder until you hear the bell. Step 3: Heating and cooling process Sample inactivation, heating and cooling down saliva Do not touch the Saliva cup when Saliva + Buffer solution is heating. The Saliva is cooling down.
Please wait for heating and cooling process finish then tap Next to next process. Step 4: Mixing the Buffer and Saliva Step 4-1. Open lid on Saliva cup. Remove the Buffer tube cap and empty contents into the Saliva cup. Cover the cup with lid. Step 4-2. Remove the Saliva cup from the Red holder and shake gently up to 10 seconds Step 4-3. Insert Saliva cup back into the Red holder until you hear the bell. Step 4-4. Tap the screen to start heating process.
Step 5: Mixing the reagent with the Saliva and Buffer for PCR process Step 5-1. Open lid on Saliva cup. Step 5-2. Clean Green holder with the alcohol pad Step 5-3 Remove Cartridge from packaging. Use front facing camera to scan QR code on Cartridge.
Step 5-4. Remove the stopper on Cartridge. Notice: Make sure reagent ball is at the bottom of the Cartridge tip. If not, lightly tap or knock on the side of Cartridge.
Step 5-5. Place Cartridge onto Saliva cup. Firmly press Cartridge for 3 second with both hands, then release. Step 5-6. Transfer Cartridge onto Green holder. Make sure Cartridge is fully inserted into the holder. Step 5-7. Tap NEXT and wait 30 second countdown.
Step 5-8. Firmly press for 3 seconds with both hands, then while maintaining the pressing position, take out Cartridge and release it. Step 5-9. Return Cartridge into the ziplock bag. Insert the stopper of Cartridge into the hole of Green holder.
Step 5-10. Press NEXT to begin PCR. Step 6: PCR Process Notice: A dialog “Have you performed this step yet?” will be popped up when enters PCR process. Please confirm you have done Step 5-8 and Step 5-9 or you have to finish these steps before PCR. When PCR process, do not touch the device. It takes times to finish and please be patient to wait. Notice: A warning dialog will pop‐up in about 30 minutes of remaining time.
PCR process completed Step 7: Result identify When PCR process finish, you can check the result after result identify. Test result and test record will be uploaded to the server in the local network when Wi‐Fi connection is available. Note: Cleaning Frequency: one time per month.
Step 8: Test finish and test kit recycle Please take out all kits and dispose them into the ziplock bag. If locked, please tap UNLOCK. Any placemat used can also be placed into the ziplock bag accordingly. If you are going to perform a new test run, back to Home screen and tap BEGIN TEST. If you have finished all of the test, remember to log out your account before leave. 7.2.3 Experiment Results At the end of an experiment the results are displayed as shown in Figure 3.
8. MAINTENANCE AND SERVICING Although the PSS‐1 unit does not require any scheduled maintenance or servicing, the operator should regularly clean and inspect the unit for any detects, as described in Section 8.1 below. Please observe and comply with all of the Unit Maintenance and Serviceability precautions listed in Section 8. Never removed the unit casework. There are no user or operator serviceable parts inside the unit.
9. WARRANTY AND RETURNS Warranty Limited 15 Months Warranty iCare Diagnostics, Inc Ltd. warrants the PSS‐1 product, when purchased new and installed and operated in accordance with the instructions of this manual, to be free from defects in materials and workmanship, and will repair or replace, at their discretion, any unit or accessory which exhibits such defects.
10. PRODUCT DISPOSAL At end‐of‐life, this product must be disposed of in accordance with your local authority regulations for the disposal of potentially hazardous waste and electronic equipment. The unit and its accessories should be decontaminated using the procedure detailed in Section 8.2 before disposal or shipping. Do not dispose of this product into unsorted municipal waste or public landfill.
11. CERTIFICATION INFORMATION FCC DECLARATION OF CONFORMANCE This device complies with Part 15 of the FCC Rules. Operation is subject to the following two conditions: (1) this device may not cause harmful interference, and (2) this device must accept any interference received, including interference that may cause undesired operation. This equipment has been tested and found to comply with the limits for a Class A digital device, pursuant to part 15 of the FCC Rules.