ICARUS 8 8" e-reader User Manual
ICARUS 8 User Manual Safety Precautions On Battery Charge the battery only in temperature that ranges from 0 to 35 degree Celsius. Do not charge the e-reader if the battery is found damaged or leaking. On Operation Never subject the e-reader to extremes of light, temperature, moisture or vibration. Do not use or store the e-reader in a location subject to: A. Extremely high temperature, such as in a sun-heated car B. Direct sunlight C. High humidity or places with corrosive substances D.
ICARUS 8 User Manual Contents SAFETY PRECAUTIONS .............................................. I CONTENTS ................................................................... II PARTS AND CONTROL ........................................... 1 TURNING THE E-READER ON AND OFF ................... 2 CHARGING THE E-READER .................................... 3 IMPORTING CONTENTS WITHOUT DRM ................. 4 IMPORTING DRM CONTENTS ................................ 5 HOME SCREEN.................................
ICARUS 8 User Manual RESTORING DEFAULT SETTINGS .......................... 29 DEVICE INFORMATION ........................................ 29 DRM AUTHORIZATION INFORMATION ................ 29 WI-FI SETTINGS .................................................. 30 MAINTENANCE ................................................... 33 PRODUCT SPECIFICATIONS .................................. 34 CERTIFICATION INFORMATION ............................ 36 COPYRIGHTS AND TRADEMARK NOTICE .............
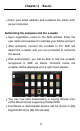
Chapter 1 Basics Parts and Control 1. Home button- press to return to the home screen 2. Menu button- press to display the options menu 3. Directional buttons/ Enter button -Directional buttons – press the button up/ down/ left/ right to move the cursor Enter button - Press to confirm or cancel 4. Return button – press once to return to the previous menu, press and hold to return to the Main menu. 5. Keyboard button- press to display/hide the keyboard. 6.
Chapter 1 7. Basics Next page button - press to go to the next page 8. Power button/ Charging indicator – Slide and hold the power button following the arrow for 3 seconds to turn on/off. When the e-reader is being charged, red light is on, when fully charged, red light will go out. 9. Memory card slot – supports micro SD card 10. Mini USB jack – for data transfer and emergency charging. 11. Earphone jack 12.
Chapter 1 Basics Charging the e-reader You need to charge the e-reader prior to using it for the first time or when battery power is low. Charge the e-reader using an optional AC adapter with output 5V, 1.5A (ICARUS ACD0052-EU, sold separately) Charging through a computer may not be able to fully charge the e-reader due to the low output charging current from a computer's USB port. Please turn the e-reader to standby mode to shorten the charging process.
Chapter 1 Basics Importing contents without DRM From a computer The e-reader supports the USB Mass Storage Device function. It can be accessed like a removable USB drive in a computer's file manager. To import contents (ebooks, pictures etc) onto the e-reader, connect the e-reader to a computer via the supplied USB cable. Upon successful connection to the computer, the e-reader will enter USB mode and all operations will be halted.
Chapter 1 Basics When the card is inserted or removed, it will take several seconds to load. Please avoid inserting or ejecting the card when other operations are running as this may cause the system to hang. Do not remove the card if the content inside the card is being played. This will halt the operation of the e-reader and cause the e-reader to restart. Importing DRM Contents The e-reader supports Adobe DRM contents. Adobe Digital Editions (ADE) is required to manage books with DRM.
Chapter 1 Basics Enter your email address and complete the online form as per instructed. Authorizing the computer and the e-reader Upon registration, return to the ADE window. Enter the user name and password to activate your Adobe account. After activation, connect the e-reader to PC. ADE will detect the e-reader and you are prompted to authorize the device. After authorization, you will be able to find the e-reader recognized in ADE as below.
Chapter 1 Basics Transferring DRM ebooks to The e-reader In the ADE menu, click on [All Items] on the left hand column. Items in [My Digital Editions] will be listed in the right window. Select the desired item(s) to be transferred, + to select multiple files. Drag and drop the selected item(s) into the e-reader’s Drive located on the last row of the left side column as illustrated below.
Chapter 1 Basics When the number of authorized device has exceeded the allowable amount, you will come across the following error message: To request for extension and reset of your ADE ID, go to http://www.adobe.com/support/digitaleditions/ [Submit a web case]. You are required to enter your ADE ID info.
Chapter 1 Basics Home screen When the e-reader is turned on, the Home screen will be displayed. Use the directional buttons to select the desired book to open. The selected item will be underlined. Press the Home button anytime to return to the Home screen.
Chapter 1 Basics 1. Now Reading -displays the book you read last. Press the Enter button to open this book in the last read page. 2. Reading history -The recently read ebooks will be saved into the Reading history, you can also open books from this Reading history. 3. Main menu -displays the main menu, press the Directional buttons to select the desired item, then press the Enter button to open the item selected. 4. Wi-Fi indication - displays the Wi-Fi network connection strength. 5.
Chapter 1 Basics Main menu Press the Directional buttons to select the desired item, then press the Enter button to open the item. To exit, press the Return button. To open the book library: all ebooks stored on your device To open the Bookmarks list. To open the music player To open the photo viewer.
Chapter 1 Basics Onscreen keyboard Use the onscreen keyboard as shown below to enter text. To enter text, press the directional button to select an input method, and press the Enter button at the panel, then use the directional buttons to select the text onscreen keyboard, then press the Enter button at the panel. A. Numeric/punctuation/ symbol key B. Input method key C. Space key D. Backspace key E. Enter key F.
Chapter 1 Basics Connecting to the internet Turning on Wi-Fi: In the Main menu choose Settings Wi-Fi SettingWi-Fi, Then “√” will appear next to Wi-Fi when you have turned it on. Joining a Wi-Fi network: press Wi-Fi setting to show the detected network list, select a network, if necessary, enter a password and press "Connect" to save the settings for the encrypted connection and connect to Wi-Fi. (Networks that require a password appear with a lock icon).
Chapter 2 Getting Started Reading books Book library In the Main menu, select Library to open the book library. In the book library, select a book to start reading. Use the Directional-up/down buttons to scroll through the e-book list. Press the Next/previous page buttons to turn pages. In the Main menu, select View by to change the view mode(List/Thumbnail mode). This e-reader supports txt, pdf, epub, pdb, fb2, html, and rtf file ormats.
Chapter 2 Getting Started Reading ebooks Books transferred to the e-reader will be saved in the device. The e-reader supports ebooks in the following formats: txt,pdf,epub,pdb,fb2,html, rtf,mobi,doc,docx,djvu,zip. In the home screen or book library, use the Directional buttons to move the cursor to the desired book and press the Enter button to open it.
Chapter 2 Getting Started Turning pages While reading a page, press the Next Page/Directional-Right button to turn to next page. To turn to previous page, press Previous Page/Directional-Left button. Using the Options Menu while Reading While reading a page, press the Menu button to display the options menu screen. The options menu will be divided into two pages. Press on “<” or “>” to browse through the available options. 1. Add Bookmark 2. Bookmarks 3. Table of contents 4. Go to page 5. Search 6.
Chapter 2 Getting Started Add Bookmark In the options menu, select Add Bookmark to add a bookmark for the current page. The icon will appear on the top right corner, indicating this page was bookmarked. Bookmarks In the options menu, select Bookmarks to enter the Bookmark List of the current book. Table of contents In the options menu, select Table of contents to show the ebook’s table of contents. Go to page You can jump to pages using the Go to Page option. In the options menu, select Go to Page.
Chapter 2 Getting Started Font In the options menu, select Font to set the font type of the currently opened ebook. Options available: Arial, Times, Verdana. Select the desired option, then press the Done button to confirm. Line Spacing In the options menu, select Line Spacing to set line spacing. Options available: Small, Medium, Large. Margin In the options menu, select Margin to set the page margin. Options available: Small, Medium, Large.
Chapter 2 Getting Started Auto Flip In the options menu, select Auto Flip to set Auto Flip mode. The auto flip duration available are: Off, 1 Minute, 2 Minutes, 3 Minutes, 4 Minutes, 5 Minutes. Select the desired option, then press the Enter button to confirm. Page refresh rate In the options menu, select Page refresh rate to set refresh rate, options available are: After every page, After 3 pages, After 6 pages. Select the desired option, then press the Enter button to confirm.
Chapter 2 Getting Started About bookmarks Adding Bookmarks When reading, turn to the desired page and open the options menu.Select Add bookmark to add bookmark for the current bookpage. And the icon will appear on the top right corner. Continuing reading from a Bookmark In the Main menu, select Bookmarks to enter the Bookmark List. In the Bookmark List screen, select the desired book bookmarked, then select the page bookmarked.
Chapter 2 Getting Started Playing Music About the music library In the Main menu, press the Music icon to open the music library. Press the Directional-up/down buttons to scroll through the song list. Press the Menu button to display the options menu to sort the song list or search the desired song. Playing songs In the music library, press the desired song to start playing.
Chapter 2 Getting Started Music player controls Pause or play Press Play previous or Press / . / . next song. Fast rewind or Press and hold / . fast forward Adjusting the volume level. Press the Directional-up/down button to adjust the volume. Changing play mode Press on play mode icon . To return to the Press the Return button. Music Library Viewing photos In the Main menu, select Photo to open the Photo viewer.
Chapter 2 Getting Started Opening pictures In the photo library, move the cursor to the desired photo, then press the Enter button on the selected photo to view it in full screen display. In full screen mode, press the Directional buttons / Previous/next page buttons to view previous and next picture. Using the options menu In full screen mode, press the Menu button to display the options menu.
Chapter 2 Getting Started Press the Return button to return to the photo list. Web browser Viewing a webpage In the home screen, press Settings Browser to open the web browser. Press the address bar at the top of the screen, press and hold to set the input method. In the address bar, type the web address and press Enter. Press a link on a webpage to open a new web page. Drag up and down to scroll through a web page. In zoom mode, drag left, right, up, down to move the webpage.
Chapter 2 Getting Started New Window: Opens a new window. Bookmarks Bookmarks This overview list all bookmarks; press a bookmark to open the webpage. Press and hold to display the option menu for a selected bookmark. Press Add Bookmark to create a new bookmark for the current webpage. Most visited Press to display the most visited website list. History Open this to view the history list. To remove these lists, press Menu button, then select Clear history.
Chapter 2 Getting Started Windows Show the multiple webpage windows opened at a time. press on the desired window to enlarge to full screen mode. Refresh/Stop Press Refresh to refresh the current page, press Stop to stop loading the current page. Forward: Press Forward to go to the next visited webpage. More Use other available functions, including Add bookmark, Find on page, Select text, Page information, Share page, Downloads, Settings.
Chapter 2 Getting Started File Explorer In the Main menu, select Explorer to open the file explorer. Press the Directional-up/down button to scroll through the file list. Press the Previous/next page buttons to turn pages. Using the options menu On file list screen, press the Menu button to open the options menu. Searching for files in the file explorer In the file list, press Menu Search to bring up the onscreen keyboard.
Chapter 2 Getting Started Renaming files or folder 1. From the file list, select the desired file/folder to be renamed. 2. 3. 4. Press the Menu button to show the edit menu, select Rename Press the Enter or Keyboard button and use the Onscreen keyboard to enter a new file name. Press OK to confirm. Deleting files In the File Explorer, select the desired files to be deleted Press Menu Delete to display a deletion screen, select Yes to delete.
Chapter 3 Settings Power Settings To enable/disable auto power off/ sleep mode; you can also set the time for the auto power off/sleep mode to go into effect. Date & Time To set the clock and date, time. Press the Directional-left/right button to move the cursor. Press the Directional-up/down button to adjust the desired value. Select YES to confirm, select NO to cancel the setting. System Language To set the user interface language for the e-reader.
Chapter 3 Settings Wi-Fi settings The Wi-Fi settings allow you manage wireless networks. Turning on Wi-Fi: In the main menu choose Settings Wi-Fi SettingWi-Fi, Then “√” will appear next to Wi-Fi when you have turned on the Wi-Fi. Join a Wi-Fi network: press on Wi-Fi setting to show the detected network list, select a network, if necessary, enter a password and press "Connect" to save the settings for the encrypted connection and connect to Wi-Fi.
Chapter 4 Troubleshooting The e-reader is not responding or can’t be turned on. Reset the e-reader by pressing the Reset button at the back of the unit's housing. The e-reader will be forced to shut down if it is on and you are required to restart the e-reader. The Battery has been fully depleted. Please charge the e-reader via USB or an optional USB AC Adapter. Battery Life seems short The operating temperature is below 5oC.
Chapter 4 Troubleshooting disconnect the data connection with the computer. After the e-reader is safely removed, the computer will only charge the e-reader and you can now resume normal operation.
Maintenance If the e-reader does get wet, turn off the e-reader immediately. Wait for the e-reader to dry completely before turning on again. Clean the screen with a soft cloth; be careful not to wipe it with anything abrasive. When carrying your e-reader in a bag, keep the e-reader in a protecting case to avoid scratches. Beware that a protective case is no guarantee that your device will not get damaged.
Product Specifications Display 8.0 inch e-paper screen, 1024x 768 pixels Brightness: 200cd/m2 Storage memory Built in memory: 4 GB (FAT format) Supports micro SD card up to 16GB (FAT32 format) Media File Formats supported Ebook: txt,pdf,epub,pdb,fb2,html,rtf,mobi,doc,docx,djvu,zip Photo: jpg, bmp,gif, png Music: mp3, wma, aac, wav, ogg Connectivity Data transfer: USB 2.0 High Speed Audio: 3.
Physical properties Dimension: 211.6 X 150.0 X 9.0 (mm)(approx.
Certification information On FCC This equipment has been tested and found to comply with limits for a Class B digital device, pursuant to Part 15 of the FCC rules. These limits are designed to provide reasonable protection against harmful interference in residential installations. This equipment generates, uses, and can radiate radio frequency energy, and if not installed and used in accordance with the instructions, may cause harmful interference to radio communications.
Copyrights and Trademark Notice Copyright laws prohibit copying the data of this product or the contents of this manual (illustrations, related documents, etc.) in whole or in part without the permission of the copyright holder. Additionally, use of the data of this product or the contents of this manual is not allowed without vendor’s permission except for personal use.
Disposal and Recycling Information Your e-reader must be disposed of properly according to local laws and regulations. Because this product contains a battery, the product must be disposed of separately from household waste. When your e-reader reaches its end of life, contact your local authorities to learn about recycling options. Battery Replacement: The rechargeable battery in it should be replaced only by an authorized service provider.
Disclaimer All the information, design and specifications contained in this manual were correct at the time of publication. However, as the product is under continuously upgrading, the final device may have a slightly difference in appearance or modified functionality than presented in this manual.