Muse iWash CS-20 Integrated Bidet Toilet External a ubject to .
Important Safeguards READ ALL INSTRUCTIONS BEFORE USING DANGER To reduce the risk of electrocuon ●● Do not use while bathing. ●● Do not place or store seat where it can fall or be pulled into a tub or sink. ●● Do not place or drop into water or other liquid. ●● Do not reach for a seat that has fallen into water. Unplug immediately.
Important Safeguards WARNING To reduce the risk of burns, electrocu on, fire or injury to persons ●● Do not dismantle, repair or alter the unit unless under the instruction of an authorized service representative. ●● Never use while drowsy. ●● Never drop or insert any object into any opening or hose. ●● Do not use outdoors, or operate where aerosol spray products are being used or where oxygen is being administered. ●● Do not pour water onto the seat. ●● Do not use a steam cleaner to clean the unit.
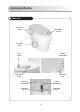
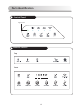
Parts Iden fica on Main unit Seat Control Panel Non-sittable Seat Lid Floor Bolt Covers Seat Sensor Manual Flush Buttons Wash Nozzle Cover Deodorizer Vent Warm Air Dryer Outlet In-bowl LED Nightlight Front Wash Spray Rear Wash Spray 3
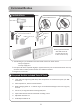
Parts Identification Control Panel Light sensor Remote control Top Front 4
Parts Iden fica on Included Parts 1/2” Supply line x1 3/4” Transfer hose x1 Water filter x1 Brass filter adapter x1 Seat anchor (for top-side of seat) x2 Rear hold-down bolt x1 Seat screw and washer x2 AAA Battery x3 Washer x1 Nut x1 Rubber anchor cap x2 Battery-operated remote with wall-mount x1 (includes adhesive tabs on back of wall-mount) � The following are pre-installed on the toilet bowl and are not shown above: ◦ Rim jet supply line ◦ Flush jet supply line � Parts pictured above may dif
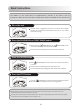
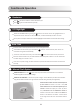
Basic Instruc ons The bu ons on the toilet bowl are supplementary controls to be used in case of emergency. Water pressure and dryer temperature can be controlled via the remote only. Sit on the seat The seat sensor is triggered by skin touch. The sensor will recognize that the seat is occupied and the bowl pre-mist will run. You should hear water running. Press the REAR WASH or FRONT WASH bu on Select either the REAR WASH or the FRONT WASH on the remote. Each wash cycle operates for 90 seconds.
Press to move the NOZZLE FORWARD or to move the NOZZLE REARWARD during the wash cycle. Water Pressure Adjustment Water Temperature Adjustment W : - Low: 93.2° F (34° C) - Medium: 98.6° F (37° C) - High: 104° F (40° C) Warm Air Dryer Temperature Adjustment Press on the remote to adjust the temperature of the warm air.
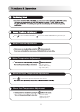
Func ons & Opera on Deodorizer Press Press the bu on to ac vate a 3 minute deodorizer cycle. again to end the deodorizer cycle early. LED Nightlight Ac vate the LED NIGHTLIGHT by pressing the bu on on the remote control. The nightlight will turn on only when the sensor reads a dim or dark environment, and will automa cally shut off in a lit room. Electric power consump on is li le and use the LED Nightlight func on without care about the electric charge.
Func ons & Opera on User Presets SAVING USER PRESETS: Set water pressure and temperature, nozzle posi on, dryer temperature and seat temperature to the desired sengs, then hold the Repeat for buon for 4 seconds to save. A long beep will sound once the sengs are saved. . ACTIVATING USER PRESETS: Quickly press and release the user preset desired to ac vate. A short beep will sound when the user preset is ac vated.
Installation IMPORTANT NOTE:of ceramic Installation Please read through this entire list of instructions and take an inventory of included parts before beginning installation. If you have any questions at all, please call Customer Connect the Angle-valve at the Shut-off valve. Service at 855-444-2372 before you begin your installation. Before unpacking product, ensure that rough-in dimensions are as follows: • The centerline of the floor drain is to be 12” from finished back wall.
Installation Installation of ceramic 2a. Insert toilet mounting bolts (not supplied) into drain flange. IMPORTANT NOTE: Bolts must be no longer than 2-1/2”. Connect the Angle-valve at the Shut-off valve. 2b. Position waxless gasket (recommended, not included) on the floor flange. If a traditional wax ring is used, affix to the bottom of the toilet bowl. 2aInsert the flange-packing into the flange. flange-packing 2b flange Turn the ceramic over.
Installation Installation of ceramic 4a. Unbox the bidet seat and the rest of the bowl. Hand-tighten the bowl jet supply line to the 1/2” plastic inlet on the left bottomside of the seat. Connect the Angle-valve at the Shut-off valve. 4b. Hand-tighten the rim jet supply line to the 1/2” plastic inlet on the right bottomside of the seat. 4c. Hand-tighten the 3/4” water supply transfer hose (included) to the center 3/4” inlet, Insert the flange-packing the flange.
Installation Installation ceramicin bowl deck holes. 5a. Install seat anchorsof(included) 5b. Insert plasticthe hold-down bolt (included) Connect Angle-valve at the Shut-offunder valve. the rear of the seat. Align seat with anchors/rear deck mounting hole. 5c. Affix seat to bowl by using screws/washers threaded into the anchors in front and by threading washer/plastic nut in the rear. Insert the flange-packing into the flange. 5d. Insert rubber caps into front screw recesses.
Installation 6a. Hand-tighten 1/2”of brass adapter to the water filter (both included). Installation ceramic 6b. Hand-tighten filter to 3/4” transfer hose. Using an adjustable wrench, GENTLY tighten Connect the Angle-valve at the Shut-off valve. each connection. DO NOT OVER-TIGHTEN AS THE PLASTIC THREADS WILL BE DAMAGED AND LEAK. 6a 6b Insert the flange-packing into the flange. flange-packing flange Turn the ceramic over.
Installation 8. GENTLY align bowlof over drain flange guiding mounting bolts through the mounting Installation ceramic holes in the base of the bowl. 8 Connect the Angle-valve at the Shut-off valve. Insert the flange-packing into the flange. flange-packing flange 9a. Thread bolt nuts onto bolts and hand-tighten. Turnhand-tightened, the ceramic over.use Place the flange at the bottom ceramic and insert 9b. Once a wrench to tighten further.ofDO NOT OVER-TIGHTEN.
Installation Installation ceramic 10. Hand-tighten 1/2”ofsupply hose to angle stop. Use a wrench to tighten fully. Ensure supply hose is not kinked or awkwardly bent. The hose should appear as in the picture below. Connect the Angle-valve at the Shut-off valve. 10 Insert the flange-packing into the flange. flange-packing flange Turn the ceramic over. Place the flange at the bottom of ceramic and insert the bolts assemble the flange and ceramic with packing nuts. Bolts 11.
Maintenance Cleaning the water filter If your integrated toilet seems to be experiencing a loss of water pressure, your water filter may be dirty or clogged and should be cleaned. Follow the steps below to clean the filter. If the pressure issue is not resolved after cleaning, see the Troubleshooting section at the end of this manual for other possible solutions. ●● Unplug the power cord from the wall outlet. ●● Close the water supply by turning the valve clockwise.
Troubleshoo ng Check the followings details before calling for service. Check points Symptoms The unit does not operate Is the power off? Press either the STOP, REAR WASH, FRONT WASH, or DRYER ON/OFF buons on the remote control to power on the unit. Is the power plug disconnected? Is there power to the outlet? Make sure the plug is securely connected. Unplug the unit and plug another device into the outlet to make sure there is power.
Item S-20.C01 (Bidet seat top only) Power Supply 120V~ , 60Hz 1460W Power Cord Length Wa Water Supply Pressure Water Flow Rate Cleansing Warm Seat Dry ) Rear Wash 0.65L / min Front Wash 0.65L / min Water Pressure Adjustment 5 Levels Temp. Adjustment 93.2°F (34°C), 98.6°F (37°C), 104°F (40°C) Heater Capacity 1400W Safety Device Thermal Fuse, Thermostat Temp. Adjustment 82°F (28°C), 90°F (32°C), 98°F (37°C) Heater Capacity 55W Safety Device Thermal Fuse Temp.
Remote Specifica ons Item S-20 RF Type of Equipment Remote Controller Rated Power Supply DC 4.5V Opera ng Frequency 2422MHz Modula on Type FSK Ambient Temperature Range 37.4°F - 104°F ( 3°C - 40°C ) This device complies with Part 15 of the FCC Rules. Opera on is subject to the following two condi ons: 1.) This device may not cause harmful interference, and 2.) this device must accept any interference received, including interference that may cause undesired opera ons.
Adjusting the Remote Control Frequency - continued 6. On the remote control, press and hold the UP and DOWN water pressure adjustment bu ons simultaneously for 4 seconds. Aer 4 seconds, the lemost LED bar light under the ICERA logo should start to flicker. 7. To change the frequency channel, quickly press the either the UP or DOWN water pressure adjustment bu on again. The LED light should move on the remote which indicates the change to the next channel.
Warranty CERAMIC TOILET BOWL - LIMITED LIFETIME WARRANTY Icera | St. Thomas Creations provides a LIMITED LIFETIME WARRANTY for its Icera and St. Thomas Creations branded vitreous china and fire clay plumbing fixtures to be free of defects in material and workmanship. This warranty is extended only to the original purchaser and installer of the product. This warranty is non-transferable. Icera | St.
Warranty BIDET SEAT TOP - THREE YEAR LIMITED WARRANTY lcera provides a LIMITED 3-YEAR WARRANTY for its iWash Bidet Seat to be free of defects in material and workmanship. This warranty is extended only to the original purchaser and installer of the product. This warranty is non-transferable. lcera will, at its election, repair, replace or make appropriate adjustments where lcera’s inspection discloses any such defects occurring in normal usage within the warranty period after purchase.
ICERA USA P.O. Box 4238 Westminster, CA 92684 P: 855-444-2372 E: service@icerausa.com 6522-0482-00 V.