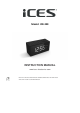
Model: ICR-240 INSTRUCTION MANUAL www.ices-electronics.com READ THIS INSTRUCTION MANUAL BEFORE OPERATING THE APPLIANCE. AND SAVE IT FOR FUTURE REFERENCE.
Top view Back view
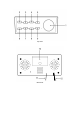
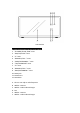
Front view CONTROLS AND INDICATORS 1. “SNOOZE / SLEEP / DIM” button 2. “ON / OFF / NAP” button 3. “P-“ button 4. “ALARM 1 / VOL –“ button 5. “HOUR / TUNING –“ button 6. “TIME / PRESET” button 7. “P+” button 8. “ALARM 2 / VOL +” button 9. “MIN / TUNING +” button 10. Battery compartment 11. FM antenna 12. AC plug A. Time and radio frequency display B. C. D. E. F.
PREPARATION FOR USE This clock radio includes a battery backup system that will maintain the time and alarm settings during a temporary power interruption. Insert two ‘AAA’ size batteries correctly by matching the polarity (+/-) markings in the battery compartment (10). If you experience a power failure while batteries are installed, the display will turn ‘off’ but the clock will continue to run and maintain your alarm settings. Please replace all batteries at the same time with only new batteries.
OFF / NAP” button (2) to turn radio on or off. 1. For setting alarm time 1 with buzzer, press “ALARM 1 / VOL –“ button (4) and indicator (E) will flash. For setting alarm time 1 with radio, press “ALARM 1 / VOL –“ button (4) twice and indicator (F) will flash. 2. When the digits are flashing, press “HOUR / TUNING –“ button (5) repeatedly to change the hour setting. Press “MIN / TUNING +“ button (9) repeatedly to change the minute setting. 3. Press “ALARM 1 / VOL –“ button (4) to confirm. 4.
volume level. The display changes to show the volume level indication (00 to 14) during the volume adjustments, then changes back to the radio station frequency and then the current time. 5. Press “HOUR / TUNING –“ button (5) or “MIN / TUNING +“ button (9) to show the radio station frequency. Pre-set Station Memory 1. The radio can store up to 20 FM stations. 2. To store a station in memory, tune to the desired radio station.
Service and support For information: http://www.ices-electronics.com/ ICES offers service and warranty in accordance to European law, which means that in case of repair (both during and after the warranty period), you should contact your local dealer. Please note: It is not possible to send products directly to ICES for repair. Important note: If this unit will be opened, or accessed in any way by a non-official service center, the warranty expires immediately.
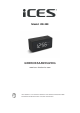
Model: ICR-240 GEBRUIKSAANWIJZING www.ices-electronics.com LEES VOORDAT U HET APPARAAT GEBRUIKT DEZE GEBRUIKSAANWIJZING DOOR. EN BEWAAR HEM OM HEM LATER TE KUNNEN RAADPLEGEN.
Bovenaanzicht Achteraanzicht
Vooraanzicht BEDIENINGSORGANEN EN INDICATIELAMPJES 1. “SLUIMER-/SLAAP-/DIM”-toets 2. “AAN/UIT/DUTJE”-toets 3. “P-” toets 4. “WEKKER 1/VOL –” toets 5. “UREN/AFSTEMMEN –” toets 6. “TIJD/VOORKEUZE”-toets 7. “P+” toets 8. “WEKKER 2/VOL +” toets 9. “MIN/AFSTEMMEN +” toets 10. batterijvak 11. FM-antenne 12. Netstekker A. Scherm voor tijd en radiofrequentie B. C. D. E. F.
VOORBEREIDING VOOR GEBRUIK Deze klok bevat een back-upsysteem met een batterij dat de tijd en wekinstellingen tijdens tijdelijke stroomuitval behoudt. Plaats twee “AAA”-formaat batterijen in het batterijvak (10) en let daarbij op de markeringen voor de polariteit (+/-). Als er zich met geplaatste batterijen een stroomstoring voordoet, schakelt het scherm uit, maar blijft de klok lopen en worden de wekinstellingen behouden. Vervang alle batterijen gelijktijdig en vervang ze alleen door nieuwe batterijen.
HET INSTELLEN VAN DE WEKTIJD Deze wekkerradio is voorzien van twee wektijden die onafhankelijk kunnen worden ingesteld en gebruikt. De procedure voor het instellen is voor beide wektijden hetzelfde. Voor beide wektijden kan worden gekozen uit de zoemer of wakker worden met de radio. Opmerking: De wektijd kan alleen worden ingesteld als de radio is uitgeschakeld. Druk op de “AAN/UIT/DUTJE”-toets (2) om de radio in of uit te schakelen. 1.
RADIO Algemene Bediening 1. Druk op de “AAN/UIT/DUTJE”-toets (2) om de radio in of uit te schakelen. 2. Druk voor handmatig afstemmen op de “UREN/AFSTEMMEN –” toets (5) of de “MIN/AFSTEMMEN +” toets (9) voor stappen van 0,1 MHz. 3. Houd voor automatisch afstemmen de “UREN/AFSTEMMEN –” toets (5) of de “MIN/AFSTEMMEN +” toets (9) gedurende ongeveer 3 seconden ingedrukt. Laat de toets los en de radio begint naar het volgende beschikbare station te zoeken. 4.
seconden ingedrukt totdat het scherm en de het FM-indicatielampje beginnen 2. 3. te knipperen. Druk de “P+” toets (7) of de “P-” toets (3) om de gewenste tijd voor het dutje in te stellen (45, 60, 90 of 120 minuten) Druk de “AAN/UIT/DUTJE”-toets (2) om de keuze te bevestigen. DIMMER Druk als de radio uit is en de huidige tijd wordt weergegeven op de “SLUIMER-/SLAAP-/DIM”-toets (1) om de helderheid van het scherm op hoog of laag in te stellen. Service en ondersteuning Voor informatie: http://www.
Modell: ICR-240 BEDIENUNGSANLEITUNG www.ices-electronics.com LESEN SIE DIESE BEDIENUNGSANLEITUNG VOR DER BENUTZUNG DES GERÄTES GRÜNDLICH DURCH. UND BEWAHREN SIE SIE FÜR ZUKÜNFTIGE REFERENZ AUF.
Ansicht von oben Rückansicht
Vorderansicht BEDIENELEMENTE UND ANZEIGEN 1. „SCHLUMMER/SCHLAF/DIMMEN“-Taste 2. „EIN/AUS/KURZSCHLAF“-Taste 3. „P–“-Taste 4. „ALARM 1/LAUTST. –“ Taste 5. „STUNDE/ABSTIMMUNG –“-Taste 6. „ZEIT/SCHNELLWAHL“-Taste 7. „P+“-Taste 8. „ALARM 2/LAUTST. +“ Taste 9. „MIN/ABSTIMMUNG +“-Taste 10. Batteriefach 11. UKW-Antenne 12. Netzstecker A. Anzeige der Uhrzeit und der Radiofrequenz B. C. D. E. F.
VORBEREITUNG FÜ R DIE ANWENDUNG Dieser Radiowecker umfasst ein Batterie-Sicherungssystem, das während eines vorübergehenden Stromausfalls die Uhrzeit und die Alarmeinstellungen beibehält. Legen Sie zwei „AAA“-Batterien unter Berücksichtigung der korrekten Polaritätsmarkierungen (+/-) in das Batteriefach (10) ein. Wenn bei eingelegten Batterien ein Stromausfall eintritt, wird die Anzeige ausgeschaltet, doch die Uhrzeit läuft weiter und die Alarmeinstellungen werden beibehalten.
EINSTELLEN DER ALARMZEIT Der Radiowecker verfügt über Dual-Alarme, die unabhängig voneinander eingestellt werden können. Das Verfahren zur Einstellung beider Alarmzeiten ist das gleiche. Beide Alarme können eingestellt werden, um entweder mit einem Summer oder mit dem Radio zu wecken. Hinweis: Die Alarmzeit kann nur eingestellt werden, wenn das Radio ausgeschaltet ist. Drücken Sie die Taste „EIN/AUS/KURZSCHLAF“ (2), um das Radio ein- oder auszuschalten. 1.
1 aktiviert ist und das Radio durch Alarm 2, der vorherige Alarm nicht automatisch gestoppt und hat sowohl Summer als auch Radio gleichzeitig. RADIO Allgemeine Bedienung 1. Drücken Sie die Taste „EIN/AUS/KURZSCHLAF“ (2), um das Radio ein- oder auszuschalten. 2. Für die manuelle Abstimmung, drücken Sie die Taste „STUNDE/ABSTIMMUNG – “ (5) oder die Taste „MIN/ABSTIMMUNG +“ (9) für 0,1 mHz Schritte. 3.
Stellen Sie die gewünschte KURZSCHLAF-Zeit ein und das Radio schaltet sich automatisch nach der voreingestellten Zeit ein. 1. Wenn das Radio ausgeschaltet ist, halten Sie die Taste „EIN/AUS/KURZSCHLAF“ (2) ca. 4 Sekunden lang gedrückt und die Anzeige und die FM-Anzeige (D) blinken. 2. Drücken Sie die Taste „P+“ (7) oder „P –“ (3), um die gewünschte Kurzschlafzeit (45, 60, 90 oder 120 Minuten) einzustellen. 3. Drücken Sie zur Bestätigung die Taste „EIN/AUS/KURZSCHLAF“ (2).
Modèle : ICR-240 MODE D’EMPLOI www.ices-electronics.com LISEZ CE MODE D’EMPLOI AVANT D’UTILISER L’APPAREIL. CONSERVEZ-LE POUR LE CONSULTER ULTÉRIEUREMENT.
Vue du dessus Vue arrière
Vue avant COMMANDES ET INDICATEURS 1. Bouton « RAPPEL D’ALARME/MISE EN VEILLE/VARIATEUR » 2. Bouton « MARCHE/ARRÊT/SIESTE » 3. Bouton « P - » 4. Bouton « ALARME 1/VOL - » 5. Bouton « HEURES/RÉGLAGE - » 6. Bouton « HEURE/PRÉSÉL. » 7. Bouton « P + » 8. Bouton « ALARME 2/VOL + » 9. Bouton « MINUTES/RÉGLAGE + » 10. Compartiment à piles 11. Antenne FM 12. Prise secteur A. Affichage de l’heure et de la fréquence radio B. C. D. E. F.
PRÉPARATION AVANT UTILISATION Ce radio-réveil inclut une pile de secours qui maintiendra les réglages d’horloge et d’alarme lors d’une coupure de courant. Installez correctement deux piles de type « AAA » en respectant les polarités (+/-) indiquées à l’intérieur du compartiment à piles (10). En cas de coupure de courant avec les piles installées, l’afficheur s’éteindra mais l’horloge continuera de fonctionner et gardera vos réglages d’alarme. Remplacez toujours toutes les piles en même temps par des neuves.
Remarque : Vous ne pouvez régler l’heure d’alarme que quand la radio est désactivée. Appuyez sur le bouton « MARCHE/ARRÊT/SIESTE » (2) pour activer ou désactiver la radio. 1. Pour régler l’heure de l’alarme 1 avec avertisseur sonore, appuyez sur le bouton « ALARME 1/VOL - » (4) et l’indicateur (E) clignotera. Pour régler l’heure de l’alarme 1 avec la radio, appuyez deux fois sur le bouton « ALARME 1/VOL - » (4) et l’indicateur (F) clignotera. 2.
RADIO Fonctionnement Général 1. Appuyez sur le bouton « MARCHE/ARRÊT/SIESTE » (2) pour activer et désactiver la radio. 2. Pour un réglage manuel, appuyez sur le bouton « HEURES/RÉGLAGE - » (5) ou « MINUTES/RÉGLAGE + » (9) pour changer la fréquence par paliers de 0,1 MHz. 3. Pour un réglage automatique, maintenez enfoncé le bouton « HEURES/RÉGLAGE - » (5) ou « MINUTES/RÉGLAGE + » (9) pendant environ 3 secondes. Relâchez le bouton et la radio commencera à rechercher la prochaine station disponible. 4.
préréglée. 1. 2. 3. Lorsque la radio est désactivée, maintenez enfoncé le bouton « MARCHE/ARRÊT/SIESTE » (2) pendant environ 4 secondes et l’affichage et l’indicateur FM (D) clignoteront. Appuyez sur le bouton « P+ » (7) ou « P- » (3) jusqu’à atteindre la durée de sieste voulue (45, 60, 90 ou 120 minutes). Appuyez sur le bouton « MARCHE/ARRÊT/SIESTE » (2) pour confirmer.
Modelo: ICR-240 MANUAL DE INSTRUCCIONES www.ices-electronics.com LEA ESTE MANUAL DE INSTRUCCIONES ANTES DE USAR EL APARATO.
Vista superior Vista posterior
Vista frontal CONTROLES E INDICADORES 1. Botón “APLAZAR ALARMA/TEMPORIZADOR/ATENUAR” 2. Botón “ENCENDIDO/APAGADO/SIESTA” 3. Botón “P–” 4. Botón “ALARMA 1/VOLUMEN –” 5. Botón “HORAS/SINTONIZACIÓN –” 6. Botón “HORA/PRESINTONÍA” 7. Botón “P+” 8. Botón “ALARMA 2/VOLUMEN +” 9. Botón “MINUTOS/SINTONIZACIÓN +” 10. Compartimento Para las pilas 11. Antena FM 12. Enchufe CA A. Presentación de la hora y frecuencia de radio B. C. D. E. F.
PREPARACIÓ N PARA EL USO Este radio-reloj incluye un sistema de batería de respaldo que conservará los ajustes de la hora y la alarma durante un corte temporal de la energía. Inserte dos pilas de tipo “AAA” en la posición correcta según los símbolos de polaridad (+) y (-) en el compartimento de las pilas. Si ocurre un fallo en la red eléctrica estando las pilas instaladas, la pantalla se apagará, pero el reloj seguirá funcionando y conservará sus ajustes de la alarma.
Nota: La hora de la alarma sólo puede ajustarse con la radio apagada. Pulse el botón “ENCENDIDO/APAGADO/SIESTA”(2) para encender y apagar la radio. 1. Para ajustar la hora de la alarma 1 con el timbre, pulse el botón “ALARMA1/VOLUMEN-” (4) y el indicador (E) parpadeará. Para ajustar la hora de la alarma 1 con la radio, pulse dos veces el botón “ALARMA1/VOLUMEN-” (4) y el indicador (F) parpadeará. 2.
incrementos de 0,1mHz. 3. Para la sintonización automática, mantenga pulsado el botón “HORAS/SINTONIZACIÓN –”(5) o el botón “MINUTOS/SINTONIZACIÓN +” (9) durante unos 3 segundos. Suelte el botón y la radio comenzará a buscar la siguiente emisora disponible. 4. Pulse el botón “ALARMA 1/VOLUMEN – ” (4) o el botón ALARMA 2/VOLUMEN” (8) para ajustar el nivel de volumen.
(45, 60, 90 o 120 minutos). 3. Pulse el botón “ENCENDIDO/APAGADO/SIESTA” (2) para confirmar. Atenuador Cuando la radio esté apagada y se visualice la hora actual, pulse el botón “APLAZAR ALARMA/TEMPORIZADOR/ATENUAR” (1) para seleccionar el brillo de la pantalla entre alto y bajo. Servicio y asistencia Para más información: http://www.ices-electronics.