
User Guide


8
Symptom Problem
Unit fails to start The sensor may not be connected or it is defective.
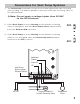
With the probe disconnected, use an ohmmeter to
measure the resistance between the probe wires. It
should match the chart in Appendix B (see Page 9). If you
read an OPEN or SHORT, replace the sensor.
Fuse and/or
circuit blows
The unit has been miswired and may be permanently
damaged.
The fan cycles
from full ON to
full OFF with
little or no
modulation
Turn OFF the control circuit power (24 VAC). Re-apply
24 VAC power and confirm hard start operation. Reduce
the hard start period to the minimum setting required to
accelerate the fan. Excessive hard starting causes large
pressure drops by running too much cold air over the
condenser.
Should the cycling persist, move the probe up several
bends into the condenser to increase the sensitivity to
condensing temperature.
Adjust probe location. Fine tune cutout adjustment.
The fan does not
come on at all
Using an AC voltmeter, measure the voltage between the
24 VAC terminals. It should read approximately 24 volts.
Measure the line voltage between LINE 1 and LINE 2 to
confirm that the line voltage is present.
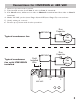
Remove the thermistor probe from the terminal block
and measure its resistance at ambient temperature.
Compare your reading at the appropriate temperature in
Appendix B (see Page 9) to see if the actual resistance
approximates the listed value. Next, hold the probe in
your hand and confirm that the resistance decreases.
Place a temporary jumper across the S2 or S3 terminals.
Fan should run at full speed. If it does, recheck probe
connection and verify probe is operating correctly.
The high
pressure switch
trips off
Move the probe further into the condenser where the
temperature is higher. This will produce a higher fan RPM
and will decrease the head pressure.
Fine adjust the cutout and hard start settings.
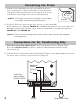
Troubleshooting