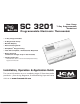
SC 3201 Heat Pump 7-Day Programmable Hardwired Programmable Electronic Thermostat • 7-Day Programmable • 2-Stage Heat Pump • Backlit Display • Manual Changeover • Simpleset® Programming • Title 24 Compliant / No Batteries Required • Relay Outputs (minimum voltage drop in thermostat) • Ideally Suited for: – Residential (New Construction/Replacement), Light Commercial Installation, Operation & Application Guide For more information on our complete range of American-made products – plus wiring diag
Table of Contents SimpleComfort® 3201 Parts Diagram........................................................................................... 1 Specifications............................................................................................................................... 2 Important Safety Information...................................................................................................... 2 Package Contents/Tools Required...........................................................
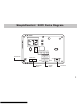
SimpleComfort® 3201 Parts Diagram C L R B O W2 G E Y1 Y2 Reset Button Mode Hold Auto Cool Mode/Hold Switch Off Heat On Emer System Switch Fan Switch
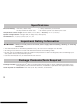
Specifications Electrical Rating: • 24 VAC (18-30 VAC) • 1 amp maximum per terminal • 4 amp maximum total load • 60 minute power loss backup for clock Temperature control range: 45°F to 90°F (7°C to 32°C) Accuracy: ± 1°F (± 0.5°C) System configurations: 2-stage heat, 2-stage cool, heat pump Terminations: C, L, R, B, O, W2, G, E, Y1, Y2 Important Safety Information WARNING!: Always turn off power at the main power supply before installing, cleaning, or removing thermostat.
To Remove Existing Thermostat ELECTRICAL SHOCK HAZARD – Turn off power at the main service panel by removing the fuse or switching the appropriate circuit breaker to the OFF position before removing the existing thermostat. 1. Turn off power to the heating and cooling system by removing the fuse or switching the appropriate circuit breaker off. 2. Remove cover of old thermostat. This should expose the wires. 3. Label the existing wires with the enclosed wire labels before removing wires. 4.
To Install Thermostat (continued) 2. To remove cover, insert and twist a coin or screwdriver in the slots on the sides of the thermostat. 3. Put thermostat base against the wall where you plan to mount it (Be sure wires will feed through the wire opening in the base of the thermostat). 4. Mark the placement of the mounting holes. 5. Set thermostat base and cover away from working area. 6. Using a 3/16” drill bit, drill holes in the places you have marked for mounting. 7.
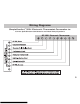
Wiring Diagrams SimpleComfort® 3201 Electronic Thermostat Conversion to: Carrier Split Stream Condensers and Heat Pump Systems SC 3201 Electronic Thermostat
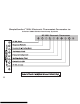
SimpleComfort® 3201 Electronic Thermostat Conversion to: Coleman 3000 Series Heat Pump Systems SC 3201 Electronic Thermostat
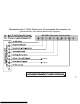
SimpleComfort® 3201 Electronic Thermostat Conversion to: Comfortmaker CYC Series Heat Pump Systems SC 3201 Electronic Thermostat (capped) (capped)
SimpleComfort® 3201 Electronic Thermostat Conversion to: Heil-Quaker 867.
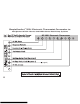
SimpleComfort® 3201 Electronic Thermostat Conversion to: Payne Reliant and Endura Model Heat Pump Systems SC 3201 Electronic Thermostat (capped)
SimpleComfort® 3201 Electronic Thermostat Conversion to: Rheem/Ruud: -PGB, -PFA, -PCB, -PLA, and -PKA Series Heat Pump Systems SC 3201 Electronic Thermostat 10
SimpleComfort® 3201 Electronic Thermostat Conversion to: Goodman, Janitrol, Trane/American Standard Heat Pumps SC 3201 Electronic Thermostat (capped) (capped) 11
SimpleComfort® 3201 Electronic Thermostat Conversion to: York E1CS, E1FB, E1FH Heat Pump Systems SC 3201 Electronic Thermostat 12
SimpleComfort® 3201 Electronic Thermostat Conversion to: Lennox CB19 Heat Pump Systems SC 3201 Electronic Thermostat 13
SimpleComfort® 3201 Electronic Thermostat Conversion to: Lennox HP19 and HP20 Heat Pump Systems SC 3201 Electronic Thermostat 14
SimpleComfort® 3201 Electronic Thermostat Conversion to: Lennox HP21 With CB21 PCB Heat Pump Systems SC 3201 Electronic Thermostat 15
SimpleComfort® 3201 Electronic Thermostat Conversion to: Lennox HP22 With CB19 PCB Heat Pump Systems SC 3201 Electronic Thermostat 16
Operation ® The SimpleComfort 3201 thermostat has buttons that are used to: • Adjust the setpoints of the thermostat • Set the modes • Program the schedule Setting the Room Temperature (Setpoint Temperature) 1. With the System switch in Cool, Heat, or Emer, the current temperature setpoint displays. 2. Press the or button until the desired temperature setpoint displays. 3. The new temperature setpoint is automatically saved in memory. Setting a New Temperature Differential 1.
LED Indictors There are three LED indicators located on the front of the thermostat.
Starting the Thermostat CAUTION!: Do not use air conditioning when the outdoor temperature is below 50 degrees. This can damage your air conditioning system and cause personal injuries. 1. Move the Fan Auto/On switch to the Auto position. On position runs indoor fan continuously. 2. Move the System switch to Cool or Heat, depending on the season.
Testing the Thermostat Once the thermostat is installed, it should be thoroughly tested. CAUTION!: Do not energize the air conditioning system when the outdoor temperature is below 50 degrees. It can result in equipment damage or personal injury. Note: Before testing the SC3201, move the Fan Auto/On switch to the Auto position. Cool Test 1. Slide System switch to Cool position. Cool mode screen is displayed. 2. Adjust set temperature so it is 5 degrees below room temperature. 3.
Emergency Heat Test 1. Slide System switch to Emer position. Emer Heat mode screen is displayed (Emer LED lights). 2. Adjust set temperature so it is 5 degrees above room temperature. 3. Second stage heat should come on within a few seconds (Aux LED lights). 4. Adjust the set temperature 2 degrees below the room temperature and the heat should turn off. There may be a fan delay on your system. Fan Test 1. Slide Fan switch to On position. 2. Indoor fan turns on. 3. Slide Fan switch to Auto position. 4.
Operating Modes Off Mode • In this mode, the thermostat will not turn on the heating or cooling devices (manual fan can operate) • OFF mode is also used to access Setup and Program modes Cool Mode • In this mode, the thermostat controls the cooling system • Press the Mode button to enter and exit Program Cool mode • In Program Cool (PROG displays) mode, the thermostat will follow the program schedule that is stored in memory Heat Mode • In this mode, the thermostat controls the heating system • Press
Setting the Time and Day of the Week The time and day of the week must be set for your program schedule to operate correctly. 1. Slide the System switch into the OFF position. 2. Press the 3. Press the button in for 6 seconds. or button to adjust the time. 4. Press the button while the time is displayed. The display shows the day currently set on the thermostat (1=Monday, 2=Tuesday, etc). 5. Press the or button to set the correct day of the week that today is.
Programming Program Overview The SC3201 programmable thermostat has four periods (MORN, DAY, EVE, NITE) that are customizable for each day of the week. Each period will have a set time, heat temperature, and cool temperature. The SC3201 monitors the day and time, while maintaining the specific conditions you have chosen for each period in your program. 1. Place System switch in OFF position. 2. Press the button for 6 seconds. 3. Press the button twice. • Day is displayed (1-7) 4.
Programming (continued) 8. 9. • Set time is displayed Press the or button to change set time. Press the button to advance to the next screen. Note: Transitions required after 11:59 PM must be programmed in the next day’s MORN period. • Heat temperature is displayed (50°F to 90°F) 10. Press the or button to adjust heat set temperature. 11. Press the button to advance to the next screen. • Cool temperature is displayed (45°F to 85°F) 12. Press the or button to adjust cool set temperature. 13.
Simpleset® Programming Simpleset® programming is a convenient method of programming the thermostat. Once the entire Monday (Day 1) schedule is set, Simpleset® programming will copy the Monday schedule to every day of the week. After the complete Monday schedule is set (see Programming on Page 24), you are at the Day 2 screen: 1. Press the button once. Day 1 screen displays. 2. Press the button for 2 seconds. • The days of the week will count down from 7 to 1 and this will lock the settings into memory.
Personal Program Schedule Use the following personal program schedule to record your settings: MONDAY 1 TUESDAY 2 WEDNESDAY 3 THURSDAY 4 MORN DAY EVE NITE HEAT COOL HEAT COOL HEAT COOL HEAT COOL MORN DAY EVE NITE HEAT COOL HEAT COOL HEAT COOL HEAT COOL MORN DAY EVE NITE HEAT COOL HEAT COOL HEAT COOL HEAT COOL MORN DAY EVE NITE HEAT COOL HEAT COOL HEAT COOL HEAT COOL 27
Personal Program Schedule (continued) FRIDAY 5 SATURDAY 6 SUNDAY 7 28 MORN DAY EVE NITE HEAT COOL HEAT COOL HEAT COOL HEAT COOL MORN DAY EVE NITE HEAT COOL HEAT COOL HEAT COOL HEAT COOL MORN DAY EVE NITE HEAT COOL HEAT COOL HEAT COOL HEAT COOL
Troubleshooting Symptom Remedy No display Check for 24 VAC at thermostat; display is blank when 24 VAC is not present System fan does not come on properly Verify wiring is correct All thermostat buttons are inoperative Verify 24 VAC is present; unit locks out when 24 VAC is not present Program schedule activates at the wrong time Check time (AM/PM) set on thermostat (see “Setting the Time,” Page 23) Thermostat turns on and off too frequently Adjust temperature differential (See “Setting a New Tem
ONE-YEAR LIMITED WARRANTY The Seller warrants its products against defects in material or workmanship for a period of one (1) year from the date of manufacture. The liability of the Seller is limited, at its option, to repair, replace or issue a non-case credit for the purchase prices of the goods which are provided to be defective.