
Installation Guide

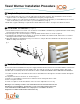


Towel Warmer Installation Procedure
1. The incoming power feed goes to a deep single gang electrical box (for timer). This electrical box can be located
anywhere in the room, although we recommend it be alongside your light switches.
2. A power feed then goes from the timer electrical box to a single gang electrical box (for Towel Warmer). The location
of this electrical box governs the location of your Towel Warmer (see fig. 2).
3. Wall studs or plywood backing is required in the wall at all bracket locations. See figure 2 for bracket locations.
Rough-in Requirements
(see figure 3)
1
Do not connect the Towel Warmer to the power supply until all instructions have been read and installation carried out in
accord with them. The heating element is 300W 110V. The element conforms to UL standards and the unit to CSA
standards (File ref: 229718). Ensure the CSA label is visible. TURN OFF POWER SUPPLY BEFORE PROCEEDING.
1. Feed the electrical cord located at the bottom of the Towel Warmer first through the round tube and then through the
cover plate.
2. Complete all electrical connections as shown in figure 3.
3. Fit tube over Towel Warmer element sleeve until it meets the hexagonal chrome collar.
4. Push cover plate onto tube.
5. Screw cover plate to electric box with the enclosed screws. Adjust where necessary.
Warning: In case of damage or failure of the Towel Warmer the unit should be returned to the
manufacturer or their distributor. The warranty of 1 year on the heating element and 5 years
on the Towel Warmer is NOT VALID in case of improper use or installation. Product is
designed for use within Canada and the United States only.
Installation Instructions
(see figure 1)
2
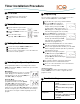
1. Check all items have been received. You should have Towel Warmer, hardwire kit, programmable timer and mounting
bracket kit. Read all instructions before continuing.
2. Fix wall supports "A" to the wall using the screws provided and in locations as shown on figure 2.
3. Assemble the threaded pin "B", the washer "C", the bush "D" with the threaded head "E", between the second and
third upper and lower tubes of the Towel Warmer.
4. Hang and adjust the Towel Warmer using set screws "F" to lock pin "B" in the wall bracket "A". Ensure the Towel
Warmer is firmly and safely fixed.
Hardwire Connection
(see figure 4)
3
fig. 1
A
B
C
D
E
F