
Instruction Manual


1
PANEL DESCRIPTIONS
1
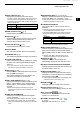
q POWER KEY (p. 7)
z Push to turn the radar power ON or OFF.
• The initial screen is displayed and a beep sounds
after the power has been turned ON.
w TRANSMIT/SAVE KEY [TX (SAVE)]/ [ ]
z Push to change the operating mode between TX
mode and the standby mode. (p. 7)
z Hold down for 1 second to turn ON the power
save function. The radar for the TX interval scan
is xed at 10 revolutions. (p. 13)
L Select the save time in the System menu.
e RANGE UP/ DOWN KEYS [+]/[–] (p. 7)
z Push [+] to increase the screen range.
z Push [–] to decrease the screen range.
r CLEAR KEY [CLEAR]/[
]
z Push to cancel the Submenu or Option selection
mode in the Menu screen. (p. 39)
z Hold down for 1 second to turn the activated AIS
target into a sleeping target. (p. 26)
L Hold down [ENTER]/[ ] for 1 second to change
the sleeping AIS target to an activated target.
z Hold down for 1 second to release the ARPA
target or delete the TLL symbol. (pp. 23, 33)
t CURSOR PAD
z Push to move the cross-line cursor
in sixteen
directions
in the normal operating mode.
z Sets the EBLs, VRMs, alarm area, ARPA target,
AIS target, and so on.
z Push [t] or [u] to select the Menu group, or
push [p] or [q] to select the menu items in the
Menu screen. (p. 39)
y ENTER KEY*
*Described as [ENTER]/[ ] in this manual.
Push to select the target and display the ARPA,
AIS, DSC, TLL, or WPT information. (pp. 14, 23,
26, 33)
z In the Menu screen, push to display a submenu
or option selection mode, or push to save the
settings. (p. 39)
z Hold down for 1 second to turn the sleeping AIS
target into an activated target. (p. 26)
L Hold down [CLEAR]/[ ] for 1 second to change
the activated AIS target to a sleeping target.
z Hold down for 1 second to display the DSC
details. (p. 32)
u
MODE / ZOOM KEY [MODE•ZOOM]/
[ • ]
z Push to select the screen mode, Head-up (H-
UP), Course-up (C-UP), North-up (N-UP) or True
motion (TM) screen. (p. 7)
L The North-up, and Course-up screens can
be selected only when a bearing data input is
connected. (pp. 45, 53)
L The TM screen requires bearing data and position
data.
L TheTM screen is not selectable in the 32 NM or
higher range.
z Hold down for 1 second to select the ZOOM
view ON or OFF. The ZOOM view expands the
Plain Position Indicator (PPI) and the trail around
the cross-line cursor to the double size of the
normal view. (p. 10)
q
w
t
u
y
Control panel (English) Control panel (Chinese)
r
i
o
!0
!7
!8
!6
!5
!4
!3
!2
!1
e
q
w
t
u
y
r
i
o
!0
!7
!8
!6
!5
!4
!3
!2
!1
e
■ Front panel
MR-1010RII / Page 13-6