
Operation Manual


1
PANEL DESCRIPTION
1-5
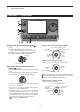
!6 NOTCH KEY
NOTCH
(AI sec. 5)
(Mode = Auto notch: SSB/AM/FM
Manual notch: SSB/CW/RTTY/AM)
➥ In the SSB and AM modes, push to toggle the
notch function between auto, manual and OFF.
•EithertheAutoorManualnotchfunctioncanbeturned
OFF in
the “[NOTCH] Switch (SSB)/(AM)” items
of the
“Function” Set mode. (6-21)
SET
> Function > [NOTCH] Switch (SSB)
SET
> Function > [NOTCH] Switch (AM)
➥ In the FM mode, push to turn the Auto Notch func-
tion ON or OFF.
➥ In the CW or RTTY mode, push to turn the Manual
Notch function ON or OFF.
•“MN” appears when the Manual Notch function is
ON.
•“AN”appearswhentheAutoNotchfunctionisON.
•NoindicatorappearswhenthenotchlterisOFF.
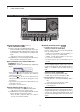
➥ Hold down for 1 second to display the “NOTCH”
screen.
Push to return to the previous screen.
•RotatetheDialtoadjustthenotchfrequencytoreject
an interfering signal when the manual function is ON.
•Notchltercenterfrequency:
SSB/RTTY: –1040 Hz to +4040 Hz
CW: CW pitch frequency –2540 Hz to
CW pitch frequency +2540 Hz
AM: –5060 Hz to +5100 Hz
✔ What is the notch filter?
The notch filter is a narrow filter that eliminates un-
wanted CW or AM carrier tones, while preserving
the desired voice signal. The DSP circuit automati-
cally adjusts the notch frequency to effectively elimi-
nate unwanted tones.
!7 DR MODE KEY
DR
(section 4, 5, AI sec. 9)
➥ Push to select the DR mode.
•WhentheDRmodeisselected,thetransceiverauto-
matically selects the DV mode.
➥ In the DR mode, push to cancel it.
•Thetransceiverreturnstothepreviousscreenbefore
entering the DR mode.
!8 SET MODE KEY
SET
(section 6)
➥ Push to enter or exit the SET mode.
•“VoiceMemo,”“CallSign,”“RXHistory,”“DVMemory,”
“MyStation,”“DVSet,”“GPS,”“SPEECH,”“QSO/RX
Log,” “Function,” “Tone Control,” “Connectors,” “Dis-
play,” “Time Set,” “SD Card” and “Others” set group
are selectable.
!9 QUICK MENU KEY
QUICK
➥PushtoopenorclosetheQuickMenuwindow.
•The Quick Menuis used to quickly select various
functions.
➥ In the setting screen, push to open the Default
set window.
•Touch“Default”toresettothedefaultsetting.
@0 AUTO TUNE•RXCS KEY
AUTO TUNE
RX
�
CS
❍ AUTO TUNE KEY Operation (AI sec. 4)
(Mode: CW)
➥ Push to automatically adjust for a zero beat
with the received signal.
Zero beat means that two signals are exactly the
same frequency.
•“AUTOTUNE”blinkswhentheautotunefunction
is activated.
•WhentheRITfunctionisON,theautotunefunc-
tion changes the RIT frequency, not the displayed
frequency.
❍ RX CALL SIGN CAPTURE KEY Operation
(p. 5-6)
(Mode: DV, when the DR mode is selected)
➥ Push to open the “RX>CS” screen.
Push again to return to the previous screen.
➥ Hold down for 1 second to set the received call
signs (station and repeaters) as the operating
call sign.
@1
TRANSMIT FREQUENCY CHECK KEY
XFC
➥
During split frequency or repeater operation, hold
down to listen to the transmit frequency. (AI sec. 4)
•Whileholdingdownthisswitch,thetransmitfrequen-
cy can be changed with the Dial or
MPAD
.
•WhentheSplitLockfunctionisturnedONintheSplit
operation, hold down
XFC
to cancel the Dial lock
function.
➥ When operating simplex, hold down to monitor
the frequency.
•Whileholdingdownthiskey,thesquelchisopenand
the interference reject function is temporarily turned
OFF.
➥ When operating simplex and the RIT function is
turned ON, hold down to listen to the transmit fre-
quency. The frequency is the same as when the
RIT is OFF.
➥ In the DV mode, hold down this key to select the
RX monitoring mode. (p. 6-3)