INSTRUCTION MANUAL VHF/UHF ALL MODE TRANSCEIVER i910H
IMPORTANT READ THIS INSTRUCTION MANUAL CAREFULLY before attempting to operate the transceiver. SAVE THIS INSTRUCTION MANUAL. This manual contains important safety and operating instructions for the IC-910H. EXPLICIT DEFINITIONS WORD DEFINITION R WARNING Personal injury, fire hazard or electric shock may occur. CAUTION NOTE Equipment damage may occur. If disregarded, inconvenience only. No risk of personal injury, fire or electric shock.
1 TABLE OF CONTENTS IMPORTANT ........................................ i EXPLICIT DEFINITIONS ..................... i PRECAUTIONS ................................... i 1 TABLE OF CONTENTS ................ 1 2 PANEL DESCRIPTION ........... 2 – 13 ■ Front panel ..................................... 2 ■ Function display ........................... 10 ■ Rear panel .................................... 12 ■ Indications during transmit ........... 32 ■ FM mode operation ......................
2 PANEL DESCRIPTION ■ Front panel o !0 !1 !2 !3 q w e r t y u i q POWER SWITCH [POWER] ➥ Push momentarily to turn power ON. ➥ Push for 2 sec. to turn power OFF. w TRANSMIT SWITCH [TRANSMIT] Push to select transmitting or receiving. e COMPRESSION SWITCH [COMP] (p. 36) Push to switch the speech compressor function ON and OFF. • The speech compressor increases average RF output power, improving signal strength and readability in SSB. r VOX SWITCH [VOX] (p.
PANEL DESCRIPTION o MAIN BAND INDICATOR [MAIN] ➥ Lights green while the squelch is opened or a signal is received on the MAIN band; lights red while transmitting on the MAIN band. • While transmitting, the indicator also shows ALC condition. Brightness increases more than usual when the ALC function is activated. ➥ Flashes when an off-frequency signal is received and the FM center detector is activated. (p.
2 PANEL DESCRIPTION ■ Front panel (continued) !4 !5 !6 !7 !8 !4 AF CONTROL [AF] (inner control) Varies the audio output level from the speaker for the SUB band. !5 SET•MENU SWITCH [SET•MENU] (p. 55) ➥ Push this switch then one of [FM], [SSB/CW], [RIT], [SCAN], [NR], [TRANSMIT], [COMP], [VOX], [ATT], [SWP], [MPW] or [SPCH] to enter the independent item set mode. ➥ Push for 1 sec. to enter the set mode for commonly used item settings. !9 @0 For 1 sec.
PANEL DESCRIPTION !8 AUTO GAIN CONTROL•AUTO NOTCH FILTER SWITCH [AGC•ANF] ➥ Push to switch the time constant of the automatic gain control to SLOW and FAST for the MAIN band.* (p. 28) @2 BRAKE ADJUSTMENT SCREW Adjust the tension of the tuning dial. • Rotate clockwise to increase the tension; counterclockwise to decrease the tension.
2 PANEL DESCRIPTION ■ Front panel (continued) @8 @7 @6 @5 @4 @4 RIT CONTROL [RIT] (p. 27) Shifts the receive frequency without changing the transmit frequency for the MAIN band only while the RIT function is activated. • SSB/CW mode : ±1.0 kHz* in 10 Hz step • FM mode : ±5.0 kHz* in 50 Hz step *For 1200 MHz band; ±2.0 kHz and ±10.0 kHz, respectively when the optional UX-910 is installed.
PANEL DESCRIPTION Switch Switch action when pushed • Enters numeral “1” when entering an operating frequency. (p. 23) • Switches between VFO and memory mode. (p. 40) 2 Switch action when pushed for 1 sec. Enters numeral “2” when entering an operating Equalizes the condition of the VFO A and B. frequency. (p. 23) (p. 21) • Enters numeral “3” when entering an operating Shows 10 Hz and 1 Hz digits of operating frefrequency. (p.
2 PANEL DESCRIPTION ■ Front panel (continued) #5 #4 #3 #2 #1 @9 SPLIT•DUPLEX SWITCH [SPLIT•DUP] ➥ Push to turn the split function, with the VFO A and B, ON and OFF. (p. 37) • The split operation is not available for the SUB band. For 1 sec. #0 SSB/CW•CW-NARROW SWITCH [SSB/CW•CW-N] ➥ Push to switch the operating mode between SSB and CW. (p. 23) For 1 sec. ➥ Push for 1 sec. to switch the operating mode between USB and LSB or between CW and CW narrow during SSB or CW mode, respectively.
PANEL DESCRIPTION 2 #4 SUB•SUB OFF SWITCH [SUB•SUB OFF] ➥ Push to enable the SUB band control from the tuning dial, keypad, etc. (p. 19) • “SUB” indicator appears. ➥ Push for 1 sec. to turn the SUB band readout indication ON and OFF. (p. 24) For 1 sec. #5 CALL•TONE SQUELCH SWITCH [CALL•T-SQL] ➥ Push to select the call channel of the operating band. The call channel can be selected from both the VFO and memory mode operation. (p. 43) ➥ Push for 1 sec.
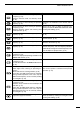
2 PANEL DESCRIPTION ■ Function display e r w FMN USB LSB CW N t u y DUP SPLIT RIT VFO A VFO B MEMO q @4 i T-SQL ATT P.AMP AFC NB FAGC NR ANF 3 S 1 5 @3 7 20 9 @2 @6 OVER @0 !9 @1 @5 q NOR 60dB 40 SWP COMP MP 9600 SCAN VOX SET !7 !6 !5!4 !8 w e FM N USB LSB C W N SUB B L AN K !3 y u RIT VFO A VFO B MEMO SATL i RE V .AMP AFC T-SQ SQL ATT P.AMP AFCNB NB F AGC NR A NF @7 @8 S 1 3 5 7 9 40 20 LOCK @3 @4 @2 @1 q FREQUENCY READOUTS (p.
PANEL DESCRIPTION 2 !1 DATA TRANSMISSION SPEED INDICATOR (p. 52) Appears when 9600 bps speed is selected for packet transmission. @4 TONE SQUELCH INDICATOR (pgs. 30, 34) “T” appears when the tone encoder function is activated; “T-SQL” appears when the tone squelch function is activated. !2 SPEECH COMPRESSOR INDICATOR (p. 36) Appears when the speech compressor is activated. @5 SUB INDICATOR (p. 19) Appears when the SUB band access is enabled. !3 SET INDICATOR (p. 55) Appears when [SET] is pushed.
2 PANEL DESCRIPTION ■ Rear panel q e w !2 !1 q 430(440) MHz ANTENNA CONNECTOR (p. 15) Accepts a 50 Ω antenna with a type-N connector. w DC POWER SOCKET [DC 13.8V] (p. 17) Accepts 13.8 V DC through the supplied DC power cable (OPC-657A). !0 o i u y t r u KEY JACK [KEY] (p. 15) Accepts a paddle, a straight key or external electronic keyer with 1⁄8 inch standard plug. (+) (_) Rear panel _ view + e 144 MHz ANTENNA CONNECTOR (p. 15) Accept a 50 Ω antenna with a PL-259 connector.
PANEL DESCRIPTION 2 D ACC SOCKETS ACC(1) Socket Pin No. 1 Pin Name Description NC No connection. 2 GND Connect to ground. 3 SEND Input terminal to transmit the trans- Transmit voltage : –0.5 to +0.8 V ceiver in relation to the external equip- Output current : Less than 20 mA ment. (Grounded: transmits) Input current (Tx) : Less than 200 mA 4 MOD 5 AF 6 SQLS 7 13.8 V 8 ALC 2 4 1 5 3 8 6 Specification 7 Input terminal for the modulation cir- Output impedance : 10 kΩ cuit.
3 INSTALLATION AND CONNECTIONS ■ Unpacking ■ Selecting a location After unpacking, immediately report any damage to the delivering carrier or dealer. Keep the shipping cartons. Select a location for the transceiver that allows adequate air circulation, free from extreme heat, cold, or vibrations, and away from TV sets, TV antenna elements, radios and other electro-magnetic sources. For a description and a diagram of accessory equipment included with the IC-910H, see ‘Supplied accessories’ on p.
INSTALLATION AND CONNECTIONS 3 ■ Required connections • Front panel HEADPHONES Input impedance: 8–16 Ω Audio output power: 5 mW with 8 Ω load Output power may differ according to the headphone HM-12 HAND MICROPHONE MICROPHONE CONNECTOR (Front panel view) SM-20 DESKTOP MICROPHONE (optional) q MIC (Microphone input) i w +8V (Max.
3 INSTALLATION AND CONNECTIONS ■ Advanced connections • Front panel MB-23 CARRYING HANDLE • Rear panel PREAMP (p. 59) (144 MHz/430(440) MHz/1200 MHz) 144 MHz : AG-25 430(440) MHz : AG-35 1200 MHz : AG-1200 External all-weather, mast mounting preamplifiers are available. 430(440) MHz EXTERNAL SPEAKER (MAIN/SUB) (p. 12) CAUTION: NEVER connect equipment (i.e. power, SWR meter) between transceiver and preamplifier. icom sp-7 Use 4–8 Ω speakers. 1200 MHz (optional) 144 MHz MAIN SUB MAIN [REMOTE] (p.
INSTALLATION AND CONNECTIONS ■ Power supply connections Use an optional DC power supply with a 25 A capacity and above when operating the transceiver with AC power. Refer to the diagrams below. 3 CAUTION: Before connecting the DC power cable, check the following important items. Make sure: • The [POWER] switch is OFF. • Output voltage of the power source is 12–15 V when you use a non-Icom power supply. • DC power cable polarity is correct.
4 BASIC OPERATION ■ Initial settings CCW After resetting the transceiver, set controls and switches as shown in the figure below. : Max. counterclockwise [AF] (MAIN band): CCW [RF/SQL] (MAIN band): [SATELLITE]: OFF [POWER]: OFF 12 o’clock [TRANSMIT]: OFF [COMP]: OFF [VOX]: OFF [RIT]: OFF [AF] (SUB band): CCW [SHIFT]: 12 o’clock [RF/SQL]: (SUB band) 12 o’clock [MIC]: CCW [AGC]: OFF [SET]: OFF [RIT]: 12 o’clock [AFC/NB]: OFF [ATT(P.AMP)]: OFF [RF PWR]: CCW Turn power ON, then check the display.
BASIC OPERATION 4 ■ MAIN and SUB bands The IC-910H has dual bands: 144 MHz and 430(440) MHz. These bands can be assigned to the MAIN and SUB bands for operating convenience. Each MAIN and SUB bands have independent features. MAIN band display FM S 1 VFO A 3 5 7 20 9 40 60dB FM The MAIN band is the operation for both transmit and receive, and is displayed in the upper area of the function display.
4 BASIC OPERATION ■ Operating band selection (optional UX-910 is required) The IC-910H can be used on the additional 1200 MHz band with the optional UX-910. The operating band can be selected by pushing [M/S•BAND] for 1 sec. D Selecting on the MAIN band q Push [SUB] to cancel the SUB band access, if required. w Push [M/S•BAND] for 1 sec. to select operating band. [SUB] [M/S•BAND] Select 1200 MHz to MAIN band.
BASIC OPERATION 4 ■ VFO description The IC-910H has two VFOs for both bands, specially suited for instant selection of 2 frequencies or split frequency operation. The VFOs are called VFO A and VFO B. You can use the desired VFO to call up a frequency and operating mode for your operation. VFO selection FM VFO A VFO is an abbreviation of Variable Frequency Oscillator, and traditionally refers to an oscillator. D Selecting the VFO A/B FM VFO B ➥ Push [A/B 3] to switch between the VFO A and VFO B.
4 BASIC OPERATION ■ Frequency setting The IC-910H has several tuning steps and a [kHz/MHz] switch for convenient frequency tuning. q Push [M/S] to select the desired frequency band as the MAIN band; or push [SUB] to access the SUB band. w Rotate the tuning dial to select the frequency. USB VFO A While tuning USB • The memory channel number changes to the 10 and 1 Hz digits when rotating the tuning dial with 1, 10, 100 Hz and 6.25 kHz tuning steps.
BASIC OPERATION 4 D Frequency setting with the keypad The operating frequency can be directly entered from the keypad. q Push [F-INP ENT] to access the keypad frequency entry. • All digits of frequency indication disappear. w Push numeral keys to enter the desired operating frequency. • The entered number is indicated from the 100 Hz digit. [EXAMPLE] 145.3400 MHz [F-INP ENT] [1] [4] [5] [.] [3] [4] [F-INP] 435.0000 MHz [F-INP ENT] [4] [3] [5] [.] [F-INP ENT] 439.1200 MHz [F-INP ENT] [4] [3] [9] [.
4 BASIC OPERATION ■ SUB band OFF The SUB band indication can be deactivated to simplify operation. ➥ Push [SUB•SUB OFF] for 1 sec. to turn the SUB band indication ON and OFF. • Push [M/S•BAND] for 1 sec. to change the operating band. (p. 20) FM S 1 3 VFO A 5 7 20 9 40 60dB [SUB•SUB OFF] for 1 sec. SUB band indication OFF. ■ SUB tuning dial The IC-910H has a large main tuning dial for frequency setting.
BASIC OPERATION 4 D SUB tuning dial assignment q Push [SET] then [RIT] to enter the RIT/SHIFT set mode. w Push [DN ▼] or [▲ UP] to select [RIT] or [SHIFT] control to be assigned. • “rit nob” or “SFt nob” appears. e Rotate the tuning dial to select the condition as described below. [RIT] [SHIFT] [RIT] [DN ▼] [▲ UP] [SET] • Pushing [M-CL 5] for 1 sec. selects the default setting. r Push [SET] to exit from the RIT/SHIFT set mode.
5 RECEIVE AND TRANSMIT ■ Functions for receive D Volume setting [AF] (MAIN) ➥ Rotate [AF] control for the specified operating band (MAIN or SUB) to output a suitable audio level. [AF] (SUB) D Squelch setting The squelch removes noise output from the speaker (closed position) when no signal is received. The squelch is particularly effective for FM. It is also available for other modes.
RECEIVE AND TRANSMIT 5 ■ RIT function The RIT (Receive Incremental Tuning) function compensates for off-frequencies of the communicating station without moving the transmit frequency. The RIT function can be used for the MAIN band only. The function affects the MAIN band even when accessing the SUB band. q Push [RIT] to turn the RIT function ON. D RIT variable range SSB/CW mode : ±1.0 kHz in 10 Hz steps (±2.0 kHz for optional 1200 MHz band) FM mode : ±5.0 kHz in 50 Hz steps (±10.
5 RECEIVE AND TRANSMIT ■ AGC time constant The AGC (Automatic Gain Control) controls receiver gain to produce a constant output level even when the received signal strength is varied by fading, etc. Use AGC slow for normal phone operation; AGC fast for receiving data and searching for signals. ➥ Push [AGC] to switch the time constant between fast and slow. [AGC] • “FAGC” indicator appears when AGC fast is selected. • The AGC time constant is fixed in FM mode regardless of the FAGC indicator.
RECEIVE AND TRANSMIT 5 ■ Attenuator The attenuator prevents desired signals from distorting when very strong signals are near the desired frequency, or when very strong electric fields, such as from broadcasting stations are near from your location. The attenuator can be set to both or either band separately, and the attenuation level can be set for each band independently. [ATT] ➥ Push [ATT] to turn the attenuator ON and OFF. VFO A CW • “ATT” indicator appears when the attenuator is activated.
5 RECEIVE AND TRANSMIT ■ Noise blanker When operating in SSB or CW mode, pulse-type noise may be received such as from car ignitions. In this case, the noise blanker eliminates such noise. The noise blanker is effective on both the MAIN and SUB bands but cannot be used for FM, or non-pulsetype noise. [AFC/NB] ➥ Push [AFC/NB] to turn the noise blanker function ON and OFF. VFO A CW • “NB” indicator appears when the noise blanker is activated.
RECEIVE AND TRANSMIT ■ Optional DSP functions 5 optional UT-106 To activate the following functions, the optional DSP unit, UT-106, must be installed for both or either the MAIN and/or SUB bands. D NR (Noise Reduction) function D Setting the noise reduction level This function reduces noise components and picks out desired signals which are buried in noise. The received audio signals are converted to digital signals and then the desired signals are separated from the noise.
5 RECEIVE AND TRANSMIT ■ Functions for transmit D Output power The transmit output power can be continuously adjusted with [RF PWR]. NOTE: To prevent interference, listen on the frequency to make sure the frequency is clear before transmitting by pushing [CHECK 7]. Available power 144 MHz band : 5–100 W 430(440) MHz band : 5–75 W 1200 MHz band : 1–10 W (optional) [RF PWR] ■ Transmission via microphone When transmitting with a microphone, push [PTT] and speak into the microphone at a normal voice level.
RECEIVE AND TRANSMIT 5 ■ FM mode operation q Push [M/S•BAND] to select the desired band. w Push [FM] to select FM mode. • “FM” indicator appears. • Push [FM] again to select repeater operation after FM mode selection. “DUP–” and “T” indicators appear. • Push [FM] for 1 sec. to select FM narrow mode after FM mode selection. “FMN” indicator appears. t Speak into the microphone at a normal voice level. • Setting the [MIC GAIN] control to 10–12 o’clock is recommended. y Release [PTT] to receive.
5 RECEIVE AND TRANSMIT ■ Repeater operation A repeater amplifies received signals and re-transmits them at a different frequency. When using a repeater, the transmit frequency is shifted from the receive frequency by an offset frequency. D Setting the auto repeater range (U.S.A. and Korea versions only) The auto repeater function automatically turns ON the duplex operation with specified shift direction and tone encoder when the operating frequency is set in the desired frequency range.
RECEIVE AND TRANSMIT 5 D Manual repeater setting e Push [TONE] to activate the tone encoder. q Set the desired frequency. • Push [M/S•BAND] to select the desired band if required. • Push [FM] to select FM mode if required. w Push [SPLIT•DUP] for 1 sec. to select the duplex operation and the shift direction. • “DUP–” or “DUP+” indicator appears, depending on the selection. • Set the offset frequency in the FM set mode, if required. • “T” indicator appears.
5 RECEIVE AND TRANSMIT ■ SSB mode operation q Push [M/S•BAND] to select the desired frequency band. w Push [SSB/CW] to select USB or LSB mode. [TRANSMIT] [M/S•BAND] [SSB/CW] [MIC GAIN] Tuning dial • Push [SSB/CW] for 1 sec. to switch between USB and LSB when either the USB or LSB has been selected. e Rotate the tuning dial to set the desired frequency. r Push [PTT] to transmit and speak into the microphone at a normal voice level.
RECEIVE AND TRANSMIT 5 ■ Split frequency operation Split frequency operation allows you to transmit and receive on two different frequencies in the same frequency band. Split frequency operation uses 2 frequencies, one in VFO A and the other in VFO B. y Push [SPLIT]. • “SPLIT” indicator appears. • Now you can receive on the displayed VFO and transmit on the undisplayed VFO. • To monitor the transmit frequency, push [CHECK 7]. q Set a receive frequency in VFO mode.
5 RECEIVE AND TRANSMIT ■ Connections for CW Before operating in CW, select the paddle type using the SSB/CW set mode. e Push [DN ▼] or [▲ UP] to select the paddle type item. q Push [SSB/CW] to select CW mode. r Rotate the tuning dial to select the paddle type. • “PAddLE” is displayed. • “CW” indicator appears. • Push [M-CL 5] for 1 sec. to return to the default setting. w Push [SET] then [SSB/CW] to enter the SSB/CW set mode. t Push [SSB/CW] to exit the SSB/CW set mode.
RECEIVE AND TRANSMIT D Setting keying speed q Push [SET] then [SSB/CW] to enter the SSB/CW set mode. w Push [DN ▼] or [▲ UP] to select the keying speed item. • “SPEEd” is displayed. e Rotate the tuning dial to adjust the keying speed to the desired speed. • Keying speed can be selected from 6–60 wpm. • Push [M-CL 5] for 1 sec. to return to the default value. 5 D Setting side tone q Push [SET] then [SSB/CW] to enter the SSB/CW set mode. w Push [DN ▼] or [▲ UP] to select the side tone item.
6 MEMORY OPERATION ■ Memory channels The IC-910H has 106 memory channels (99 for regular, 6 scan edges and 1 call) and they are equipped for each frequency band for storing the most often used frequencies and operating mode, as well as tone frequency, offset frequency, etc. Memory Channel Description 1–99 Regular memory channels. Programs operating frequency, mode, subaudible tone activity with frequency and split/duplex conditions. 1A/1b–3A/3b Scan edge channels.
MEMORY OPERATION ■ Programming in VFO mode FM 6 VFO A Memory channel programming can be performed either in VFO mode or in memory mode. Set desired frequency and mode. q Set the desired operating frequency and mode in VFO mode. • Push [V/M 1] to select VFO mode, if required. • Tone frequency, offset frequency, etc., can also be programmed. • Input the frequency from the keypad Push [F-INP ENT] ⇒ [1] ⇒ [4] ⇒ [4] ⇒ [.] ⇒ [2] ⇒ [6] ⇒ [8] ⇒ [F-INP ENT] USB Select desired memory channel.
6 MEMORY OPERATION ■ Blank channels Memory channels 6–99 are blank channels by factory default. They have no contents programmed. When a blank channel is selected, the “BLANK” indicator appears and the frequency band is displayed 2 sec. after the selection. D Programming a blank channel q Push [V/M 1] to select VFO mode. w Set the desired operating frequency, mode, etc. e Push [MW 4] for 1 sec. to program the memory channel. • “BLANK” indicator disappears.
MEMORY OPERATION 6 ■ Memory clearing USB Any unnecessary memory channels can be cleared. The cleared memory channels become blank channels. MEMO q Push [V/M 1] to select memory mode. w Push [DN ▼] or [▲ UP] to select the desired memory channel to be cleared. e Push [M-CL 5] for 1 sec. to clear the contents. Beep tone sounds. MEMO • The programmed frequency and operating mode disappear. • “BLANK” indicator appears. B L AN ANK Operating band appears after 2 sec.
6 MEMORY OPERATION ■ Memo pads Use the transceiver’s memo pads instead of relying on hastily scribbled notes that are easily misplaced. The IC-910H has a memo pad function for each frequency band to store frequency and operating mode for easy write and recall. The memo pads are separate from memory channels. D Writing frequencies and operating modes into memo pads The default number of memo pads is 5, however, this can be increased to 10 in the memo pad set mode (p. 64) if desired.
7 SCANS ■ Scan types Scanning searches for signals automatically and makes it easier to locate new stations for contact or listening purposes. The IC-910H has several scan types; programmed scan, memory scan and mode select scan. The scanning operation can be performed independently for MAIN and SUB band. And to search a subaudible tone frequency for a repeater frequency, a tone scan is also available. MEMORY SCAN Repeatedly scans all programmed memory channels. This scan operates in memory mode.
7 SCANS ■ Programmed scan operation Scans specified frequency range, programmed in the memory channel 1A/1b, 2A/2b and 3A/3b. Before starting the programmed scan, scan edges should be programmed in these channels. D Selecting scanning range q Push [M/S•BAND] or [SUB] to select the desired frequency band to be scanned. w Push [SET] then [SCAN .] to enter the scan set mode. e Push [DN ▼] or [▲ UP] to select the programmed scan item. • “P-SCAn” is displayed.
SCANS 7 ■ Mode select scan Scans the memory channels, desired operating mode is programmed, only. wSelect mode. qSelect memory mode. q Push [M/S•BAND] or [SUB] to select the desired frequency band to be scanned. w Push [V/M 1] to select memory mode. e Push [SSB/CW] or [FM] to select the desired operating mode to be scanned. • The operating mode can also be changed during scan. e r Push [SPCH•LOCK] for 1 sec. LOCK • “LOCK” indicator appears. appears. rStart. tStop. t Push [SCAN .
8 SATELLITE OPERATION ■ Satellite communications outline Both satellite mode B (435 MHz uplink, 145 MHz downlink) and mode J (145 MHz uplink, 435 MHz downlink) can be operated from the IC-910H, and mode L can be operated when the optional UX-910 1200 MHz BAND UNIT is installed. Orbit information Orbit information describes satellite location, reaching angles, etc. This information may be available in ham magazines or organization issues, such as from ARRL, RSGB handbook, etc.
SATELLITE OPERATION 8 ■ Setting the satellite VFO q Push [SATELLITE] to enter the satellite mode. • “SATL” indicator with either “NOR” or “REV” indicator appears. w Push [V/M 1] to toggle satellite VFO and memory mode. r Push [SWP 0 S] to enable the uplink frequency tuning. • Downlink frequency indication disappears. • Push [SWP 0 S] again after the tuning. • VFO or memory mode indicator is displayed in the SUB band (lower area). USB e Push [SCAN . M] to enable the downlink frequency tuning.
8 SATELLITE OPERATION ■ Preparation u Perform a loop test. q Decide on a usable satellite. w Confirm the approximate location of the satellite and operating mode (e.g. “B,” “J,” etc.) through documentation (magazine, etc.) or via appropriate satellite tracking software. e Set the antenna direction for the desired satellite. r Select satellite mode on the transceiver. • Push [SATELLITE]. • Push [F-INP ENT NOR ↔ REV ] for 1 sec. to select tracking mode if desired.
SATELLITE OPERATION 8 ■ Satellite operation When your own signal can be received with a loop test, satellite communication can be performed. q Rotate the tuning dial to re-tune the uplink frequency after pushing [SWP 0 S], when shifting a frequency with the Doppler effect. • The downlink frequency readout (MAIN band) disappears. w Rotate the tuning dial to re-tune the downlink frequency after pushing [SCAN . S], when the operating station’s signal frequency is shifted.
9 DATA COMMUNICATION ■ Functions for AFSK The IC-910H does not have an FSK mode for RTTY, AMTOR, PACKET, etc., however, you can operate these using AFSK in SSB or FM mode. OPERATION NOTES FOR 9600 bps • Set the transceiver to 9600 bps data mode. - See p. 57. • Set AFSK/GMSK output level of the terminal unit to 0.4 V p-p (0.2 V rms). The transceiver accepts data speed of up to 9600 bps. When using 9600 bps, set the transceiver to the 9600 bps data mode using the general set mode. (p.
DATA COMMUNICATION ■ Operating mode notes ■ Operating frequency notes Use FM mode for 9600 bps operation. Use SSB or FM mode for 1200 bps operation. D Operating notes for RTTY and AMTOR 9 RTTY or AMTOR operating frequency in LSB mode differs from the displayed frequency. [Your operating freq.] = [Displayed freq.] – 2125 Hz (when the frequencies of the RTTY demodulator in your TNC or TU are — mark = 2125 Hz and space = 2295 Hz).
9 DATA COMMUNICATION D Adjusting the transmit signal output from the TNC When setting the data transmission speed to 9600 bps, the data signal coming from the TNC is applied exclusively to the internal limiter circuitry to control the transmission. NEVER apply data levels from the TNC of over 0.6 V p-p, otherwise the transceiver automatically cancels the transmission. 1. When using a level meter or synchroscope, adjust the TX audio output level (DATA IN level) from the TNC as follows. 0.4 V p-p (0.
SET MODE 10 ■ Set mode description Set mode is used for programming infrequently changed values or conditions of functions. The IC-910H has a regular set mode and additional 12 independent set modes for simple condition changing. D Set mode operation q Push [SET] for 1 sec. to enter the general set mode. w Push [DN Z] or [UP Y] to select the desired item. e Set the desired condition using the tuning dial. SCAN e Push [DN Z] or [UP Y] to select the desired item.
10 SET MODE ■ General set mode Display backlight brightness Adjust backlight brightness for the function display to the desired level within 0 (dark) to 100 (bright) range. Beep tone Adjust key touch beep output level to the desired level within 0 (no output) to 100 (max. output) range. RF/SQL control assignment Assign [RF/SQL] control function from rF/SqL, Auto and SqL. • rF/SqL : RF gain and squelch controls are combined for SSB/CW mode. Acts as squelch control for FM mode.
10 SET MODE Microphone UP/DN speed Select continuous changing speed with microphone’s [UP]/[DN] operation from high and low. Tuning step selection Below 1 kHz HI Lo 50 steps/sec. 25 steps/sec. Above 1 kHz below 1 MHz 20 steps/sec. 10 steps/sec. 1 MHz or Memory Channel 5 steps/sec. 2.5 steps/sec. 9600 bps data transmission Turn the 9600 bps data transmission capability ON and OFF. • on : For 9600 bps data transmission. • oFF : For the regular audio (or slower data) transmission only.
10 SET MODE ACC socket Pin 8 Assign the ACC socket pin 8 action/connection from ALC and microphone up/down. • ALC : Inputs ALC signal. • ud : Inputs up/down signals from the microphone. ACC socket Pin 4/DATA socket Pin 1 Select modulation signal input level from high and low. • HI : High modulation signal level (200 mV rms) • Lo : Low modulation signal level (2 mV rms) ACC socket Pin 3 for 144 MHz band Switch the SEND signal output for 144 MHz band operation ON and OFF.
SET MODE 10 Preamplifier controller for 430(440) MHz Switch the preamplifier control capability ON and OFF. When using the optional AG-35, ON must be selected. Otherwise, the preamplifier is never activated. P.AMP P.AMP P.AMP P.AMP DO NOT connect any equipment, such as an SWR or power meter, between the transceiver and preamplifier. In such case, the preamplifier may not activate properly. Preamplifier controller for 1200 MHz Switch the preamplifier control capability ON and OFF.
10 SET MODE ■ FM set mode Offset frequency for 144 MHz Set the offset frequency for duplex (repeater) operation within 0–10.00000 MHz range. This item is displayed when the 144 MHz band is accessed, including the SUB band access capability. • Default value: 0.6000 FM Offset frequency for 430(440) MHz Set the offset frequency for duplex (repeater) operation within 0–10.00000 MHz range. This item is displayed when the 430(440) MHz band is accessed, including the SUB band access capability.
SET MODE 10 Tone squelch frequency for 144 MHz Select tone squelch frequency from one of 50 available tone frequencies. This item is displayed when the 144 MHz band is accessed, including the SUB band access capability. • Default value: 88.5 FM T-SQ SQL Tone squelch frequency for 430(440) MHz Select tone squelch frequency from one of 50 available tone frequencies. This item is displayed when the 430(440) MHz band is accessed, including the SUB band access capability. • Default value: 88.
10 SET MODE ■ SSB/CW set mode Squelch threshold Select the squelch threshold level from 12 and 13 o’clock. • 12 : The squelch closes around the 12 o’clock position of the [SQL] control. • 13 : The squelch closes around the 13 o’clock position of the [SQL] control. Carrier frequency Adjust the carrier frequency for SSB (USB/LSB) mode operation within –200 to +200 Hz range in 10 Hz steps. USB LSB USB LSB CW pitch frequency Adjust the CW pitch frequency within 300 to 900 Hz range in 10 Hz steps.
SET MODE 10 AF control relation Turn the relation of [AF] control for CW side tone output level ON and OFF. • on : CW side tone output level is adjustable via [AF] control adjustment. • oFF : CW side tone output level is fixed regardless of [AF] control setting. CW CW CW CW CW CW CW side tone output level Adjust the CW side tone output to the desired level within 0 (no output) to 100 (maximum output) range. Key type Select the key type from normal, reverse, bug, OFF and microphone [UP]/[DN].
10 SET MODE ■ Scan set mode Programmed scanning range Select the programmed scan range from 1A-1b, 2A2b and 3A-3b. • 1A-1b : Scans within the range programmed in the memory channel 1A and 1b. • 2A-2b : Scans within the range programmed in the memory channel 2A and 2b. • 3A-3b : Scans within the range programmed in the memory channel 3A and 3b. SCAN SCAN SCAN SCAN SCAN SCAN Scan resume condition Select the scan resume condition from ON and OFF. • on : Scan resumes.
SET MODE 10 ■ VOX set mode VOX sensitivity Adjust the VOX sensitivity within 0–100% range. VOX VOX delay time Adjust the transmit-to-receive switching delay to the desired level within 0.0 sec. to 2.0 sec. range in 0.1 sec. steps. VOX Anti VOX Adjust the anti VOX gain within 0–100% range. VOX ■ Attenuator set mode Attenuation level for 144 MHz Adjust the attenuation level to the desired level within 0–100% range for the 144 MHZ band operation.
10 SET MODE ■ Transmit set mode Time-out timer Select the time period for the time-out timer function from OFF, 3, 5, 10, 20 and 30 min. PTT lock Turn the transmission inhibit capability ON and OFF. Any control for transmission is inhibited when this item is ON. SUB band mute Turn the SUB band audio mute function ON and OFF. The SUB band audio is muted while transmitting when this function is turned ON.
SET MODE 10 ■ NR set mode Noise reduction level for 144 MHz Adjust the noise reduction level to the desired level within 0–15 for the 144 MHz band operation. Adjust it to the level that noise signals are reduced, and received audio has no distortion. NR This item is displayed only when the optional UT-106 is installed. Noise reduction level for 430(440) MHz Adjust the noise reduction level to the desired level within 0–15 for the 430(440) MHz band operation.
10 SET MODE ■ RIT/SHIFT set mode RIT control assignment Assign [RIT] control function from rit, dIAL, SubdIAL and Sub-SFt. • rit : [RIT] control functions as RIT control. • dIAL : [RIT] control functions as tuning dial for MAIN band. • SubdIAL : [RIT] control functions as tuning dial for SUB band. • Sub-SFt : [RIT] control functions as IF shift control for SUB band. SHIFT control assignment Assign [SHIFT] control function from SFt, Sub-SFt, dIAL and SubdIAL.
SET MODE 10 ■ Speech set mode Output level Adjust the speech audio output level within 0 (no output) to 100 (maximum output) range. • Default value: 50 Announcement language Select the announcement language from English, Japanese and OFF. • EnG : Announces in English. • JPn : Announces in Japanese • oFF : No announcement. Announcement speed Select the announcement speed from high and low. • HI : Faster announcement. • Lo : Slower announcement.
11 OPTION INSTALLATIONS ■ Internal view • Top view — PA unit DC power connector Circuitly fuse (FGB 4 A) Cooling fan • Bottom view — PLL/MAIN unit PLL unit DSP unit J1801 for UT-102 connection SSB filter (MAIN band) CW-N filter (MAIN band) PLL ref.
OPTION INSTALLATIONS 11 ■ Opening the transceiver’s case Follow the case and cover opening procedures shown here when you want to install an optional unit or adjust the internal units, etc. q Remove the 5 screws from the top of the transceiver and the 4 screws from the sides, then lift up the top cover. w Turn the transceiver upside down. e Remove the 5 screws from the bottom of the transceiver, then lift up the bottom cover. Disconnect the speaker cable.
11 OPTION INSTALLATIONS ■ UT-106 DSP UNIT The UT-106 provides AF DSP functions such as noise reduction and auto notch. Up to 2 DSP units can be installed for simultaneous DSP operation for both MAIN and SUB bands. When only 1 DSP unit is installed, DSP functions can be operated in either the MAIN or SUB band, whichever is being accessed. NOTE: The insulating soft case is not used with the IC-910H. RECOMMENDATION: When installing only 1 DSP unit, you can install into either front or rear panel side.
OPTION INSTALLATIONS 11 ■ UX-910 1200 MHz BAND UNIT The UX-910 is a band unit for 1200 MHz band operation. FM, SSB (USB/LSB), CW and CW narrow mode operations are available. r Place the UX-910 using the supplied 4 screws. BE CAREFUL not to drop the supplied screws inside the transceiver. q Remove the bottom cover as shown in the diagram on p. 71. w Remove the antenna plate from the chassis using a standard screw driver.
11 OPTION INSTALLATIONS ■ CR-293 HIGH STABILITY CRYSTAL UNIT By installing the CR-293, the total frequency stability of the transceiver will be improved. q Remove the bottom cover as shown in the diagram on p. 71. • Remove the UX-910 if you have installed it. (p. 73) w Remove the 6 screws from the PLL shield cover, then lift up the PLL shield cover. t Unsolder the original reference crystal, then remove it.
OPTION INSTALLATIONS 11 ■ FL-132/FL-133 CW NARROW FILTER The IC-910H has a CW narrow mode to provide better S/N (Signal-to-Noise), or to reject interference. To operate the CW narrow mode, an optional CW narrow filter is necessary. t Install FL-132 or FL-133 to the specified position on the MAIN unit. NOTE: For CW narrow mode during satellite operation, the FL-133 (for SUB band filter) is necessary since the SUB band circuit is used for receiving, although the MAIN band display shows receive frequency.
11 MAINTENANCE ■ Troubleshooting The following chart is designed to help you correct problems which are not equipment malfunctions. POWER PROBLEM If you are unable to locate the cause of a problem or solve it through the use of this chart, contact your nearest Icom Dealer or Service Center. POSSIBLE CAUSE No sounds comes from • Volume level is too low. the speaker. • The squelch is closed. • Rotate [AF] clockwise to obtain a suitable listening level.
MAINTENANCE ■ Fuse replacement 11 DC POWER CABLE FUSE REPLACEMENT If a fuse blows or the transceiver stops functioning, try to find the source of the problem, and replace the damaged fuse with a new, rated fuse. 30 A fuse CAUTION: DISCONNECT the DC power cable from the transceiver when changing a fuse. The IC-910H has 2 types of fuses installed for transceiver protection. • DC power cable fuses ................................ FGB 30 A • Circuitry fuse ................................................
13 CONTROL COMMAND ■ Remote jack (CI-V) information • CI-V connection example The transceiver can be connected through an optional CT-17 CI-V LEVEL CONVERTER to a personal computer equipped with an RS-232C port. The Icom Communications Interface-V (CI-V) controls the following functions of the transceiver. IC-910H 9–15 V DC Up to 4 Icom CI-V transceivers or receivers can be connected to a personal computer equipped with an RS-232C port. See p. 59 for setting the CI-V condition using set mode.
CONTROL COMMAND Command Sub command 00 01 — Description Send frequency data for transceive. — Read band edge frequencies. 03 — Read operating frequency data. 04 — Read operating mode data. 05 — Set operating frequency. 06 00 01 03 04 Set LSB. Set USB. Set CW. Set FM. — Select VFO mode. 00 01 A0 B0 D0 D1 Select VFO A. Select VFO B. Equalize VFO A and VFO B. Switch VFO A and VFO B. Select MAIN VFO. Select SUB VFO. — Select memory mode. 01–0106* 08 — Memory write.
14 SPECIFICATIONS • Receiver • Frequency coverage : Version U.S.A. Europe 144 MHz (Unit: MHz) 430(440) MHz 1200 MHz* 1 Tx: 144.0–148.0 Tx: 430.0–450.0 Tx: 1240.0–1300.0 Rx: 136.0–174.0*2 Rx: 420.0–480.0*3 Rx: 1240.0–1320.0*4 144.0–146.0 430.0–440.0 1240.0–1300.0 Australia 144.0–148.0 430.0–450.0 1240.0–1300.0 Sweden 144.0–146.0 432.0–438.0 1240.0–1300.0 Italy 144.0–146.0 430.0–434.0 435.0–438.0 1240.0–1245.0 1270.0–1298.0 *1 Optional UX-910 *2 Guaranteed range is 144.0–148.0 MHz.
OPTIONS 15 CR-293 HIGH STABILITY CRYSTAL UNIT FL-132 (for MAIN band) FL-133 (for SUB band and satellite operation) CW NARROW FILTERS HM-36 HAND MICROPHONE Frequency stability: ±0.5 ppm (0˚C to +60˚C) Have good shape factor and provide better CW reception during crowded band conditions. 500 Hz/–6 dB Hand microphone equipped with [UP]/[DOWN] switches. Same as that supplied with the transceiver. SP-21 EXTERNAL SPEAKER SM-20 DESKTOP MICROPHONE UT-106 DSP UNIT Designed for base station operation.
16 INSTALLATION NOTES For amateur base station installations it is recommended that the forwards clearance in front of the antenna array is calculated relative to the EIRP (Effective Isotropic Radiated Power). The clearance height below the antenna array can be determined in most cases from the RF power at the antenna input terminals. As different exposure limits have been recommended for different frequencies, a relative table shows a guideline for installation considerations.
INSTALLATION NOTES 16 DECLARATION OF CONFORMITY We Icom Inc. Japan 1-1-32 Kamiminami, Hirano-ku, Osaka 547-0003 Japan Declare on our sole responsibility that this equipment complies the essential requirements of the Radio and Telecommunications Terminal Equipment Directive, 1999/5/CE, and that any applicable Essential Test Suite measurements have been performed. Kind of equipment: VHF/UHF ALL MODE TRANSCEIVER Type-designation: i910H Düsseldorf 21th Feb.
IC-910H #02 (Europe) < Intended Country of Use > IC-910H #05 (Sweden) < Intended Country of Use > IC-910H #08 (Italy) < Intended Country of Use > ■ GER ■ AUT ■ GBR ■ IRL ■ FRA ■ GER ■ AUT ■ GBR ■ IRL ■ FRA ■ GER ■ AUT ■ GBR ■ IRL ■ FRA A-5699H-1EX-u Printed in Japan © 2000–2007 Icom Inc. Printed on recycled paper with soy ink.