iControl System Starter Kit Beta User Manual - DRAFT This document provides more detailed information on how to use your iControl System. More specifically: . •how to read your iControl Summary page . •adding, changing, and managing your iControl box and devices, and . •frequently asked questions You should consult your Quick Start Guide or Getting Started Guide for information on how to install your system. Your Starter kit or device box will provide a list of what’s included with the kit or device.
Table of Contents Chapter 1 Chapter 2 Chapter 3 Chapter 4 Chapter 5 Chapter 6 Chapter 7 Chapter 8 Chapter 9 Chapter 10 Chapter 11 Appendix A Check pages Getting Started 3 About your iControl box 9 Using your System 11 Using your Wired Camera 19 Using your Door/Window Sensor 32 Using your Keychain Remote Control 33 Using your Lamp Module 36
Using your Motion Sensor 37 Adding Additional Devices 38 Frequently Asked Questions 42 Terms and Conditions, Warranty Information, and More 44 Battery Maintenance 45 Getting Started Your iControl Summary page is where you begin using your iControl System; the iControl Summary page is your portal to your iControl System. To begin, log on First, go to a web browser and enter www.icontrol.com.
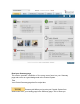
Read your Summary page This section provides a definition of the many terms found on your Summary page and serves as a good background to the iControl System. Tabs Your iControl Summary page has five major tabs. Summary tab When you log onto your iControl System from www.icontrol.com, your landing page is the Summary page.
begin using your System. The Summary page consists of the following series of windows. Status window The top portion of this window indicates the overall status of the system and the current mode the system is in. The status light can have three possible colors as described below: Green – No alarm conditions. System operating normally Yellow – One or mode device alarm conditions (e.g. motion detected) Red – System problem (e.g. iControl box communication problem).
Device Possible state Door/Window Open, Closed Sensor Motion Sensor Occupied, Empty Example Open indicates the door or window is open Occupied means a person is in the monitored area Alarm Condition Open Occupied Additional optional devices, such as freeze, water, smoke and heat sensors have their own associated states as well but are not described here since they are not part of the iControl Starter Kit.
In this example, the Thermostat will change its setpoint for cooling to 64 degrees and the heating setpoint to 76 degrees. (Note, a thermostat device is not part of your Starter Kit but is available as an optional accessory. Please go to www.icontrol.com for more information.) Reminders window Reminders are not implemented in Beta. Schedules window Schedules are not implemented in Beta. Details tab This tab presents a listing of all the devices installed in your system.
System tab This tab is most useful for seeing a complete list of devices in your system and confirming that a device was installed and is working. The System tab also provides a way to add and delete a device. You may also access the device page via this tab to change the device’s name or gather such information as device ID and manufacturer. Definition of other items on the Summary page Help button Help which is indicated by a ‘?’ mark is not yet implemented.
This section describes some of physical characteristics of the iControl box. iControl Box Indicator Lights The iControl box has the following buttons and indicator lights: DEVICE light: Blinks green when your box is communicating with lamp modules, door/window sensors, motion sensors, and other devices. You may not see this LED turn on and off often because most of your devices act infrequently (such as turning on a light in the evening) and therefore will blink very infrequently.
plugged in. UPDATE BUTTON: Initiates a iControl box to server uplink communication. Used when you need to manually update the iControl network with information. DEVICE BUTTON: Can be used to enable the iControl box to discover a newly installed device. iControl Box back panel As described in the Installation Guide, the iControl box should not be plugged into power strips or wall outlets that are connected to or contain a surge protector or uninterruptible power supply.
page or via the ‘Lock’ and ‘Unlock’ buttons on your Keychain Remote Control. To change the mode via your Summary page. 1 Navigate to the ‘Mode’ link shown in the Summary page menu bar. 2 Click on it. A new window appears and there will be a pointer next to one of the modes. 3 Select the mode to which you want to change your System. To change the mode from your Keychain remote.
Change or Set Notifications A notification is an email or SMS (Short Message Service also referred to as text messaging) message sent to your PC, PDA, or cell phone alerting you that a device recognized a change in your location. For example, a Motion Sensor may sense that someone has entered a room; a Door/Window Sensor may report that a door is open. Here is an example of an email notification sent to ‘brian@icontrol.
not want to receive notifications while someone is home. In Sleep mode and Away mode, you may or may not want to receive notifications. In Away mode, you may want to receive an email notification any time a device recognizes a change at your house. For example, every time a window or door opens, you can set notifications under the Notification tab to generate an email.
George provided during his purchase. George’s email is shown here as he chose to have his notifications go to his email. Change your default notification You can change your default notification. To do so, 1 Select the Notifications tab. 2 Select the mode (Home, Sleep, Away) that you want to change. Click on the name that you entered, in this case, George. 3 Here you have the option of changing the name of your notification. If you do not want to change it, click on the Cancel button.
4 You may change your email address. Enter a new email address if you wish. If you do not wish to change it, click on the Save button. 5 You can add more email addresses. For example, you have set up your system to send an email when your children come home after school and you want both parents to receive an email. To add addresses, click on the Add button. Enter the additional email addresses. 6 To save, click on the Save button.
Tip: To delete an existing notification, select the Notification tab, and click on the mode from which you want to remove notification. Click on the trash can icon and click on the Save button. Change or set automation Automation enables you to program your devices to take an action when another device recognizes a change. For example, you may want to take a picture when someone enters your front door while you are away.
3 Choose camera from the drop down menu. 4 Click the Add and Save buttons. To have the house lights turn on based on a device recognizing a change You can set lights to come on or off and at different levels when a device recognizes a change. 1 Go to the Summary page, then to Automation tab. 2 Choose the mode and device. In this example, we want the house lights to come on when the front door is open while we are away. Go to the column ‘Away’ and the row entitled, ‘Front Door open’ and click.
5 Click on Add and Save. Tip: You can have different actions occur in different modes. In this example, the lights are to come on when the Front Door (large) was opened while the iControl System is set in Away mode. We did not set the lights to come on in Home mode as the lights would probably be on as friends and family are around. Rename a Device iControl Networks, Inc. adds your device to your system before your Starter Kit is shipped to you.
4 Using your Camera You can use your iControl Wired or Wireless Camera to see pictures (images) or live video from your location while you are away. Setting up your camera for pictures 1 Go to the System tab. 2 Navigate to the ‘Add Device’ heading under the tab heading on the left hand side of the page. 3 At the Add Device screen shown below, first choose the technology and then the type of technology from the drop down menus.
4 Create a name for the camera. 5 Enter the serial number from the back of the camera. The number should have the following 12 character format. S/N 00408C648CCD Do not enter the letters ‘S/N’. 6 Click Add. You should now see the new camera in the System device list with a yellow dot next to it. The yellow dot indicates that it is installing. Wait a few minutes for the iControl Box to discover and configure the camera.
1 Go to the Summary page. 2 Under Pictures, click on the picture thumbnail from the camera for which you want to enable video. An expanded window will open. 3 Click on menu item, Live Video, shown below. The menu item shown here is inside of the expanded picture window. 4 You will then see the following dialog box. Record the IP address and port number shown in the window (Here the IP address is 192.168.1.102 and the port number is 80).
provided in the user manual.) Setting port forwarding for Linksys router Here are the steps for a typical Linksys router. Different models of Linksys routers may have different screens and you should consult your Linksys user manual for more information. 1 Select ‘Click here to go to your router’s home page’ from the ‘Camera Not Accessible’ window. You will then be presented with the router administration page. Enter your user name and password.
your camera for video.) in the Start field. In this example it is 80. Enter the end port in the End field as 80. The Start port and end port are the same in this example. 5 Select the protocol as ‘Both’ in the Protocol field. 6 Enter the IP Address obtained from the steps in the prior section, Setting up your camera for video, in the IP Address field. 7 Check the check box under the heading, Enable. 8 Select the Save Settings button to save your entries.
Setting port forwarding for a NetGear router Here are the steps for a typical NetGear router. Your NetGear router screens may be different from those shown here and you should consult your NetGear user manual for more information. 1 Select ‘Click here to go to your router’s home page’ from the ‘Camera Not Accessible’ window. You will then need your user name and password to access the administration page.
Setting up your camera for live video. 6 Save your changes and close the screen as shown on the router’s port forwarding setup screen. 7 Close your browser and return to your iControl Summary page. Select the thumbnail of the camera that you have enabled for video. You will be presented with an expanded window. Select the menu item, Live Video, from the menu bar at the top of the window. 8 At this point you should see live video.
To obtain the iControl Camera user name and password, 1 Go to the System tab 2 Select the Camera from which you want to see live video 3 Select the heading, Advanced Settings, from the dialog box shown below 4 Write down the Username and Password shown in the dialog box shown below. In this example, the Username is icontrol and the Password is 1097430472. 5 Return to the Internet Explorer dialog box and enter the username and password. Again, the username and password entered here is for the camera.
icontrol 1097430472 6 Check the box, ‘Remember my password’. 7 Click on the button, OK, to close the window. 8 Quit Internet Explorer. 9 Reopen Internet Explorer and log on to www.icontrol.com and navigate to the Summary page. Click on the picture thumbnail to bring up an expanded view and then select ‘Live video’. Setting port forwarding for other routers There are many routers in use today.
For support in setting up port forwarding for other routers, please email support@icontrol.com. Adding AXIS Media Control ActiveX control for your Camera If you are presented with the following dialog box, you will need to install an ActiveX control into your browser so that you can view live video from within an Internet Explorer page.
Seeing pictures from your location You can see pictures from your camera remotely in one of four ways. Viewing from the Pictures area on the Summary page 1 view from the Pictures area indicated by the Picture icon. 2 You will be presented with an expanded image. 3 At the bottom of the window, you can select the heading, Take a new picture now. Viewing by using the QuikControl feature on the Summary page 1 Navigate to the Summary page. Go to QuikControl button in the upper right hand portion of the page.
3 Click on Take Picture button. 4 You will then be brought back to Summary page where an item ‘Home office Picture’ will be listed in the Pending Updates window. At the next iControl System update (the time of which is shown in the Pending updates window), the picture will be taken. Viewing from the Details tab 1 Go to the Details tab. On the Details page, you will see a thumbnail from each of your cameras. Select the one you want to see.
Seeing live video from your location If you have configured your camera to provide live video from your location, you can see live video from your location. To do so, 1 Go to the Summary tab. 2 Under the heading, Pictures, click on the picture thumbnail from the camera that you want to see video. An expanded picture will appear. 3 Click on the heading, Live Video and you will be brought to a screen displaying live video from your camera. Note, you may need to wait a few moments for the video to appear.
Screen shot from clicking on a picture in Pictures in Summary Page 5 Using your Door/Window Sensor Once you have installed a Door’/Window Sensor in your house and it appears in your iControl Summary page, you only have to activate the sensor once to make it operational. To do so, open and close the door or window once to tell your iControl box whether it is initially open or closed. You do not need to make any other configuration changes or take any other set up actions.
closed. Using your Keychain Remote Control Through your iControl Keychain Remote Control, you can control selected functionality in your iControl System. For example, you can click on the Light Button and turn on the lights as you approach your house. The Keychain Remote has a range of approximately 100 feet (assuming a clear line-of-sight to your iControl box).
How your Keychain Remote works The buttons on your Keychain Remote Control are pre-configured with the functionality as described in the captions shown above. Tip: when pressing a button on the Keychain Remote Control, it is important to hold the button down until the Keychain Remote LED (see above diagram) flashes green. In contrast to a car remote control that activates immediately, the iControl Keychain Remote Control takes a few moments to communicate with your iControl box the green light flashes.
Customizing your Keychain Remote Control You can customize the button preferences on your Keychain Remote. Button preferences enable you to choose which actions your Keychain Remote Control buttons invoke. You may want to take a picture, turn on a light, or change the iControl box’s mode to sleep when you leave your location.
V e rs io n 2.
Remote works the same across all modes, Home, Sleep and Away. Customizing your Light Button You can set the light brightness with your Light button (the button with the light bulb on it). So for example, when you press the Light button, not only will the lights in your house controlled by a Lamp Module turn on but they will turn on to pre-set brightness. Let’s add this functionality to ‘Mom Keychain’. 1 Go to the Automation tab.
7 Using your Lamp Module Set the brightness level You can set the brightness of the lights that are controlled by a Lamp module. To do so, 1 Go to the Summary page. 2 Click on the QuikControl button on the blue menu bar. 3 Click in the Brightness field to show a drop down menu. Choose a brightness level such as 100%. This means the light will be as bright as it can be. Click on the button labeled ‘Set’.
See the status of your Lamp Module 1 Go to the Summary page. In the Status window, look for your Lamp module. Scroll down if necessary to see it listed. 2 The lamp’s brightness level will be displayed. 8 Using your Motion Sensor See the status of your Motion Sensor To see the status of your Motion Sensor, 1 Go to the Summary page. In the Status window, look for the name you gave your Motion Sensor. Scroll down if necessary to see it listed.
Device Total count of numbers and Sample serial or ID letters in the serial number number IControl box 12 006035019f62 Lamp module 12 120013752100 Camera 12 00408c6675d2 Motion Sensor 6 2a34c1 Door Window Sensor 6 0d5aa8 Keychain Remote 6 AA64DC Thermostat 5 BD7DE Tip: Letters can be entered in upper or lower case. 2 Navigate to the System page 3 Select the Add Device heading 4 Choose the technology, then the type from the drop down menu.
5 You can give the device a name such as hallway light, back door light, office camera, Dad’s keychain remote, or hallway watcher for a motion sensor. 6 Enter the identifier in the ID field. Here is an example of adding a Door/Window Sensor 7 Click on the Add button to add the device to your iControl System 8 You will receive a confirmation in the Status screen that you have successfully added the device. 9 You will be returned to the System page where you will see the new device.
Description of the colored icons Besides the yellow circle, you will see other colored icons next to each device listed in on the System page. Here is a definition of what each icon means. Colored icon Green circle Yellow triangle Red circle Yellow circle Status Device working and no changes recognized Any of these states: Device working and recognized a change; Device undergoing installation; Device status unknown because the iControl box is disconnected. Device off line iControl box installing a device.
10 Frequently Asked Questions Camera How do I reset my camera? If for some reason you need to reset your camera, follow these steps: 1 Disconnect the power cord from your camera 2 Press and HOLD the control button (a little black pin) next to the network indicator on the back of the camera.
My picture is fuzzy. What do I do? See Chapter 4 on how to install your camera for details on focusing your camera. Will port forwarding let viruses into my network? No. Will other people be able to see what my camera sees? No. They will not have the unique IP address, user ID, and password to access your camera. Why don’t I plug my iControl Camera into my iControl box? Your camera is an IP device and can talk to the iControl network over the Internet on its own.
What are the default buttons? Unlock Button: Change to Home mode Lock Button: Change to Away mode Light Button: Press once to turn on all the lights controlled by a lamp module. Press again to turn them off. Star Button: Take a picture Motion Sensor How do I test my motion sensor? 1 Remove sensor from mounting plate, then reattach. You have 60 seconds 2 Walk across room and wait for sensor light to turn on 3 Stop, stand still and wait for sensor light to turn off.
• • • • Re-orient or locate the receiving antenna. Increase the separation between the equipment and receiver. Connect the equipment into an outlet on a circuit different from that to which the receiver is connected. Consult the dealer or an experienced radio/TV technician for help. Modifications made to the iControl Gateway, Keychain Remote, IP Camera, Motion Sensor, Door Window Sensors and associated sensors unless expressly approved by iControl, could void the user’s authority to operate the equipment.
iControl Keychain Remote Your iControl Keychain Remote battery is designed to last several years. However if you need to change the battery, follow these steps: 1 Turn over your Keychain Remote. Remove the screw on the back and then the back cover. 2 Insert a 12 volt alkaline battery. Match the ‘+’ and ‘-‘ markings on the inside of the battery compartment to the battery. 3 Reattach the cover. 4 Test the Keychain Remote. Note: Please dispose of your battery in accordance to local regulations.