
User's Manual

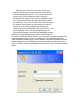


4 Create a name for the camera.
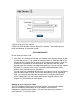
5 Enter the serial number from the back of the camera. The number should
have the following 12 character format.
S/N 00408C648CCD
Do not enter the letters ‘S/N’.
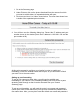
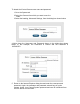
6 Click Add. You should now see the new camera in the System device list with
a yellow dot next to it. The yellow dot indicates that it is installing. Wait a few
minutes for the iControl Box to discover and configure the camera. Once the
iControl box completed its communication, the yellow dot will turn green
indicating that the camera is installed and operating. If you do not see a green
dot within five mintues, refer to the Frequently Asked Questions (FAQ)
section of this manual for more assistance.
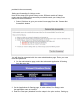
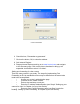
You can now see a thumbnail picture from your camera. Go to your Summary
page and look under Pictures. Click on the thumbnail to see an expanded
view. You can also manually take pictures now by using the QuikControl
button. Additionally you can create automations using the camera. See
Chapter 3 in this manual for more details.
Setting up your camera for video
This is an advanced feature of the iControl System. You should be familiar
with port forwarding functionality on home network routers before
attempting to implement this feature. You must first have your camera set
up for pictures. To set up for video,