
User's Manual
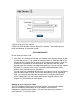

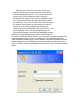


your camera for video.) in the Start field. In this example it is 80. Enter the
end port in the End field as 80. The Start port and end port are the same in
this example.
5 Select the protocol as ‘Both’ in the Protocol field.
6 Enter the IP Address obtained from the steps in the prior section, Setting up
your camera for video, in the IP Address field.
7 Check the check box under the heading, Enable.
8 Select the Save Settings button to save your entries.
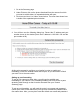
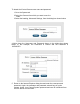
9 Close your browser window and return to your iControl Summary page.
Select the thumbnail of the camera that you have enabled for video. You will
be presented with an expanded window. Select the menu item, Live Video,
from the menu bar at the top of the window.
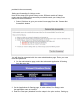
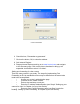
10 At this point you should see live video. If you do not, you will again be
presented with a dialog box entitled, Camera not Accessible. Click on the
button, Test port forwarding, to test your port forwarding work. If it does not
test properly, email beta@incontrol.com.
[Note to reader: In the dialog box, ‘Click here to get help with your router’
is not available in Beta]
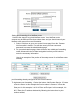
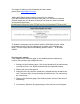
11 If you want to review your settings, navigate to your system tab, select the
camera that you would like to review and click on advanced settings. You
should see a dialog box similar to this: