UserManual ViVOpay KioskII 631-0071-00 Copyright©2010-2014,InternationalTechnologies&SystemsCorp.Allrightsreserved.
Copyright© 2014, International Technologiesand Systems Corporation.All rights reserved. ID TECH 10721 Walker Street Cypress CA90630 USA This document, as well as the hardwareand software it describes, is furnished under licenseand may only be used in accordance with the terms of such license. The content of this paper is furnished for informationaluse, subject to changewithout notice, and not to be construed as a commitment by ID TECH.
FCC Regulatory Compliance Notices Class B Equipment This equipment has been tested and found to comply with the limits for a Class B digital device pursuant to Part 15 of the FCC Rules. These limits are designed to provide Reasonable protection against harmful interference in residential installation. This equipment generates, uses, and can radiate radio frequency energy and, if not installed And used in accordance with the instructions, may cause harmful interference to radio communications.
Table of Contents Overview..............................................................................................................5 Features............................................................................................................5 ValidCard Types...............................................................................................5 Kiosk II Specifications.......................................................................................6 ViVOpayKioskIIInstallation......
Overview The ViVOpayKiosk II is a compactstand-alone contactless readerdesigned to support contactless transactions based on ISO 14443Type A/Type B/MiFare compatible cards, fobs, and tags aswell as NFC phones.The ViVOpay Kiosk II is comprised of a compact controller module and an antenna module packaged individually. This two-part design allows the controller module to be installedwithin thecabinetry of a kiosk and the antenna installed on an exterior surface witha separation of up to 1 meter.
KioskII Specifications Hardware MTBF 500,000 hrsbased on TelcordiaTechnologies SR-332 modeled at 40°C. 13.56 MHz +/- 0.01% ISO 14443-2Type A Rise/Fall Time: 2-3 µsec.Rise, <1 µsec fall ISO 14443-2Type B Rise/Fall Time: <2 µsec. each; 8%-14%ASK 847.5 KHz ISO 14443-2Type A: Modified Manchester ISO 14443-2Type B: NRZ-l, BPSK 4-6 cm (1.5 to 2.
ViVOpay Kiosk II Installation Thissection provides information on how to install the ViVOpay Kiosk II on a kiosk. PartList Verify that you have the following hardwarefor the installation of the ViVOpay Kiosk II: ViVOpay Kiosk II Controller ViVOpay Kiosk II Antenna(either square or angle bezel) Antenna LED power and data cable ViVOpay Kiosk II to ECR/POS cable(customer supplied). This USB or serial cable varies based on thehost to be used.
MountingtheViVOpayKioskII ExternalAntenna Use the following instructions to mount the antenna on the exteriorof the kiosk: Note: Verify the orientationof the ViVOpay Kiosk II Antenna beforemarking anddrilling the holes. The two larger holesshould be located towards the top ofthe mounting location to ensure that the ViVOpay KioskII Antennais oriented correctly with the LEDs at the top. 1. Using the Drill Template for the antenna(630-1046-00), locate and mark the four 4.4mm (0.173 inch) mounting holes. 2.
7. Align the four screwswith the mounting holes and attach the ViVOpay Kiosk II to the outside surface. Make sure that the cable is not pinched or binding. 8. Use the fournuts to secure the ViVOpayKiosk II to the outside surface of thekiosk. Makesure to tighten the nuts securely sothat the ViVOpay Kiosk II does not move on the outside surface of the kiosk. If you are installing the Angle Bezel Antenna, tighten the nuts to 5-7in/lbs. for a good weather seal. 9.
.Attach the RJ45 connectorcoming fromthe ViVOpay Kiosk II Antenna to the RJ45 receptacle onthe 220-2457-00cable. Flush- Mounting the Square Bezel Antenna The RF fieldof the antenna is sensitiveto the proximity of metal.Ifyou are flushmounting theantenna in a metal surfaceor bezel, you have three options: Mount with the RF emittingsurface of the antenna at least 1 cm forward of any metal. Mount with the RF emittingsurface of the antenna at least 1 cm behind any metal.
2. Locate the four 4.4 mm (0.173 inch) mounting holesby holding the ViVOpay Kiosk II Controller in position andmark the holes. The following diagramshows the spacing on the holes to be drilled for mounting the ViVOpay Kiosk II Controller. 3. Drill the four 4.4 mm (0.173 inch) mounting holes using a number 17 drill bit. 4. Use fourscrews and nuts to mount theViVOpay Kiosk II Controller to the kiosk surface. (Mounting screws are not provided and must be supplied bythe installer.) 5.
2. Attach the other end of the cable (220-2457-00) from the antenna to the ViVOpay Kiosk II Controller. Note: Verify that the polarizing plug on the end of thedata cable isfacing towards the top of the ViVOpay Kiosk II Controller (away from the mounting plate) before inserting the cable.If the cable is installed incorrectly (upside-down), it willapply the wrong polarity to the LEDs and damage them.
Connecting to the Data Port The Kiosk II has two data connections options: USB through the USB connector and RS232 through the 14-pin Molex connector. The USB port uses a standard USB connector and pin outs. TheRS232 port has the following pin outs. Pin 1 3 5 7 9 11 13 Description Power ground Power ground No connection Reserved Signal ground RS232 Tx ISP Input Pin 2 4 6 8 10 12 14 Description +7.5v to 36VDC (By using AC to DC adapter) +7.
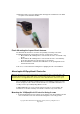
UsingtheViVOpayKioskIItoMakeaPurchase Presenting Cards, Fobs, or NFC Phones Your new ViVOpay Kiosk II allows for credit/debit card purchasesusing the new contactless technology. Present the card/fob/phone in close proximity tothe front portion ofthe antennamodule. Present the card/fob/phone so that maximum surfacearea is parallel to the antenna module as shown below. The antenna should beep and all four green LEDs should illuminate briefly to indicate a successful test.
Test the ViVOpay Kiosk II installation using a test card to performan end-to-end transaction (the same as an actual purchase on theKiosk). Thekiosk control panel should display “Requesting Authorization”. Even if the transaction is declined (as it should bewith a test card),it will proveconnectivity all the way through the system. If possible the store manager or some other responsibleparty should test each cardto ensurecontinued operationand functionality.
Troubleshooting The ViVOpayKiosk II readers arereliable and easy to troubleshoot. The components that may require troubleshooting include thepowermodule (if applicable), the reader, and the serial cable. Symptom Possible Cause Remedy General Issues Reader does not Reader not powered on or Check cableconnections. appear to bepowered incorrect voltage. Verify that power is on and on (no LEDs lit). Improper useof internal correct voltage and currentare power supplyprovided by present. the kiosk.
Symptom Possible Cause Communication to Kiosk No data is received, or Faulty or incorrect cable data is garbled. connections. Remedy Check that the cable connection is secure and in the correct port on the kiosk. If you are unable to resolvethe problem, contact your localsupport representative. Firmware Upgrade The Kiosk II can be upgraded using either the serial or USB interfaces.
7. The COM port is normally set to1 but this depends upon your PCDevice Manager setup. Youcan select the COM port to which thecable is connected by navigating to the WindowsDevice Manager (Start ->Settings ->Control Panel->System >Hardware->Device Manager ->Ports) to verify theactual port number that is assigned to the serial port. PressENTERafter making the selection. 8. ClickRead Device ID, thePart ID: andBoot LoaderID: fields should be filled inif the reader is responding to the utility.
Symbols explanations The symbol on the product or in the instructions means that your electrical and electronic equipment should be disposed at the end its life separately from your household waste. There are separated collection systems for recycling in the EU. For more information, please contact the local authority or your retailer where you purchased the product. Copyright©2010-2014,InternationalTechnologies&SystemsCorp.Allrightsreserved.