
Installation Instructions


5
IMPORTANT!
Before Starting Installation:
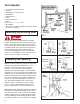
Step 1: Check the opening size and verify that the
door is the proper size for the opening. Wood
jambs require the door to be the same size as the
opening with stop moldings nailed to inside of
opening to seal the door. Steel jambs require the
door to be two-inches wider than the opening to
allow a one-inch door overlap on each side. No
stop moldings are required in this application. The
opening must be plumb and square to assure a
good fit.
Step 2: Check all materials with the pick slip
found in the hardware carton. Any report of
shortages must be accompanied by the Clopay
contract number. A copy of the pick slip is kept at
the factory. Report the number of pieces received
along with the number of pieces short. Springing
information, including the number of turns to wind
spring, can be found on the hardware box label.
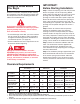
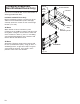
Step 3: Check for sufficient headroom and side
room. The chart below contains approximate
clearance requirements. Headroom is the dis-
tance between the top of opening to the ceiling or
the lowest obstruction.
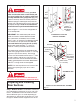
Step 4: The hardware package supplied with your
door should include red fasteners for attachment
of the torsion spring center bracket and/or the
bottom roller brackets. These fasteners must be
securely attached as indicated in the installation
manual.
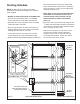
Things to Know Before
You Begin
Read the instructions completely before starting
the installation of the door. Becoming familiar with
the components before assembling the door will
reduce the installation time.
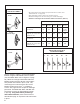
Clearance Requirements
Headroom*
,
**
,
*** Sideroom* Backroom
2" Track 3" Track 2" Track 3" Track 2" Track 3" Track
12" Radius 14
1
/2" N/A 4
1
/2"5
1
/2" Door Ht.+23" Door Ht.+25"
15" Radius 16" 18" 4
1
/2"5
1
/2" Door Ht.+23" Door Ht.+25"
Low Headroom
Rear Torsion 6
1
/2" 10" 6" 6
1
/2" Door Ht.+30" Door Ht.+32"
Low Headroom
Front Torsion 10" 13" 6" 6
1
/2" Door Ht.+23" Door Ht.+25"
High Lift High Lift +12" High Lift +12" 4
1
/2"5
1
/2"Varies Varies
Vertical Lift Dr. Ht. +12" Dr. Ht. +12" 4
1
/2"5
1
/2" 23" 25"
* Doors over 18' high, over 1,000 lbs. springing weight, high cycle springs, may require additional headroom and
sideroom. Consult distributor for exact requirements.
* Doors with more than one row of springs require additional headroom.
** Chain hoist and electric operators require additional clearance. See instructions provided with operator for exact
amount.
*** Vertical lift doors with straight incline require additional headroom. Contact factory.
In the interest of safety this symbol means
WARNING or CAUTION. Personal injury and/or
property damage may occur unless instruc-
tions are followed carefully.
•To avoid damage to the door, you must reinforce
the top section of the door in order to provide a
strengthened mounting point for attachment of
an automatic opener (see page 29).
• Check headroom clearance requirements in the
chart below before beginning.
Springs and related hardware are under
EXTREME spring tension and could cause
SEVERE INJURY OR DEATH if mishandled.
DO NOT ATTEMPT TO REPAIR OR ADJUST the
springs, red fasteners, hardware, or structure
to which they are attached.