
Installation Instructions


8
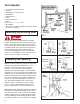
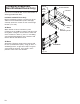
pictures shown in Figure 1-S and fasten bottom
bracket using the red-colored fasteners shown.
(Low headroom doors refer to Figure 8-T, page
23.) Some have flanges which hook under the
bottom section and some do not. Install cables,
then position the bracket in place. (FIG. 1-S)
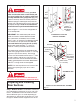
Install hinges on end and center stiles of the
bottom section using #14 x
3
/4" self-drilling
screws. See Figure 2-S for sequence and hinge
placement. For Model 901 doors and door with
Full Vision see page 13. Stack bottom section
in opening. Long stem rollers provided go
into bottom brackets. Install vertical track as
described on page 15. Top rollers will hold section
in place.
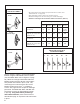
Fig. 2-S
End Hinge Top of Each Section
Bottom #2 #3 #4 #5
Section Section Section Section Section
2" Track except as Continue
listed below #1 #2 #3 #4 in this
manner
2" Track with Vertical or
High Lift, (4) or (5) section #2 #4 #6 #8 N/A
high doors only
3" Track except as Continue
listed below #4 #5 #6 #7 in this
manner
3" Track with Vertical or
High Lift, (4) or (5) section #4 #6 #8 #10 N/A
high doors only
Roller
14 GA.
Roller
#1 #2 #4 #6#5
SIDE VIEW
HINGES ARE TALLER WITH
INCREASING NUMBER
#3
HINGE ILLUSTRATION &
ROLLER PLACEMENT
#2, 3, 4, Hinge
#1 Hinge
14 GA.
18 GA.
Center Hinge
–All center hinges are #1 hinges (except for full vision sections, and
Full View doors, see page 13).
–Start end hinge sequence at the top of bottom section.
– Double end hinges use the same # hinge as outside end hinges.
– Rollers in end hinges will use farthest sleeve from section. (FIG. 2-S)