
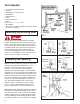
Installation Instructions


9
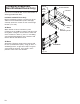
Strutting Schedule
NOTE: All doors do not require struts, follow
instructions listed below according to the number of
struts supplied.
• Number of struts will be shown on hardware box.
•All struts are attached with #14 x
3
/4" self-drilling
screws and struts to center stiles and end stiles.
•When only one strut is supplied it is to be mounted
on the top section. (FIG. 3-S)
•When an equal number of struts and sections are
supplied, install one on each section as illustrated,
omitting strut with asterisk. (FIG. 3-S)
• If your door contains less struts than sections,
evenly distribute the struts from bottom to top.
•Doors installed in high windload regions (Florida and
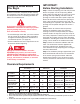
Fig. 3-S
other hurricane prone areas) may require addi-
tional reinforcement beyond what is detailed in
these instructions. Please refer to engineering
drawings for these areas.
• When there is one more strut provided than
the number of sections this strut is to be
mounted on the bottom section over the
bottom bracket as shown in illustration.
(FIG. 3-S)
•Top strut is to be mounted with top edge of strut
1
/4" down from top of door and above top bracket
as illustrated—except on low headroom installa-
tions, see page 23. (FIG. 3-S)
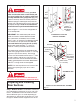
•With section face down on saw horses, place
strut on top of section (section should be
straight). Fasten strut at each end stile and
each hinge hole location. Attach each end of
the strut first, then attach center.
End
Stile
#1
Hinge
INSTALLED
Strut
Use (2) #14 x
3
/4" Self-Drilling Screws.
No Pilot Hole Required. Install Any
Location On Hinge But Thru Slot.
ATTACHMENT VIEW — EXPLODED
Some Doors Have One
More Strut Than Sections,
Place Extra Strut Here.
SINGLE-END HINGED DOOR
Double
End Stile
DOUBLE-END HINGED DOOR
Strut
Single End Stile
Center Stile
Top Bracket
Place Roller
Through
Both Hinges
When Installing
Bottom
Bracket
Sheet Metal Screw
Installed. Self-Drilling
Screws Into Strut