#61-846 ® HeatSeeker 160 Dual View Thermal Imaging Camera Instruction Manual Safety Warning: The equipment described in this document uses a Class 2 laser. Under no account should anyone look directly into the laser beam or the laser beam exit aperture, irreversible damage to the eye may occur. The laser should not be operated when there are personnel in the imager’s field of view.
#61-846 Contents 1. Page CONTENTS OF THE CASE .................................................................................... 3 2. MAIN CONTROLS ................................................................................................... 4 2.1. BACK ................................................................................................................... 4 2.2. FRONT ..................................................................................................................
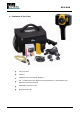
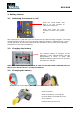
#61-846 1. Contents of the Case Carrying Case. Camera. USB PSU and International Adaptors. CD – 61-846 Instruction Manual and ThermalVision™ 160 Software and Software Instruction Manual USB Cable (Camera to PC). Quick Start Guide.
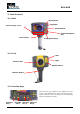
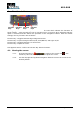
#61-846 2. Main Controls 2.1. Back Microphone Function Keys 1 to 4 Speaker Power Button Center Navigation Key Laser button 4 Navigation Keys 2.2. Front Laser Infrared lens Light Visible camera Capture Button 2.3. Function Keys The Function Key functions are indicated by the icons or text displayed on the screen above them. These functions vary according to the operating options chosen by the user.
#61-846 3. Getting started 3.1. Switching the camera on/off Press the on/off button and hold it for two seconds to switch the camera on. Press and hold for three seconds to switch the camera off. After switching on, it will take up to 30 seconds for the infrared image to appear. The image will periodically freeze for one or two seconds while the camera re-calibrates itself.
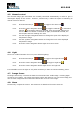
#61-846 3.4 Focusing Gently rotate the lens clockwise and counter-clockwise to focus the image. Remember to remove the lens cap. Focus Bar Out of Focus Focused When focusing a focus bar appears on the screen to assist in focusing the image. It indicates the approximate distance in feet (in meters when °C is selected) of a focused target from the camera. 3.5. Saving an image Save image button To save a live or frozen image, press the Save button once.
#61-846 4. Function buttons Function key1 Function Key2 Function key3 Function key4 Pressing any of the Function Key buttons reveals the icons which indicate the functions of these buttons. A box around the icon for Function Key1 or Function Key2 indicates that this option is selected and this defines the operation of the navigation buttons.
#61-846 4.2. Image alignment As the visible and thermal cameras are not co-axial the visible and thermal image may need to be aligned. This is usually required when moving to view objects at different distances. 4.2.1. Press Function Key 1 to toggle to the alignment icon 4.2.2. Use the up/down and left/right navigation buttons and visible images. . to align the thermal Note The visible image is moved during alignment. Examples of alignment.
#61-846 4.3. Turning the visible image off and on 4.3.1. Press Function Key 2 to toggle to the Visible On icon 4.3.2. Press the center navigation button to toggle to Visible Off 4.3.3. Press the center navigation button again to toggle to Visible On . . . 4.4.
#61-846 4.5. Manual control The thermal image gain and offset are normally controlled automatically in order to give a meaningful display on the screen. However, Function Key 2 offers the option of switching to manual control if desired: 4.5.1. Press Function Key 2 to toggle to the Auto icon . 4.5.2. Press the center navigation button to toggle to Manual or Persistent manual. If Persistent manual is selected, then the manual settings are stored.
#61-846 5. Menu structure. Center Navigation button Up/Down, Left/Right navigation buttons Function Key1 Function Key2 Function Key3 Function Key4 Select the menu by pressing Function Key 4. Navigate through the menu using the navigation buttons and press Function Key 3 to select the required option. The highlighted item will have a box around it. Use the up/down buttons to move in the selected list and select the required item.
#61-846 5.1. Infrared settings Emissivity Set the emissivity value between 0.10 and 1.00 using the left/right navigation buttons. Pressing Function Key 3 ( Table) gives a table of emissivity values of common materials from which a selection can be made. Note that if more than one cursor is selected, individual emissivity’s can be assigned to each cursor. Palette Display the image using different colour palettes. 1. Ironbow 5. High Contrast 2. Rainbow 6. Rainbow 16 3. Isotherm Style 7. Black Hot 4.
#61-846 5.2. Measurement options This menu enables the selection of options for temperature measurements. The symbols shown below indicate the icons shown for Function Key 1 when the various options are selected. Cursors . Choose from one to four cursors. When more than one cursor is selected, the temperatures of all the cursors are displayed in a table or are tagged next to the cursors (see section 5.8). When two cursors are chosen, the temperature difference between them is also displayed.
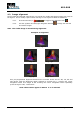
#61-846 Isotherms .Select “High”, “Low”, or “High & Low” in order to highlight areas of the scene with temperatures within a high (red) or low (blue) temperature band. The temperature bands are adjustable by means of Function Key 1 and the navigation keys. Red isotherm Blue isotherm Combined isotherms Temp. profile .
#61-846 5.3. Camera settings Caption mode Select “On” to enable the addition of a text caption when saving an image. Options will then be displayed when saving an image, to be selected by means of Function Key 2 and Function Key 3. Auto off Select “5 Mins”, “10 Mins”, “20 Mins” to allow the camera to switch itself off after a defined period of inactivity in order to save power. There is also an “Always On” option. Camera reset Select with Function Key 3 to restore the factory settings.
#61-846 5.4. Audio settings Imager sounds Select “Off” to mute all audible outputs. Voice annotation Select “Individual” to add a voice message to each saved image. Select “Session” to add a voice message at the start of a set of images (A session ends when the imager is switched off). Select “Combined” to add a common voice message at the start of a set of images and add additional comments for each image. Voice playback Select “speaker” or “headset” for the desired method of audible outputs.
#61-846 5.5. Image browser The saved images are shown on the screen with the most recently saved image first. Select the desired image by means of the navigation keys. To display the selected image press Function Key 3. To delete the selected image press Function Key 2, to confirm deletion press Function Key 3. When a stored image is displayed, press Function Key 3 to return to live imaging. 5.6.
#61-846 5.7. Language selection To select a language move to the relevant flag. When the language is highlighted press Function Key 3 to select. 5.8. Display Settings LCD brightness Select from 1 (low) to 9 (high) to control the screen brightness to save battery power. Zoom Allows the user to digitally zoom into the image. Options are X2 and X4 zoom. Cursor Type Select how the cursor temperature values are to be displayed on the screen.
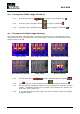
#61-846 6. Adding captions when saving images 6.1. Voice message When saving an image with Individual Voice Annotation turned on, there is the option of saving a voice message with each image. The screen shots below describe the procedure: a) Do you wish to attach a voice message to this saved image? Function Key 2 for no . Function Key 3 for yes . c) Stop Recording stop. Function Key 3 to e) If caption mode is selected this option will now be offered to save a text caption.(see 6.
#61-846 6.2. Text captions When saving an image with Caption Mode turned on, there is the option of attaching a text caption to each image. The screen shots below describe the procedure: a) Do you wish to attach a text caption message to this image? Function key 2 for No Function key 3 for Yes 2. Use the up/down arrow buttons to cycle through letters and numbers until the one required appears. The available symbols are: ABCDEFGHIJKLMNOPQRSTUVWXYZabcdefg hijklmnopqrstuvwxyz0123456789 3.
#61-846 Appendix A1. Emissivity Tables Emissivity Look-up Tables in Camera 1.00 0.98 0.95 0.94 0.93 0.92 0.90 0.85 0.80 0.79 0.78 0.76 0.75 0.70 0.67 0.65 0.64 = Human skin = = = = Paint, oil Brick red Concrete Planed Oak Wood = Oxidized steel = Oxidized Copper = Sand = Red Rust = Water = Oxidized Cast Iron General Emissivity Look-up Tables 0.98 0.98 0.98 0.97 0.96 0.96 0.95 0.95 0.94 0.94 0.93 0.93 0.92 0.92 0.91 0.90 0.90 0.89 0.88 0.87 0.86 0.85 0.85 0.84 0.83 0.82 0.81 0.
#61-846 A2. Full Icon List. Function Key one Isotherm high Cursor one. Isotherm low. Cursor two. Profile horizontal. Cursor three Profile vertical. Cursor Four Alarm high. Alignment. Tracking. Alarm low. . Area. Function Key two Playback Camera off. Light off. Camera on. Light on. Auto temperature range. No. Manual temperature range. Manual persistent Yes. Function Key three Live. . Freeze. No. Yes Function Key Four Menus.
#61-846 A3. Technical specification Performance Field of View: 20° X 15° Focus: Minimum Focus: Spectral response: Thermal Sensitivity: Manual 30cm 8µm to 14µm NETD 80mK (0.08°C) @ 23°C ambient and 30°C scene temperature.
#61-846 • • • • • • • • • • • • Isotherms with temperature difference. Voice and or text annotation. Image capture; time and date. Visual/audio alarm for above/below set temperature values. Palette selection. User selectable integration. Image fusion control: 0 to 100% adjustment on whole image and on picture in picture. Electronic zoom, x2 and x4. Multi-language options. Battery power indicator. Image browser showing thumbnails and voice annotation playback. Time or Alarm sequence recording.
#61-846 Warranty Statement This tester is warranted to the original purchaser against defects in material and workmanship fro two years from the date of purchase. During this warranty period, IDEAL INUSTRIES, INC. will, at its option, replace or repair the defective unit, subject to verification of the defect or malfunction. This warranty does not cover damage from abuse, neglect, accident, unauthorized repair, alteration, or unreasonable use of the instrument.