
Installation Guide

Thank you for your purchase. The HP pull handle is the first pull handle designed to open a storm door
using a horizontal pull action. The easiest and most natural way to open a storm door.
Installation Instructions: SKHP Pull Handle for storm Doors.
No New Holes are required to install this when replacing another standard storm door handle.
Included in this package: Outside handle, inside latch, strike, spindles+spring, handle screws, strike screws, and shims
Tools required: Screw Driver with Phillips drive * Steel hack saw for spindle in some rare occasions
Although we have made every attempt to make this package complete, if you are missing any screws or
spindle length to make this suitable for your door, please contact us and we will ensure that your product
functions properly.
Please call: 800-361-2236 ext. 230.* e-mail: ideal@idealinc.com * www.idealinc.com
The screws and spindles included in this package are for door thicknesses ranging from 1” to 2-1/8”. The
handle screws are 8-32 machine screws and the thickness for your door roughly equals the length of
screw required. Several lengths of spindles and screws are included. See fig.2 to determine the length
needed for your door. You may try a few lengths to see the action that best suits your door. 2 shims for
the inside latch are provided which can also help in fitting the spindle to your door.
For installation on new doors, please visit our website for installation information. A template from the
door manufacturer is recommended as most door profiles are different. The handle has been packaged
assembled. If the handle has become unassembled and you require assembly information, please visit
www.idealinc.com/skhp
Installation:
1. Remove the old handle from the door.
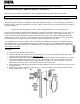
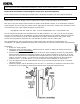
2. Assemble spindle and spring as per the drawing (fig.1). Insert the spindle and spring through
outside of the door as shown in the assembly view
.
3. Place outside handle onto outside of door. With the handle on and the spindle seated into outside
handle, the spindle must project 5/16” through inside of door, and not touch inside mechanism.
(fig.2) If the spindles included are too long, you have 3 options: A) cut to length, B) use 1 or 2
latch shims C) contact us for exact length (need your door thickness).
4. Fasten handle to inside latch with machine screws provided. Do not over tighten as this may cause
the latch to bind.
5. Attach strike (shim if necessary) with the 6 x 1” screws provided to wooden door jamb so strike
firmly engages latch. (fig.3)