Luftreiniger www.ideal.
EN 25
Thank you for choosing a device from IDEAL. • The device is used exclusively for cleaning the ambient air indoors. • Please read these operating instructions before starting to use the device and please follow the safety instructions. The operating instructions must be kept available with the device at all times. Read and save these instructions: to persons associated with use of the appliance. Only use the device indoors. Only use a wall socket that supplies the correct voltage (see rating plate).
• Children being supervised not to play with the appliance. • Do not block the air intake and outlet. technical parameters. Improper usage may pose a threat to life and health. • Disconnect the mains plug prior to any cleaning or maintenance work. • Do not use any solvents. These could damage the housing surface. • Do not use any substances containing silicone, since this could destroy the air quality sensor.
• needs to be replaced. • • • • With self-adhesive • With 3V lithium battery Luftreiniger www.ideal.
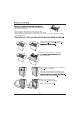
• The air intake ducts on the top can be used as handles (see adjacent diagram). • Place the device at least 10 cm away from the wall. • Keep the device away from areas subjected to draft (wind). • Make sure that furniture, fabrics or other objects do not come in contact with the air intake/ outlet or block them. Take out the power cable ( ), operating instructions ( ) and remote control ( with Remove top packaging tray. Grasp the lift it out of the box. 5.
. 9. using the recessed grips provided and turn it anti-clockwise ( ). ) and remove ). 8. the notches provided and lock in position by turning clockwise ( ). 14. then pivot upwards and press shut ( ( ), then to the socket ( ). ). Note: 13. Use the original packaging to store the air protect the activated carbon. Safety information protective covers (motor protection grille, ventilation outlet grille, door, etc.) fully and securely attached is not permitted.
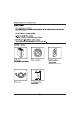
Air outlet grill Control panel Air intake ducts Filter cartridge Front panel Power cable 31
A On/off button E Air quality indicator B Fan speed button C Timer button Fan speed indicator F Filter replacement indicator D Quiet button Timer indicator J Daylight sensor L Air quality sensor Quiet indicator K IR receiver The air quality sensor (L A) and after being disconnected from the mains power supply. Once the air quality sensor has been calibrated, the (F) and air quality indicators (E) flash red alternately.
A On/off button E Air quality indicator B Fan speed button C Timer button Fan speed indicator F Filter replacement indicator D Quiet button Timer indicator J Daylight sensor L Air quality sensor Quiet indicator K IR receiver • Press the on/off button (A . In automatic mode, the fan speed ( ) automatically adapts to the measured air quality. The worse the air quality, the higher the fan speed. • Press the fan speed button (B fan speed . Press again to increase the fan speed to .
A On/off button E Air quality indicator B Fan speed button C Timer button Fan speed indicator F Filter replacement indicator D Quiet button Timer indicator J Daylight sensor L Air quality sensor Quiet indicator K IR receiver The Quiet button (D) is provided for particularly low-noise, unobtrusive operation (e.g. bedrooms). Press the Quiet button (D) to switch the fan speed ( ) to its lowest capacity and switch off all indicators. Only the Quiet indicator ( ) is dimly lit.
• Always use 3V lithium batteries CR2025 for the remote control. • Incorrect battery usage may result in leakage of battery fluid and/or damage. • If the remote control is not going to be used for a long time, please remove the battery. • Make sure that no objects or furnishings are situated between the remote control and the • Locations where fluorescent tubes are flickering because they are defective or old. • Do not store the remote control in direct sunlight and/or close to radiators/heaters.
B A C • Open the battery compartment by pressing (A) and pulling out (B) at the same time. Take out the flat battery. • Insert a new battery into the battery compartment, making sure the polarity is correct (+ / -). • Always use 3V lithium batteries CR2025. • Slide the battery compartment back into its seating (C). The remote control comes with a selfD).
P On/off button Q Quiet button O Automatic button Turbo N Fan speed buttons 8h Auto 3 4h 2 2h 1 1h R Timer buttons S Locking button Select the required fan speed P . . . Select the required timer time . Press the locking button Press the locking button again to unlock. . pressing and holding down the on/off button (A) on the device. Note: When you operate the remote control, the air quality indicator (E) lights up for approx.
F, see page 34) 1. The front panel is hooked in at the bottom in two places, and kept shut with 4 magnets. Open the front panel from the top and hold ( ), pivot downwards ( ) and take off ( ). 2. 3. 4. 6. using the recessed grips provided and turn it anti-clockwise ( ). ). Remove the ). 5. 7. in the notches provided and lock in position by turning clockwise ( ). ), then pivot upwards and press shut ( ). Connect ), then to the socket ( ). 9. 10. 11. 8.
smartphone/tablet (iOS /Android). E Air quality indicator D Quiet button Press and hold down the Quiet button (D) until the air quality indicator (E) flashes The WLAN is enabled when the air quality indicator (E) flashes blue The WLAN is disabled when the air quality indicator (E) flashes white. Press and hold down the Quiet button (D), plug in the power cable and continue to hold down the Quiet button (D) until the air quality indicator (E) flashes pink The WLAN is reset to factory settings.
F, page 34) lights up. • Clean the control panel with a dry, lint-free cloth. • Clean the openings for the air quality sensor (L) and the dust sensor (M page 32) with a vacuum cleaner. cartridge (" " page 38). • Do not use any solvents. These could damage the housing surface, the control panel and the air quality sensor. • Do not use any substances containing silicone, since this could destroy the air quality sensor.
Make sure that the power cable is not damaged in any way. Check both ends of the power cable. Make sure that these are plugged in and that the (page 30). cartridge is inserted. in place with all 3 tabs and is fully locked ( , page 30). Disable the locking function on the remote control ( , page 37). Unplug the power cable and then plug it back in. Check the battery (3V lithium CR2025). Clean the IR receiver with a dry, lint-free cloth. (page 35).
on/off button (A, page 32). Disable the Quiet function by pressing the Quiet button (D, page 34). Wait until the calibration process (see , page 32) has been completed (this may take a few minutes) Clean the openings for the air quality sensor L, dust sensor M (page 32), the air intake ducts and the interior of the air located) with a vacuum cleaner. Calibrate the air quality sensor by briefly disconnecting it from the mains again! becomes saturated and reliable of the odours. fan speed (page 33).
Place the device on an even surface. Use the fan speed button (B, page 33) to set a lower fan speed ( , page 33). Clean the relevant section on the control panel (J, page 32)! The display intensity automatically adapts to its surroundings.
Power supply 200-240V 50/60Hz / 100-120V 50/60Hz Power consumption 90W (200-240V) / 75W (100-120V) Suitable for rooms 50 to 70 m² * Air flow rate (max.) 600 m³/h Dimensions (L × W × H) 468 × 275 × 668 mm Weight 15 kg Volume at turbofan speed Volume in Quiet mode 56,6 dB(A) (max.) 16,5 dB(A) (min.) Power supply 200-240V 50/60Hz / 100-120V 50/60Hz Power consumption 175W (200-240V) / 180W (100-120V) Suitable for rooms 70 to 90 m² * Air flow rate (max.
The company Krug + Priester has the • Quality management system according to DIN EN ISO 9001:2015 • Environmental management system according to DIN EN ISO 14001:2015 • Energy management system according to DIN EN ISO 50001:2018 IDEAL provides a warranty for this device from the date of purchase. • If a material or design defect occurs during the warranty period, IDEAL shall repair or replace the device, or repay the purchase price, at its discretion.
This machine is GS-tested and conforms to the following EC guidelines: • 2014/35/EU for electrical safety • 2014/30/EU for electromagnetic compatibility. • 2011/65/EU, 2015/863/EU RoHS. machine. Subject to technical changes. - Herewith we declare that Made in Germany Made in Germany - complies with the following provisons applying to it Low voltage directive RoHS directive EMV Electromagnetic compatibility directive - Applied harmonised standards in particular 09.02.
Supplier‘s Declara on of Conformity 47 CFR § 2.1077 Compliance Informa on This device complies with part 15 of the FCC Rules. Opera on is subject to the following two condi ons: (1) This device may not cause harmful interference, and (2) this device must accept any interference received, including interference that may cause undesired opera on. Manufacturer: KRUG + PRIESTER GMBH & CO KG Simon-Schweitzer-Straße 34 72336 Balingen, Germany U.S.
Krug & Priester GmbH & Co. KG Simon-Schweitzer-Str. 34 D-72336 Balingen (Germany) www.krug-priester.com 9700285 01-2018 09.02.