
Instruction Manual

125
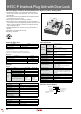
HS1C-P Interlock Plug Unit with Door Lock
Safety Precautions
• Do not install the interlock plug unit with door lock in the place
subject to oil or water. Electric shocks or fire hazard may be
caused if the interlock plug is operated when the plug part is
contaminated with oil or water.
• Interlock plug units with door lock are used to ensure the
safety of operators who carry the plugs. Provide only one plug
to a guard. Otherwise the hostage control function is lost,
endangering the operators. Ensure complete safety manage-
ment so that the function is maintained.
• In order to avoid electric shocks or fire, turn power off before
installation, removal, wire connection, maintenance, or in-
spection of the interlock plug unit.
• Do not disassemble or modify the interlock plug unit with door
lock Also do not disable the function of interlock plug unit in-
tentionally. Otherwise a malfunction or an accident may occur.
• Do not install the actuator in a location where a human body
may come into contact. Otherwise injury may occur.
Instructions
• The plug of HS1P interlock plug units resemble the HS2P
plug, however, these plugs are not interchangeable. Do not
use the plugs of other types, otherwise the interlock plug units
will be damaged. The plugs can be distinguished with the
han dle color.
HS1P: black (sane as HS1C-P)
HS2P: aluminum color
• Regardless of door types, do not use the interlock plug unit
as a door stop. Install a mechanical door stop at the end of
the door to protect the interlock plug unit against excessive
force. If excessive force is applied to the plug, especially to
the direc tion of removing the plug, solenoid operation failure
may occur even though the solenoid is energized, resulting in
unlocking failure.
• Do not apply excessive shock to the interlock plug unit when
opening or closing the door. A shock to the interlock plug unit
exceeding 1,000 m/s2 may cause damage to the interlock
plug unit.
• Regardless of door types, do not use the interlock plug unit
as a door lock. Install a separate lock using a latch or other
mea sures.
• The solenoid has polarity. Make sure of the correct polarity
when wiring. Do not apply overvoltage, otherwise the solenoid
will be burnt.
• When wiring, unscrew the cover only. Unnecessary loosening
of other screws may cause a malfunction of the interlock plug
unit.
Cover
• The cover uses special screws which cannot be removed or
tightened by general drivers. Use the special wrench supplied
with the interlock plug unit.
• While connecting to the conduit port, prevent foreign objects
from entering the interlock plug unit, such as dust and liquids.
• If the operating atmosphere is contaminated, use a protective
cover to prevent the entry of foreign objects into the interlock
plug unit through the actuator entry slots.
• Entry of a considerable amount of foreign objects into the
interlock plug unit may affect the mechanism of the interlock
plug unit and cause a malfunction.
• Actuator retention force is 1500N (static load). When larger
force is expected, add a system using interlock switch without
lock (ex. HS1B) and sensor in order to detect door opening
and to stop the machine.
• Plug the unused actuator entry slot using the slot plug sup-
plied with the interlock plug unit.
• Do not store the interlock plug unit in a dusty, humid, or
organic-gas atmosphere.
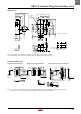
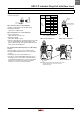
• Make sure that the interlock plug unit is not energized when
removing or installing the plug (after operating the emergency
stop button shown in the circuit example shown below). Do
not start or stop the machine by plug removal/installation, oth-
erwise the interlock plug unit may fail.
+
RR
Start
Load
Stop
Emergency Stop Switch
Interlock Plug
–
R L
Interlock Plug
Circuit Example
Note 1: When using the main circuit on AC, connect emergency
stop switch to Line, and interlock plug unit to Neutral.
Note 2: When using the main circuit on DC, connect to the + line
with emergency stop switch first followed by the interlock
plug unit.
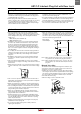
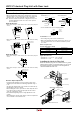
Manual Unlocking
The HS1C-P allows manual unlocking of the actuator to pre-
check proper entry of the actuator into the slot as well as for
emergency use such as a power failure.
• Remove the screw located on the front of the interlock plug
unit using the special wrench supplied with the interlock plug
unit. Insert a small screwdriver into the screw hole and push
the lever inside as shown below until the key is unlocked.
• Turn and remove the plug.
• After unlocking, ensure to install the screw.
Interlock Plug
Unit
Plug
Screwdriver
HS1C-P