
Datasheet


26
HS5L Interlock Switches with Solenoid
Instructions
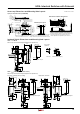
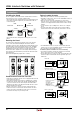
Installing the Rear Unlocking Button Kit
1. Install the connecting rod onto the push rod on the HS5L-
L
rear unlocking button interlock switch.
2. A pin is attached to the connecting rod. Insert the pin into the
hole in the push rod, using pliers.
Connecting
Ro
d
Push Rod
HS5L-L
Interlock Switch
Pin
3. Pull the connecting rod from the hole in the mounting frame,
and turn the button operating pin to the horizontal position.
Correct
Incorrect
Connecting Rod Orientation
Pull
Connecting
Rod
Safety Precautions
• Ensure that the connecting rod is pulled out completely and it is
horizontal to the interlock switch, otherwise the unlocking button
cannot be installed.
Note: Frame must be supplied by the user.
When using an HS9Z-SP51 mounting plate (sold separately) to
install the HS5L on a frame, provide a hole for the connecting
rod on the frame and mounting plate.
For the mounting hole layout of interlock switches, see
dimensions on page 21.
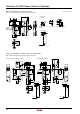
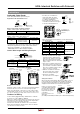
4. Install the unlocking button on the connecting rod by tting the
pin to the grooves on the back of the button, and fasten the
base plate on the mounting frame using the screws.
B
A
Button
Operating
Pin
Button
Gr
oove
(1) Pull up once
(2)
Screw
Unlocking
Button
5. After fastening the screws, check if locking and unlocking
operations can be performed.
Safety Precautions
Correct
orientation
Incorrect orientation
• Install the rear unlocking button
kit in the correct direction as
shown below. Do not install
the kit in incorrect directions,
otherwise malfunction may
occur.
• Do not apply strong force
exceeding 100m/s
2
to the
interlock switch while the rear unlocking button is not pressed,
otherwise malfunction may occur.
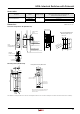
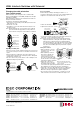
Unlocking the Manual Lock Using the Rear
Unlocking Button
Use the rear unlocking button when a worker is locked inside
a safety fence (hazard area). (Compliant with escape release
described in ISO14119 [2003] and GS-ET-19)
Unlock
Rear Unlocking Button
Unlock
Rear Unlocking
Button Kit
Procedure
• When the rear unlocking button is pressed, the interlock switch
is unlocked and the door can be opened.
• To lock the interlock switch, pull back the button.
• When the button remains pressed, the interlock switch cannot
be locked even if the door is closed, and the main circuit remains
open.
Safety Precautions
• Install the rear unlocking button in the place where only the
operator inside the hazardous area can use it. Do not install the
button in a place where an operator outside the hazardous area
can use it, otherwise the interlock switch can be unlocked during
usual machine operation, causing danger.
• Operate the rear unlocking button by hand only. Do not operate
using a tool or with excessive force. Do not apply force to
the button from the direction other than the proper direction,
otherwise the button will be damaged.
Recommended Tightening Torque
• HS5L interlock switch: 1.8 to 2.2 N·m (M4 screws × 3)∗
• Lid mounting screw: 0.5 to 0.7 N·m (M3 screw × 2)
• Rear unlocking button: 0.5 to 0.7 N·m (M3 screw)
• Rear unlocking button kit: 4.8 to 5.2 N·m (M5 screw)
• Actuators
HS9Z-A51: 1.8 to 2.2 N·m (M4 screws × 2)∗
HS9Z-A52: 0.8 to 1.2 N·m (M4 flat head screws × 2)
HS9Z-A51A/A52A: 1.0 to 1.5 N·m (M4 screws × 2)∗
HS9Z-A53: 4.5 to 5.5 N·m (M6 screws × 2)∗
HS9Z-A55: 1.0 to 1.5 N·m (M4 screws × 2)∗
HS9Z-A55S: 1.0 to 1.5 N·m (M4 screws × 2)∗
HS9Z-BA5: 4.5 to 5.5 N·m (M5 screws × 2/4)∗
∗ If the mounting screw recommended tightening torque values
above is not satised, check loosening after installation
thoroughly.
• Mounting screws need to be prepared by the customer.
• To avoid unauthorized or unintended removal of the interlock
switch and the actuator, it is recommended that the interlock
switch and actuator are installed in a secure manner, for
example using special screws or welding the screws (ISO14119).
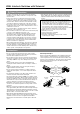
• When installing the HS9Z-A51A and HS9Z-A52A actuators, use
the washer (supplied with the actuator) on the hinged door, and
mount tightly using two M4 screws.
Mounting centers: 12mm (factory setting), adjustable to 20mm
M4 Screw Hole
Hinged Door
M4 Screw
Rubber
Bushing
Washer
(supplied)