
Datasheet


66
(Zener diode reference value)
Zener voltage: 4.3 to 4.7V
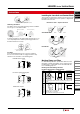
Selector Switches with Key
Observe the following instructions to prevent malfunction or
damage.
• Insert the key to the bottom of the key hole.
• Do not remove the key from any key retained position.
• Besides the standard key (key number 0H), six other key
numbers are available. Use a key of the matching number
with the key cylinder. The standard key does not have a
key number indication.
• Keys are available in two types.
Key numbers 0H (standard), 1H, and 2H are reversible
keys which can be inserted in two ways.
Key numbers 3H, 4H, 5H, and 6H are non-reversible
keys. Make sure of correct insertion direction.
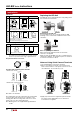
Countermeasures against Dim Lighting
Leakage currents through transistors or a contact protection
circuit may cause the LED lamp to illuminate dimly even
when the output is off.
When the LED lamp is illuminated by a transistor output,
take the following measure.
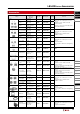
Leakage Current Shunt Resistor Allotment Table
(Recommended)
Leakage
Current
Io
Shunt resistance R
Red (R), White (W) Green (G)
Resistance Rated Power Resistance Rated Power
0.1 mA max. 13kΩ 0.25W 18kΩ 0.25W
0.1 to 0.7 mA 2kΩ 0.25W 2.7kΩ 0.25W
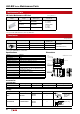
Noise
LED elements deteriorate due to extraneous noise,
resulting in significant decrease in luminance, hue change,
or failure of lighting. When such effects are anticipated, take
a protection measure shown below. However, measures
may differ according to operating environment and condition
Zener Diode
(–)(+)
Static Electricity (UP Series)
UP series are delicate products that may be damaged by
static electricity Make sure to take measures to prevent
static electricity.
LED
Pilot
Light
Shunt Resistor
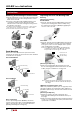
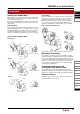
Switch Guards
Opening/closing the Switch Guard
When opening/closing the switch guard while the switch
guard is not installed on a panel, make sure to hold the
hinge. Holding the base might result in damage. Also do not
apply force on the guard in other than open/close directions,
otherwise the hinge may be damaged.
Hing
e
Base
Rubber Gasket when using LB9Z-K2 Switch
Guard (remains open) for Round/Square Units
Choose to use or not to use the rubber gasket for the switch
referring to the conditions described below. Note that the
degree of protection is IP40 with or without the rubber
gasket.
•When the panel thickness is up to 2.8mm
Install the switch onto the switch guard with rubber gas-
ket, and mount on the panel.
w/rubber gasket
a) Panel thickness 2.8mm max.
b) Panel thickness 2.8 to 3.2mm
c) Single board mounting
w/o rubber gasket w/o rubber gasket
•When the panel thickness is 2.8 to 3.2mm
Remove the rubber gasket from the switch and install the
switch onto the switch guard, and mount on the panel
(discard the rubber gasket).
w/rubber gasket
a) Panel thickness 2.8mm max.
b) Panel thickness 2.8 to 3.2mm
c) Single board mounting
w/o rubber gasket
w/o rubber gasket
•Single board mounting
Remove the rubber gasket from the switch and install the
switch onto the switch guard, and mount on the panel
(discard the rubber gasket).
w/rubber gasket
a) Panel thickness 2.8mm max.
b) Panel thickness 2.8 to 3.2mm
c) Single board mounting
w/o rubber gasket
w/o rubber gasket
LB/LBW Series Instructions