
Datasheet


11
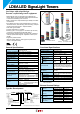
LD6A LED SignaLights
Safety Precautions
Turn off the power to the LD6A before mounting, dis- •
mounting, wiring, and assembling the LED module. Make
sure of correct wiring, otherwise electrical shocks or re
hazard may result.
Mount the LD6A on a solid surface not subjected to vibra- •
tions.
Do not mount the LD6A upside-down or horizontally. •
Do not leave the LD6A without a cap or unassembled. •
Install the supplied gasket, otherwise the waterproof char- •
acteristic is impaired.
Do not apply any chemicals which may corrode the plastic •
materials.
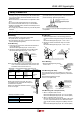
If the LD6A is subjected to strong vibrations, the hexa- •
gon socket screw may become loose. Take measures to
prevent loosening. (See the gure below.)
2-M4 holes for hexagon socket
set screws
(recommended tightening torque:
1.1 to1.2 N・m)
Do not loosen a screw for which the tightening torque is •
not specied.
Instructions
Mounting
See drawing below on mounting of the LD6A. •
For panel cut-out, see pages 9 and 10. •
Face the LD6A to the front to make sure the alarm sound •
is clear. (Steady/ashing/alarm)
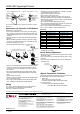
Frame Mounting
1. Insert two nuts in the frame, and attach the bracket us-
ing two M5 screws.
Recommended tightening torque: 2.6 to 2.7 N·m
2. Mount the LD6A to the bracket using four M4 screws.
Recommended tightening torque: 1.6 to 1.7 N·m
Note: See table below for typical examples of frames and
nuts. Consult the manufacturer of the frame for the
installation method of the frame nut.
Examples of recommended frames and frame nuts •
Frame Size Frame Frame Nut Manufacturer
30 mm
(Note)
SFF-302
SFB-001
SFB-4B5
SFB-101
SUS
Corporation
(Japan)
40 mm
SFF-402
SFB-008
SFB-4A5
SFB-108
Note: The mounting bracket for the housing is 40 mm.
When using a frame mount type, be sure to
use exible conduit, otherwise the waterproof
characteristic is impaired.
Refer to the “Example of Flexible Conduit”
shown on the right.
Example of Flexible Conduit •
Conduit Port Size M20
Gland AL16/M20/A/BL
Conduit PAFS16BL
Manufacturer Adaptaex
Frame (Note)
Frame Nut (Note)
Bracket
Plain Washer
Spring Washer
M5 Screw
M4 Screw, Spring Washer, Plain Washer
➀
➁
Gland
Conduit
Conduit port
(M20×P1.5)
Wall Mounting
1. Make four tapped holes in the mounting panel and
mount the bracket and gasket using four screws (M4 x
20).
Recommended tightening torque: 1.6 to 1.7 N·m
2. Mount the LD6A to the bracket using four screws
(M4 x 8).
Recommended tightening torque: 1.6 to 1.7 N·m
Direct Mounting
Recommended tightening torque: •
2.6 to 2.7 N·m
Pole Mounting (with base)
The pole mount type can be installed in four ways. The
recommended mounting method (pattern A) is described
below.
Recommended tightening torque:
2.6 to 2.7 N·m (M5 screw)
Pole Mounting (with L-shaped bracket)
1. When L-shaped bracket is used
Recommended tightening torque: 10 to 11 N·m (M10)
Recommended tightening torque: 25 to 26 N·m (M22)
2. When L-shaped bracket is not used
Remove the bushing, hexagonal nut (M22), plain wash-
er, and L-shaped bracket from the LD6A and install in
order of plain washer, hexagonal nut (M22), and bush-
ing.
Recommended tightening torque: 25 to 26 N·m (M22)
Panel
Nut
Gasket
Bracket
Plain Washer
Spring Washer
M4 Screw (20 mm)
M4 Screw (8 mm), Spring Washer, Plain Washer
➁
➀
Pole Stand
4-M5 Mounting Hole
(recommended)
3-M4 Mounting Hole
4-M4 Mounting Hole
4-M5
Mounting
Hole
M5 Screw
O-ring
Pole Stand
Gasket
Panel
Plain Washer
Spring Washer
Nut
Panel
M5 Screw
Spring Washer
Plain Washer
O-ring
Base
Gasket
Nut
(091218)